
Blog-checking lines: The March 2011 Daring Baker’s Challenge was hosted by Ria of Ria’s Collection and Jamie of Life’s a Feast. Ria and Jamie challenged The Daring Bakers to bake a yeasted Meringue Coffee Cake.
This is one of the best challenges we have had the recipe is basically a poor man's (lean) brioche the dough is so sexy to work with it yields a buttery light airy textured crumb that isn't too sweet BUT with the addition of the unusual meringue filling produces an exquisite level of moisture to the final baked product it is wondrous - this a keeper recipe, I love making this recipe it can be made sweet or savoury - great for so many purposes.
The Verdict
Produces the best sweet bread that I have ever made, great recipe can be adapted to sweet or savoury, ... only one word ... exquisite! A strange technique to add meringue to the rolled out dough but it really works. A keeper!!!!
The following is from the challenge recipe introduction by Ria and Jamie...
We just want to get a little rise out of all of our wonderful, talented fellow Daring Bakers so decided to bring you into our warm cozy kitchen to make one fabulous yeast-risen coffee cake. A gorgeous brioche-like dough is rolled jellyroll style around a whipped meringue and whatever filling you choose, shaped into a wreath and baked. More often than not, yeast and non-yeast baking are seen as two separate things and we have often found that even the most passionate and seasoned bakers don’t have a lot of experience or confidence with yeast baking. This is a very easy and fun recipe to make and will make all of you non-yeasties fall in love with one of our favourite pastimes!
Beautiful to put together and gorgeous out of the oven, the cake is light and fluffy, barely sweet, the meringue miraculously melts into the dough as it bakes leaving behind just a hint of sweetness and adding to the perfect moistness of the cake. Don’t scrimp on either the chopped nuts or chocolate or whatever filling additions you choose as the crunch and the flavours are the focal point of this tender, moist, outrageously delicious coffee cake. We were each inspired to flavour the basic coffee cake – the brioche-type sweet yeast dough and the meringue filling – with our own personal national twist, Jamie going all-American and Ria adding Indian flavours. We have given you both variations, allowing you to choose. Or go creative, let your imagination flow and create your own personal flavour variation. Why not let your own national cuisine inspire you?
Recipe Source: Jamie found this recipe on a piece of yellowed paper in her dad’s collection of clipped out and hand-written recipes from the 1970’s, no source, no date, and she tried the recipe and it was brilliant!
Blog-checking lines: The March 2011 http://www.blogger.com/img/blank.gifDaring Baker’s Challenge was hosted by Ria of Ria’s Collection and Jamie of Life’s a Feast. Ria and Jamie challenged The Daring Bakers to bake a yeasted Meringue Coffee Cake.
See here for the PDF of the recipe.
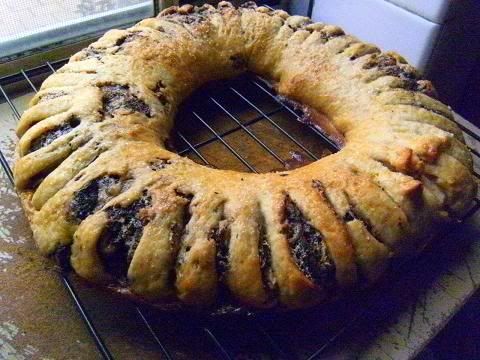
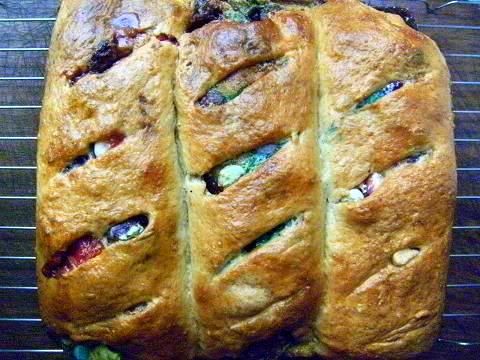
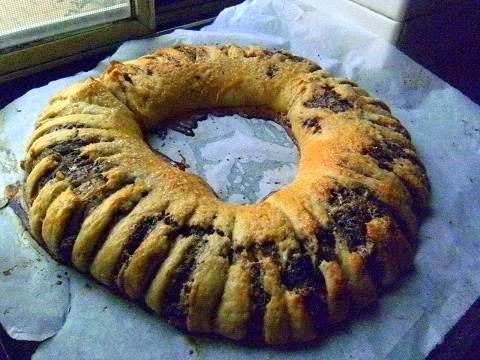
Bitter chocolate, nut brown butter and roasted walnut meringue cake

I have never seen a sweet bread like this before (a filling of meringue with nuts and chocolate) so I kept very close to the recipe and the given instructions. I made 1/2 of the challenge recipe.
I hate having egg yolks left over when making meringue so if making the full recipe use two egg yolks and one whole egg for the dough and one egg yolk (and a little milk) for the dough wash of the wreath and use the remaining three egg whites for the meringue, which saves one whole egg with nothing left over.
I had walnuts to hand so I used them I roasted and chopped them finely for the filling. I only had a bar of 85% bitter chocolate on hand so I grated it finely for the filling I used 4 tablespoons of molasses brown sugar in the filling and added granulated white sugar on top of the cake to counter the bitterness of the chocolate.
I fried the butter until it was nut brown I feel it always adds a lot more flavour to a recipe especially one like this.
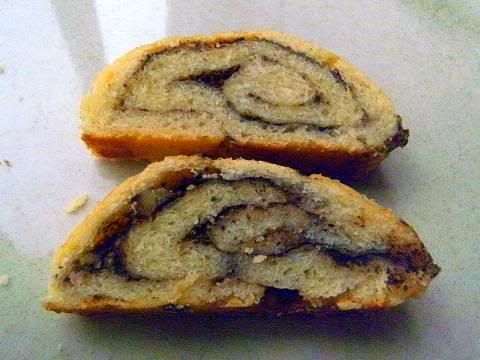
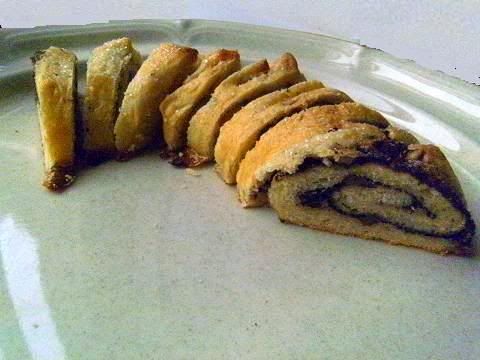
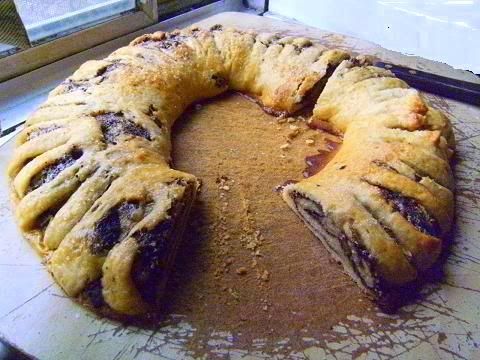
I really liked the look of the cake with its dark and light browns of the crust and stripes of black and white filling bursting through and the sugar crystals glistering, the whole cake is very striking. Also when cut the interior has a wonderful spiral of blackness.
Final verdict
A wonderful treat for the afternoon.
Notes
1. The dough is very soft, very yellow ( I have noticed the eggs and butter in Australia are very yellow as compared to other countries) and is slightly oily to the touch and tastes delicious. The gluten in the dough hydrates beautifully.
2. Making the meringue – make sure that the bowl and the beaters are scrumptiously clean and that the egg whites contains no egg yolk at all. Start beating at low speed until the egg whites (and salt) becomes foamy then increase the beater speed to high and continue beating until soft peaks form then add slowly tablespoons of sugar until all the sugar is dissolved and stiff peaks are formed. This will take about 5 minutes to test feel a little of the meringue between your fingers you shouldn't feel any grains if you do beat for longer. Castor (superfine) sugar takes the least amount of time don't use icing (powdered/confectioners') sugar to make meringue. It is important that you beat the meringue to shiny stiff peaks, it you under beat the meringue it will leak out of the cake through the slashes and not be absorbed into the cake giving a 'dryish' result.
3. The dough rolls out (almost pats out in fact) easily make sure that the dough has an even thickness and try to shape the dough to the dimensions given in the recipe you can easily cut the dough and spread the cut-out-dough onto the rolled out dough and roll it into the dough of course you can patch holes with some dough if you need to. I didn't use any flour on the counter or the rolling pin since the dough is slightly oily it didn't stick to the counter or the rolling pin. It is important to "roll out" the dough by stretching it out slowly with the rolling pin if you are too rough with it and tear it you will destroy (that is cut) the gluten threads therefore weaken the dough so it will not bake as well. So pat out ("roll") the dough slowly to the correct shape. Also this dough really needs a double rise and punch down (or even more) to give the gluten threads the time to reach maximum strength so do try to punch down the dough a couple of times,see the texture in my party scroll cake it is almost like flaky croissant pasty I raised and punched it down about four times.
4. I used an off-set spatula to spread the meringue it was a little tricky to do this since it sticks to the dough but overall an easy job.
5. Make sure you finely chop the nuts and chocolate since sharp edges will easily tear apart the dough.
6. Since the dough is soft the rolling up of the dough is easy so long as you are careful I'm sure it will tear if you rush, the roll feels very odd since the meringue is soft and airy that is the filling is easy to deflate and displace in the roll therefore the shape of the roll. Leave a good space at the end of the dough so you have enough to seal the seams correctly.
7. It is a quite a job to transfer the roll onto the parchment lined baking tray. I needed to oil-spray the parchment paper so the roll wouldn't stick to it.
8. I used scissors to cut the wreath shape this is the easiest method I think a knife would be too difficult and leave jagged edges.
9. I noticed after the second rising that a small amount (about 1½ tablespoons) of liquid had oozed out I'm sure it was collapsed meringue. The wreath mostly spreads out and rises in height a little during the second rising. It is best to slash the cake just before placing into the oven that way there is less chance of any liquid oozing out of the openings. Be confident with your slashing and use a very sharp knife.
10. When baking the cake smells of toffee and the whole house smells of it for a few hours after that.
11. The oven-spring (how much the dough expands when first placed in the oven) of the cake is enormous. I always preheat the oven for 20 minutes at least and use a heavy baking stone for baking bread which really improves the oven spring of the dough when baked, also I preheat the oven 20°C (35°F) hotter than the recipe states since you lose a lot of heat when you place the unbaked dough into the oven then I immediately turn down the oven to the correct temperature.
12.It took 30 minutes to bake the wreath it was easy to remove from the parchment paper.
13.I noticed this cake (with an egg wash) does most of the browning in the last 1/4 of the baking time. You could place the cake under a griller (broiler) if you need to get a better colour (I didn't in this case but have done it for some other desserts).
13. It cuts clearly into thin slices.
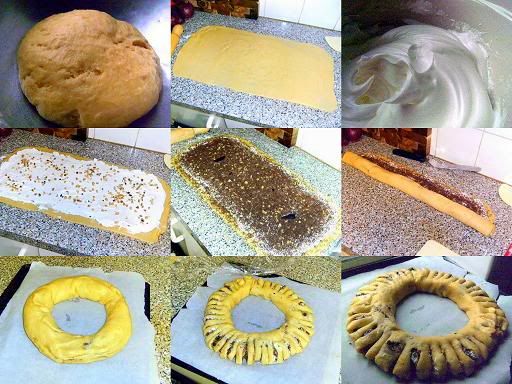
A montage of the process
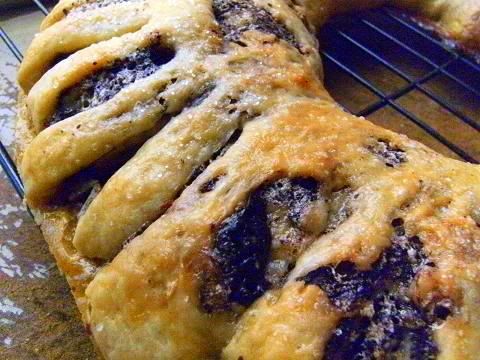
A close up of the unbaked cut up wreath
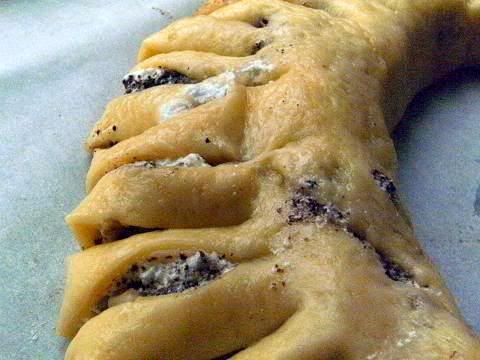
Some of the oozing meringue

The baked meringue cake
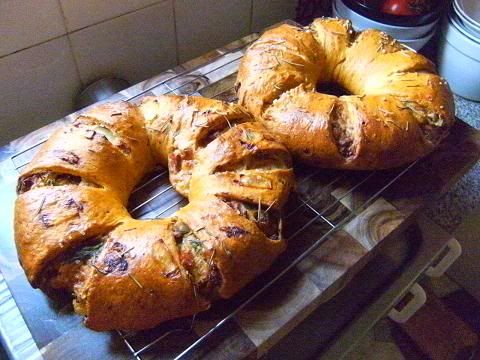
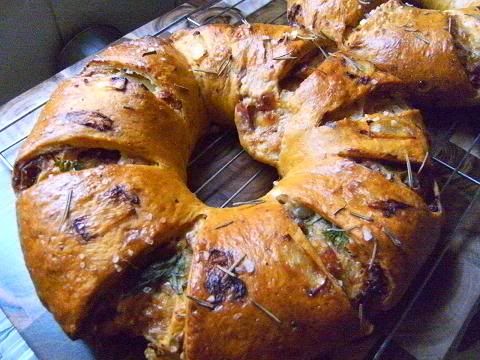
Pizza wreaths
I needed to bring something savoury to a BBQ so I decided to make some pizza wreaths. I looked in the fridge and used what I had. For the dough I added sun-dried tomato pesto (made for a Daring Cooks challenge), cheese, onion and garlic powder also I used 1 tablespoon of sugar.
OMG the dough itself tastes so delicious when you have a small piece it tastes mildly pizza-ish but after a few seconds you get a huge burst of tomato pesto, cheese, onion and garlic flavour WOW I hope it tastes as good as this when baked. The dough was a dark orange since the pesto is red and the yolks and butter are yellow.
I made two versions
Speck and pineapple – I thought the salty speck (a type of ham) would counter the slight sweetness of the dough, meringue and pineapple.
Olive and mortadella – a wonderful combination that is very popular in my circle of friends and family.
It is amazing how the cheese and the meringue combine when baked to form a melting oozing cheese sauce for the other ingredients. When the wreath is cooled the cheese sauce and the other ingredients form a hight flavoured "cream cheese" filling.
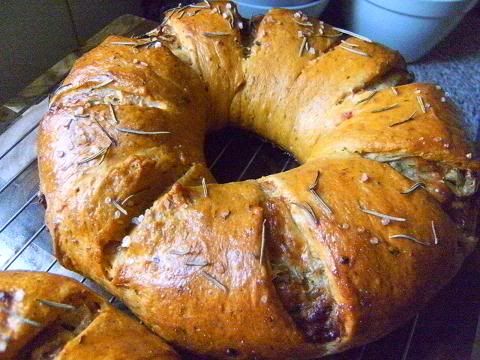
The baked wreaths are wondrous the crust is very thin and crisp and the interior is soft, it was a marvellous combination, the flavours of the fillings were intense but these melded with the dough well. I really liked them both.
I loved the colour and look of them a lot a great dish to bring to a BBQ.
The soft tomato pesto cheese dough used for both versions of pizza dough it is soft and the gluten hydrates exquisitely
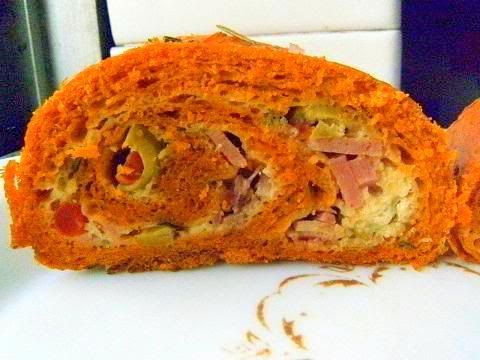
Olive and mortadella filling
Unbaked olive and mortadella wreath
Baked olive and mortadella wreath
Close-up of the olive and mortadella wreath it is so pretty
Interior of the olive and mortadella wreath
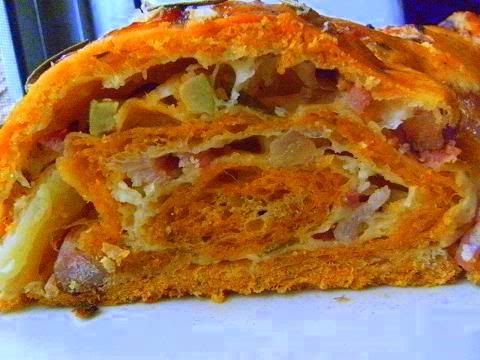
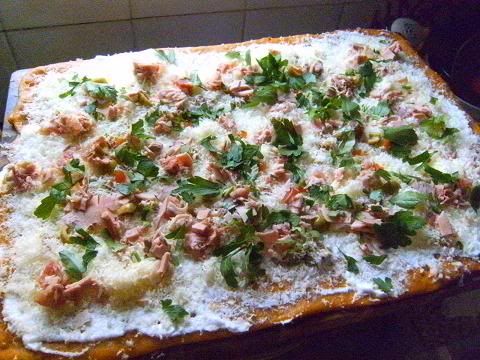
Speck and pineapple filling
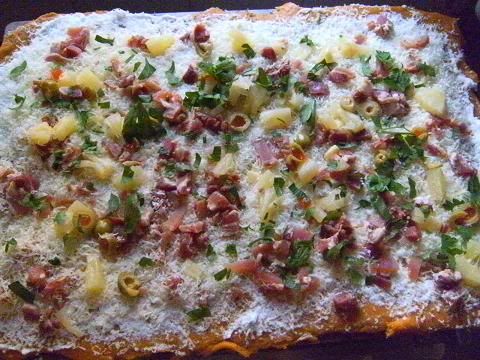
Unbaked speck and pineapple wreath
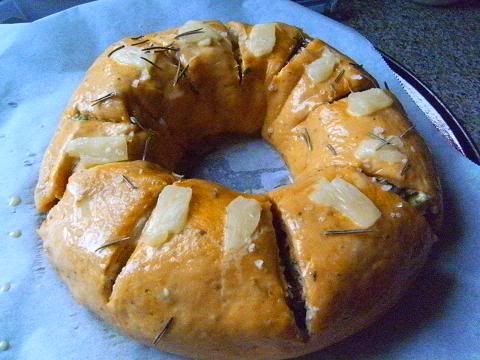
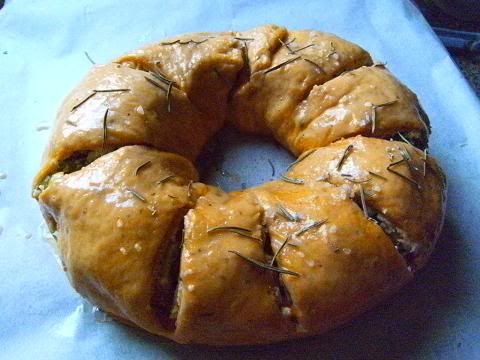
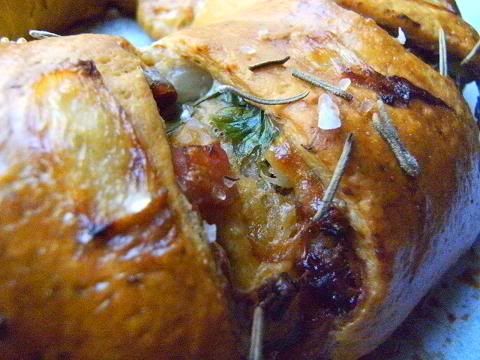
The baked speck and pineapple wreath
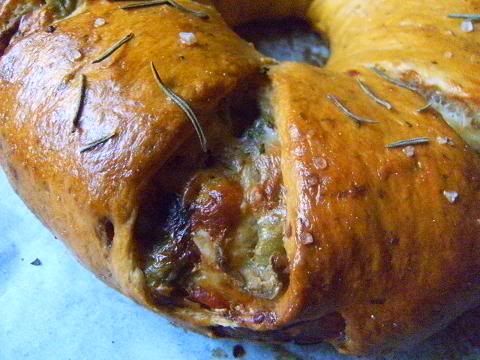
Close-up of the speck and pineapple wreath I love the salt and the ingredients peeking through the slashed dough
Interior of the speck and pineapple wreath
Both of the pizza wreaths, speck and pineapple on left, olive and mortadella on right

Recipes for the pizza wreath
For the dough
4 cups OO flour (this is finely ground type of flour used to make pizza)
¾ teaspoon salt
2¼ teaspoon (7 gm) (¼ oz) active dried yeast
¾ cup (180 ml) milk
½ cup sun dried tomato pesto
¼ cup unsalted butter, fried to nut brown
¼ cup olive oil
½ cup grated Parmesan cheese (plus equal amount of tasty cheese optional)
1 tablespoon each of onion powder and garlic powder
2 large eggs at room temperature
For the meringue
3 large egg whites at room temperature
¼ teaspoon salt
2 tablespoons sugar
I like my pizzas in the Italian style i.e. light tasting not too much meat and not too much cheese, feel free to double (or use even more) the amounts of meat/cheese filling ingredients if you like pizzas to be meaty, cheesy and oozy.
Filling for the speck and pineapple pizza cake
½ cup of chopped speck (you can double this amount if you like your pizza meaty)
½ cup grated Parmesan cheese (plus equal amount of tasty cheese optional)
¼ cup finely chopped pineapple, drained
¼ cup chopped herbs
Filling for the mortadella and olives pizza cake
½ cup of chopped mortadella (you can double this amount if you like your pizza meaty)
½ cup grated Parmesan cheese (plus equal amount of tasty cheese optional)
¼ cup quartered olives
¼ cup chopped herbs
Party roll cake
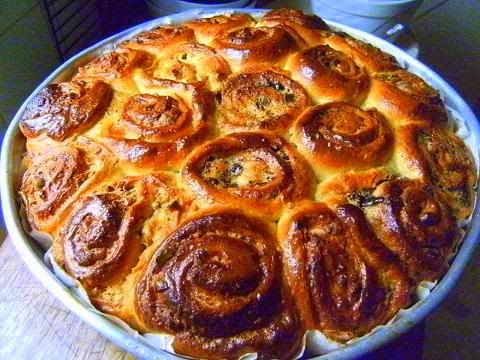
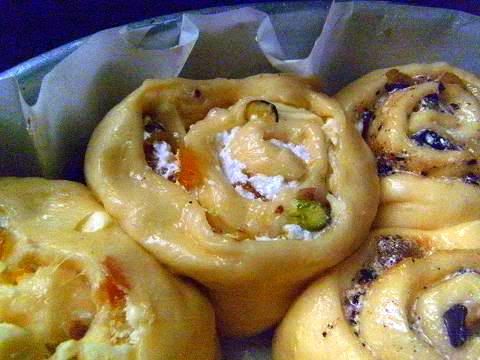
I was going to a party and wanted to bring something that had that OooHhhh factor so I made a huge roll cake. I used the full recipe and divided the dough into two logs, I filled one log with white chocolate, pistachios, apricots and vanilla sugar the other log I filled with dark chocolate, candied 'naked' ginger (a very pungent soft candied ginger it has a big kick) and dark molasses sugar, I made the logs as per the recipes but then I cut each log into ten rolls (total twenty) and placed these into my large deep pizza pan, I arranged the rolls upright in concentric circles in the pizza pan.
I rang my mum and asked how she does her glazing she always gets an excellent dark shiny colour on her baked goods, so I followed her advice. I double egg washed the rolls (egg wash once wait 5 minutes and egg wash again also "flood the swirls with the egg wash" she said and that is what I did I only used in total one whole egg and a splash whole milk) and baked at 200°C/390°F for 40 minutes since it was a large amount of dough.
Wow I cannot believe the colour of the glaze on this cake (it actually glows a dark shiny honey neon sheen bloody excellent I thought when I saw come out of the oven) it looks so impressive and I think it has that OooHhhh factor the oven spring was astounding about 3x this has to be one of the best dough recipe's I have worked with.
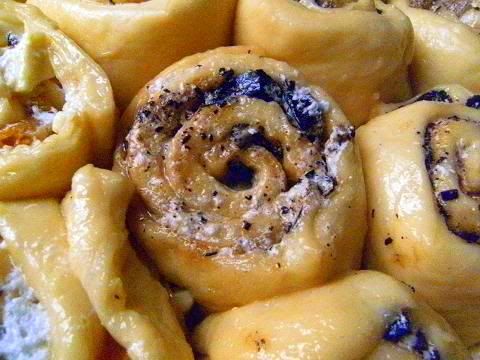
Unbaked party roll cake
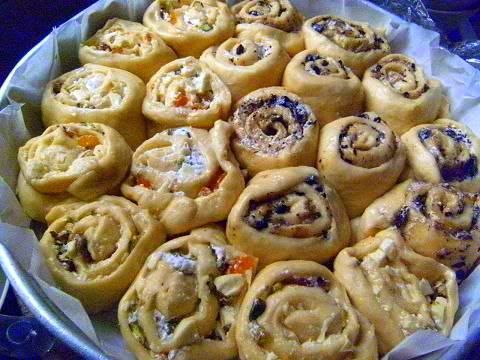
Close-up of the unbaked white chocolate, pistachio and apricot rolls I really like the coloured pieces peeking through the swirls
Close-up of the unbaked dark chocolate and candied 'naked' ginger rolls
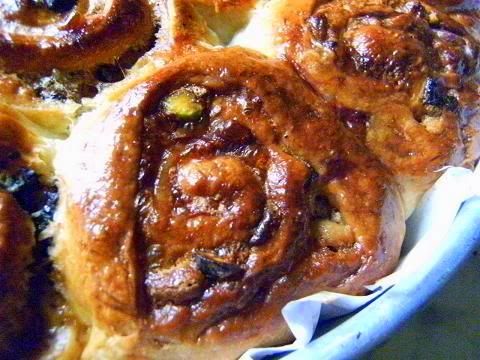
Close-up of the baked white chocolate, pistachio and apricot rolls
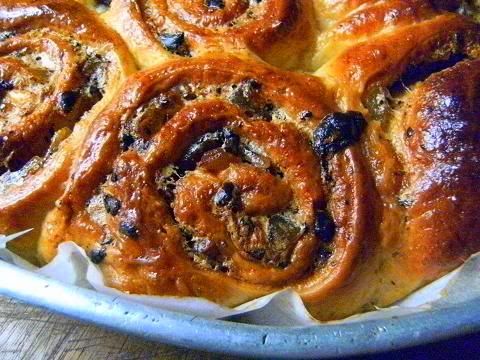
Close-up of the baked dark chocolate and candied 'naked' ginger rolls
Side view of the party roll cake even the edges have a great colour
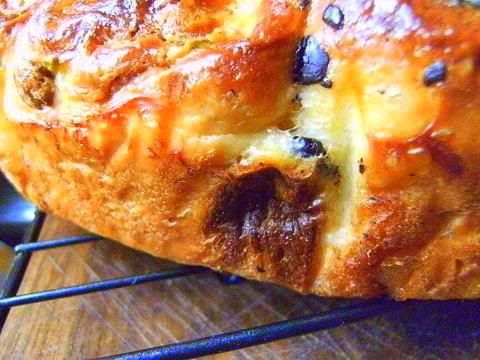
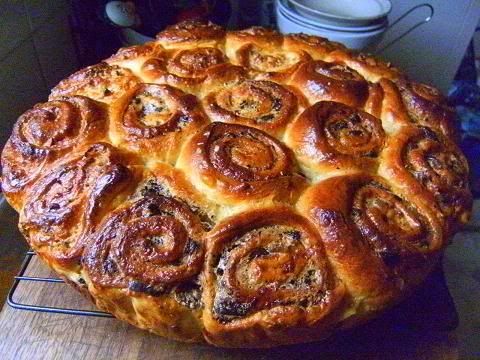
Final undecorated baked party roll cake
I still need to decorate it for the party.
I'm going to a party and wanted to bring something sweet so I made a huge batch of rolls. I used the full recipe and divided the dough into two, I filled one with white chocolate, pistachio and apricots with other half was filled with dark chocolate and candied 'naked' ginger (a very pungent soft candied ginger it has a big kick), I made the rolls as per the recipes but then I cut each half into ten rolls (total twenty) and placed these into my large deep pizza pan. Then I double egg washed them and baked at 200°C/for 40 minutes. I arranged the rolls upright in concentric circles in the pizza.
I triple raised the dough that is I raised and punched down the dough three times then I formed the rolls and then raised again. multiple raisings increases taste and improves texture of the final baked product.
Wow I cannot believe the colour of the glaze on this cake and it looks so impressive the oven spring was astounding about 3x this has to be one of the best dough recipe's I have worked with.
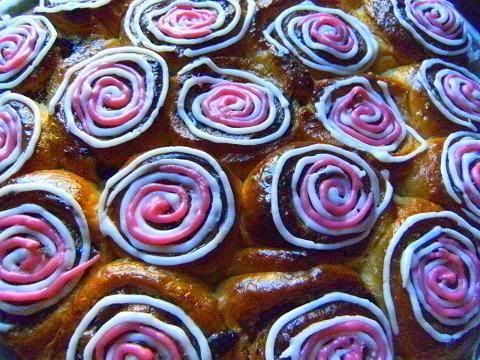
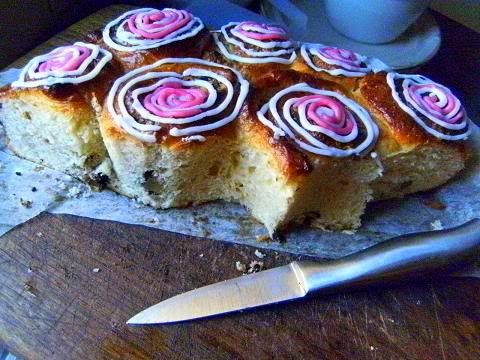
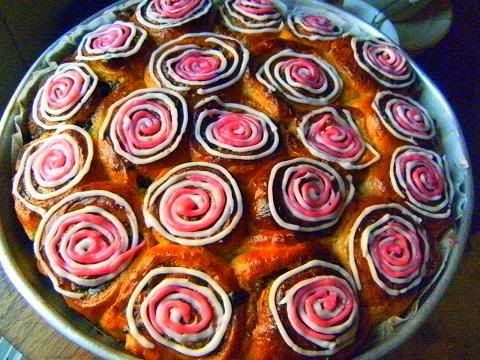
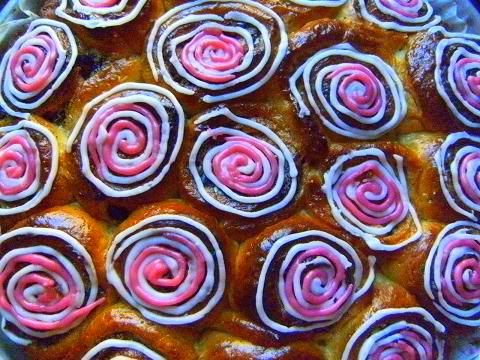
I decided that it needed some an extra WOW factor so I glazed it in coloured icing sugar mixed with a little water.
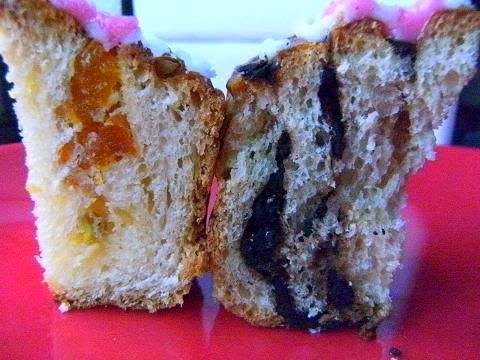
It is so impressive it looked like a bouquet of flowers it went down very well at the party. The texture of the cake is (almost) like a brioche interspersed with flavour bursts I absolutely loved it. The meringue totally disappeared into the cake but not its lightness and moisture, I adored both flavours, the dark chocolate and ginger had a great kick of flavour, while the white chocolate, pistachio and apricots had all the taste of white chocolate with pretty specks of green and orange into it. And to add to all that it sliced beautifully it served 24 people, totally cost $6 (pro rata since I have lots of dark/white chocolate, nuts and apricots left over).
Overall a wonderful cake for a party certainly a 'keeper' of a recipe.
Egg washed and unbaked party roll cake
Undecorated and baked party roll cake
Decorated party roll cake
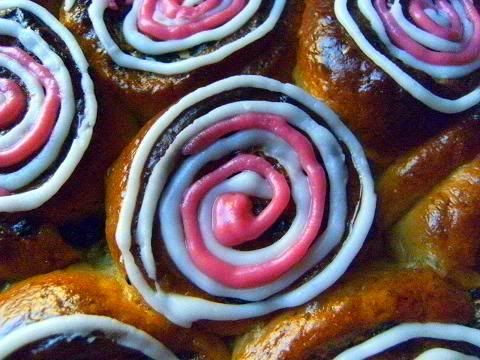
Close-up of decoration
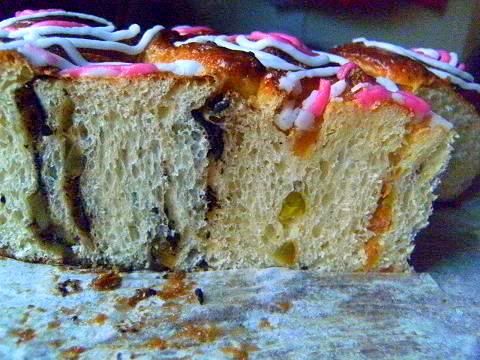
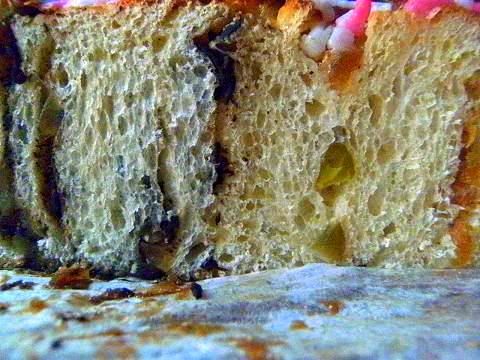
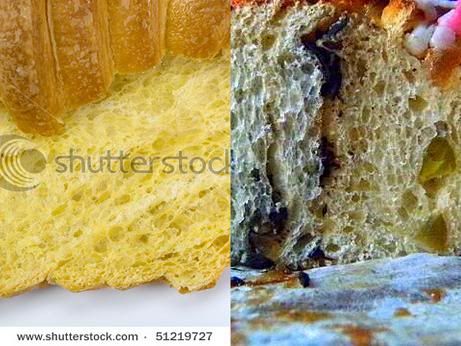
Close-up of the filling pattern and texture of the roll cake notice how much the crumb looks like brioche I love all those small bubbles. Right hand side is dark chocolate with soft candied 'naked' ginger, the left hand side is white chocolate, pistachio and apricot.
Finished decorated cake
Notice how much the crumb (the interior texture of the baked dough) of the party roll cake looks like brioche (a stock photo) or a croissant crumb, I think was a result of the multiple raisings I did.
The amazing dough
The challenge dough recipe is stunning it is very easy to get over three times increase in volume for the first rise this version took 1½ hours to rise, since it was cool today in Sydney Australia. I quickly (about one minute) mixed the wet ingredients into all of the dry ingredients and made sure that there weren't any dry patches then I kneaded it for about 1½ minutes until I started getting a ball that held together then I placed it into an oiled bowl covered with plastic over a deep pan (the bowl not touching the water) filled with warm water. It grew and grew at the end of the rising time the dough was fully hydrated and fully elastic a joy to handle and pat out. I experimented a little with some dough and found that it is the meringue melting into the dough which adds a lot of moistness and some sweetness to the baked product (no pictures sorry I forgot). The dough without the meringue is good light and fluffy but with the meringue it is super good a whole new type of moistness and airiness is introduced by the baked meringue.
The activity of the yeast is very rapid in this challenge recipe by the time I had rolled and made the first cake using half the dough the other punched-down half had risen by 50% in about 10 minutes, the dough just kept on growing and growing constantly. A joy to work with I love it. I find it intriguing how much the final baked bread is like flaky croissant pastry (especially the crust) since the challenge recipe doesn't use chilled butter layers and the many turns that croissants need to make them flaky. See here for full tutorial on croissant making.
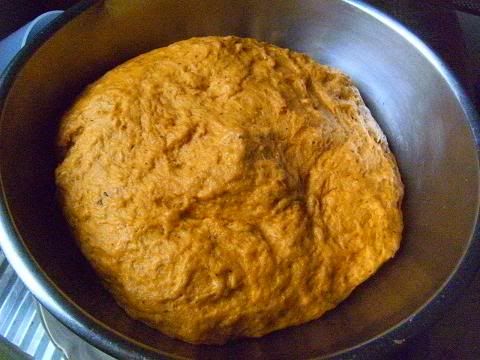
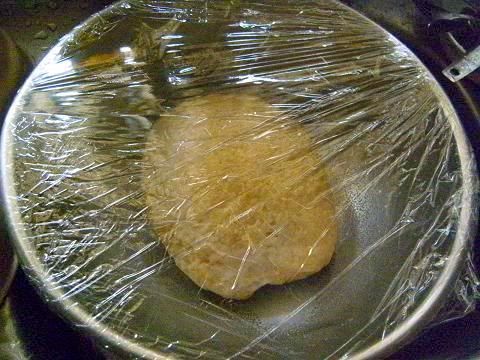
The dough at the start of the rising
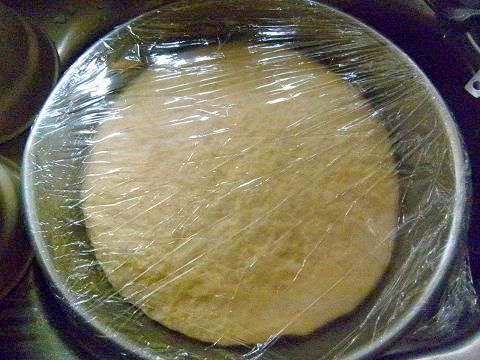
The risen dough notice it is touching the plastic it had increased in volume by at least three times
I carefully measured the weights and volumes of the ingredients I used I substituted the milk with cream to improve the mouth feel also it was near its expiry date so had to be used. The flour measurement (560 gm) is what I got when I measured out 4 U.S. cups (960 ml) of flour you might get something different that is normal so no need to worry about the slight differences between this and the challenge recipe. I noticed I needed a little more water than the challenge recipe to get a fully hydrated dough.
The recipe I used for the dough shown above
4 cups (960 ml) (560 gm) (19¾ oz) (1¼ lbs) plain (AP) flour
2 tablespoons (30 ml) (27 gm) (1 oz) sugar
¾ teaspoon (3¾ ml) (4½ gm) (0.16 oz) salt
1 package (2¼ teaspoon) (11 ml) (7 gm) (¼ oz) active dried yeast
¾ cup (180 ml) thickened cream, 35% butterfat
⅓ cup (80 ml) water
½ cup (120 ml) (115 gm) (4 oz) unsalted butter, melted
2 large egg yolks at room temperature
1 large whole egg at room temperature
For the meringue I used this recipe
3 large egg whites at room temperature
¼ teaspoon (1¼ ml) (1¼ gm) (0.04 oz) salt
¼ cup (60 ml) (55 gm) (2 oz) sugar
For the egg wash
1 large egg yolk with a splash (1 tablespoon) of cream
I used the recipes above to make two versions of challenge meringue cake. One savoury and one sweet each using one half of the batch.
Savoury Vegemite and cheese scrolls and Sweet Birthday Lolly Treat
Vegemite and cheese scrolls
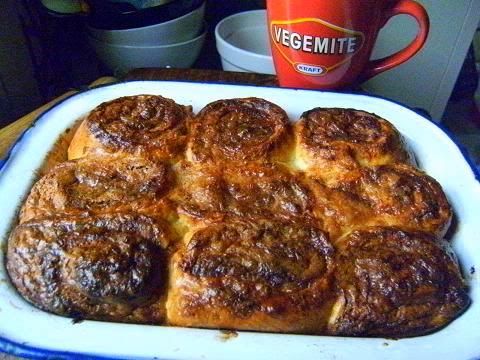
I had to make vegemite and cheese scrolls they are a very popular treat for Australians any time during the day. Vegemite is the most popular spread for morning toast in Australia, it looks like black road bitumen (road tar) well that's what my mum says (it's a glossy black solid thick paste) and it tastes like salty yeasty meaty soya sauce (my mum says it tastes like road bitumen also LOL LOL) many people also like cheese on the vegemite toast hence the concept of vegemite and cheese scrolls. I used half of the full dough recipe and for the filling I used two heaped tablespoons of vegemite dissolved in three tablespoons of melted butter, I spread this over the rolled out dough and then spread the meringue over it and then added one cup of grated sharp tasty cheese, I rolled the dough and filling into a long log and divided it into nine scrolls which were egg washed and sprinkled with some extra grated cheese. I baked them for 30 minutes at 220°C ( 430°F).
Vegemite is a highly acquired taste you really need to have had it as a child to like it, most adults trying it for the first time say things like "It tastes horrible" President Obama and "Why do you want to eat road bitumen" my mum.
WOW they were perfect the bread was moist fluffy light with tons of flavour the texture was very much like an airy brioche, the salty cheese and vegemite was in great balance with the slightly sweet bread. An absolute joy to eat these are on my regular rotation from now on. At the local bakery one large scroll costs $2.50, I made nine of them for about the same cost.
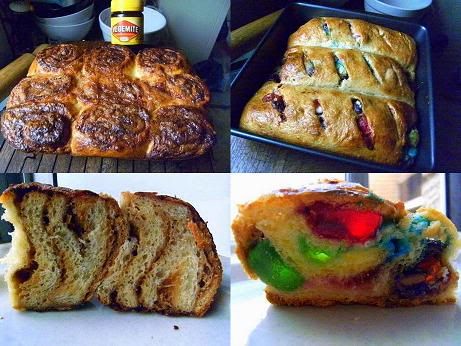
Baked vegemite and cheese scrolls
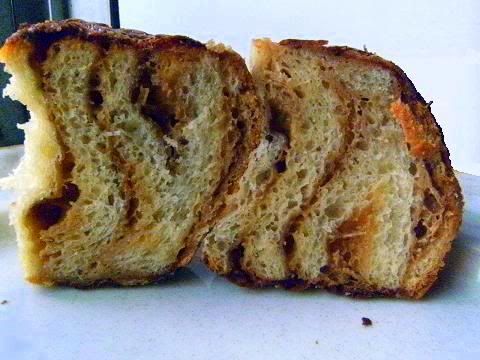
Interior of the scrolls I like how they look like tiger stripes
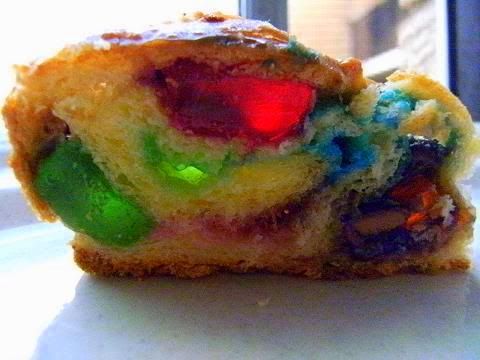
Birthday Lolly Treat
I wanted to make a special treat for a three-year's old birthday party I asked him what flavour he wanted the treat to be he answered, smarties (the Australian version of M&M's), gummy snakes and clinkers (chocolate coated honeycomb bombs where the honeycomb can be various flavours) – … I had to ask didn't I … everybody had a good laugh. Well with the challenge recipe I made exactly that using 200g smarties, 100g clinkers and 100g gummy snakes I baked it for 30 minutes at 220°C (430°F). OMG OMG OMG it tasted exactly like an uber-superb flaky butter croissant with sweet bursts of chocolate yumminess I have to say this treat is not for the faint hearted. I really really really liked this so much the kids (and adults) were in chocolate, sugar and fat bliss (and a little later a stupor) for the afternoon. Most times kids just eat the sweet icing on cakes but this time they eat everything. I noticed that all the adults had a slice or two, I served approximately thirty slices from this cake. This was fantastic the crust and interior of the rolls had the texture of a high quality flaky croissant which seemed to be made from chocolate butter with explosions of coloured sweetness interspersed in the swirls. And the look of the interior was astounding due to the smarties melting their colours into the dough a wonderful child's lolly treat BUT only for special occasions. Actually it wasn't that sweet since the dough only used a few tablespoons of sugar and the meringue had the minimum sugar to make it stiff peaks and the slices were thin. What I liked was the mouth feel of the flaky croissant like dough and the soft chocolate pockets of deliciousness with the gummy snake pieces uhmmmm so good.
Some of the ingredients
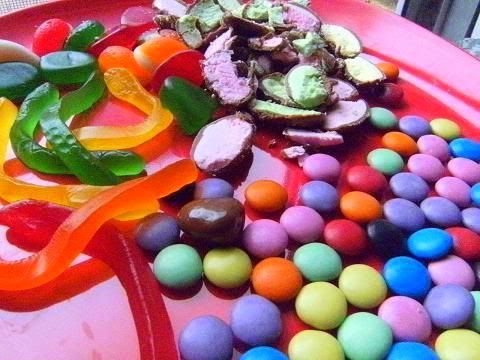
The sweet lollies spread over the meringue

The baked treat
Interior of the Birthday Lolly Treat
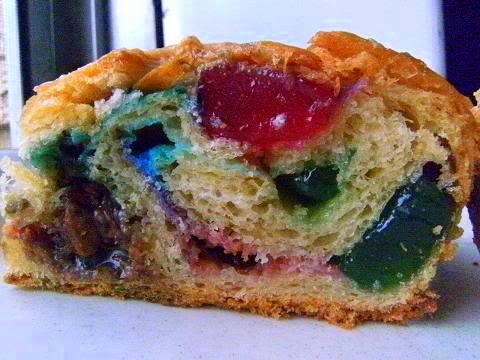
Looking at the interior of the Birthday Lolly Treat through strong sunlight so beautiful like stained glass
Answers to questions
Question one
Oh dear. I seem to be the only one who's failed with this recipe. I followed the recipe to the letter making the garam masala version and my own sultana and lemon version with the rest of the cashews thrown in for good measure.
My first problem was which type of flour to use. I'd usually use strong flour for breads but it didn't seem to be specified in the recipe (unless I missed it in my excitement to get started - very likely!!) so I used plain flour.
Whilst I had a small amount of rise it didn't anywhere near double in size but I carried on regardless.
The smell from the oven was lovely but the finished articles were....well, not exactly prize winning! There's no rise or cake like texture at all. It's like cooked pastry rolled around the filling.
Was my failure just down to the flour used? Help someone please!! I'd like to have another go as this is my first challenge and I won't let it beat me!
I have made a couple of versions now using plain flour and strong bread flour and didn't notice any difference in the rise of the cake (there was a difference in the interior texture i.e. crumb of the cake, the bread flour give a finer crumb). It sounds to me it was a yeast/rising issue more likely:
0. did you check if the yeast in the pack was alive by activating it in some water or milk before adding it to the flour, or
1. did you use too hot water or milk which might of killed the yeast. or
2. did you place the salt or sugar directly onto the yeast which could of killed the yeast, or
3. did you cover the dough during rising; drafts, drastic temperature changes and a skin forming on the dough can kill yeast, or
4. did you leave enough time in the first rise to let the yeast do its magic that is activate (i.e. come alive) and multiply which produces enough gas to rise the bread sometimes it does take a very long time (several hours) for the yeast to multiply correctly (when the yeast is near its expiry date) especially when there is a lot of fat, sugar, salt and alcohol in the dough mixture (which can all kill or inactivate yeast), or
5. was the temperature of the room or place where you did the rising too cold or too hot, yeast likes a blood-warm temperature range too hot it dies too cold it becomes sleepy and rests and does nothing i.e. they become lazy buggers!. or
6. did you punch down the dough correctly which helps redistribute the yeast in the dough again which re-energises it and makes the dough rise in the oven with a good oven-spring, no oven-spring is a telling sign that it was a yeast/rising problem I feel.
7. Did you notice if you got good gluten development if you look at the risen dough pictures in this thread you can see how the gluten threads are fully hydrated and are strong and elastic which means that you have left enough time of the moisture to be absorbed into the 'gluten protein' so when the yeast produces its gases it is this gas which is trapped in the dough and stretches the gluten which rises the mixture.
Question two
My cake did not turn out as fluffy as I would have liked. Also, it was a little dry since I may have used a bit too much flour. I probably didn't need to use all 600g flour.
Could the method that I used to knead the dough have contributed to the dryness and/or lack of fluffiness? I decided to get in a workout and knead the dough like the baker does in this video instead of the "normal" way to knead. (http://www.youtube.com/watch?v=PvdtUR-XTG0&feature=channel_video_title).
I found mine was dry too, I used the stand mixer dough attachment to knead it. Is it possible to overwork the dough?
I have made the challenge recipe several times now (using 600g of flour) and each time I had to add about 3-4 tablespoons of extra liquid (water) to make the dough feel right. I agree I think the 600g might be a little too much I think 560g would be better for the liquid specified (that's my opinion).
Since this dough is so soft I think it is easy to 'misread' the consistency of the dough that is misinterpret softness with a fully hydrated gluten matrix.
I got (for my party roll cake) a rise of about 3X for the first rise and little under that for the final rise but I was very careful about fully hydrating the gluten in the first instance with a good resting time. In fact I punched down the dough three times since I was busy doing other things (this helps improve the taste and texture of the final cake) then I rolled it into logs with the meringue filling and it let rise for the another time and then I cut the logs to form the party roll wreath and let them rise again and then baked it.
Yes (in my humble opinion) I think it is possible to overwork dough (that is work it well after it has formed high gluten hydration and a good network of cross linked threads), for some reason most people think kneading is what develops gluten actually it is the liquid added to the dough that develops the strands of gluten, kneading ONLY helps speed up the formation for cross linkages in the cohesive web (or matrix) of gluten strands in the dough that helps traps the gases which the yeast releases while multiplying. In fact you don't need to knead dough AT ALL to form a good gluten matrix (think of the no-knead bread recipes that are popular at the moment). Gluten forms within 10-15 minutes (20 minutes maximum) so long as the liquid is quickly mixed into the flour and the flour is hydrated evenly (that is having no dry spots in the dough) with minimal later flour incorporation. The best technique is a thorough mixing (about 30 seconds) with a plastic scraper, fork, spoon or mixer (at low speed) to quickly and uniformly hydrate the dough. Then 30 seconds of mixing with a mixer (medium speed) or some short kneading (about a minute or two) using moist hands then form a ball and cover, then just let it sit for 10-20 minutes (just looking at the dough will tell you if the gluten has be hydrated and formed a good interconnected matrix of gluten strands). A couple more folds by hand or a quick knead or a short burst in the mixer is all that is really needed to make a good dough ready for the first rise try to avoid adding more flour (since it isn't hydrated).
A less-than-ideal hydrated dough usually has some or all of these characteristics 'toughish' (not as soft as a normal dough), 'rubbery-ish' (lacks resiliency), lacks hydration (is dry) and has less elasticity (does rise as well).
A well-hydrated dough on the second rise should take about half the time of the first rise and should rise about the same height if it doesn't the dough is under-hydrated.
A well-hydrated dough should pass the window pane test see here.
This is not my picture it is from the site linked above.

I think the standard "knead for 5 to 7 minutes with a mixer" is just a tradition that has creep into cook books because it is familiar. By the above this method does not "make gluten" it only develops it in that it hydrates the flour and organizes the gluten (somewhat). However, just letting the dough sit lets gluten hydrate and a couple of simple folds organizes the network of gluten strands so...a short quick mix, resting for 20 minutes and some very brief kneading (or a fold or two) are all that is really needed and is good as 20 minutes of vigorous hand kneading as shown as in video link. The above method is advocated by Peter Reinhart and it works for me.
I looked at the video what a workout (20 minutes and 600 turns and slap downs!!!) I think this technique is used to add some oxygen to the dough to produce disulfide bonds between the gluten strand molecules which contribute to the cross linking of the gluten matrix i.e. makes a well woven gluten mass. Also I notice that he starts with a very wet and just barely mixed dough and works it to a great satin dough, I'm sure if he let the dough rest at the start for 10 minutes the workout time would of been half (or even shorter) as long. I have done this "turn and slap down" method but never for 20 minutes more like 5 to 10 minutes (with a few minutes rest at the beginning) when I make cinnamon rolls I get good results. You can tell when its ready by the good sized bubbles that are formed (trapped) under the skin of the dough at which time you form the ball and let it rise.
So summarising I think it was a matter of too much flour (or not enough liquid) not so much the "turn and slap down" method which looks like fun! or over-kneading by machine.
This is not meant to be a criticism for the dough recipe which is a 'keeper' I absolutely love it, it's more a matter of knowing how much extra liquid or flour you need to get the right consistency to the dough on the day you are making. As everybody knows all bread recipes need to be adjusted a little for the local temperature and humidity conditions on the day you are making it.
Question three
My only issue is that I'm not sure if the meringue should entirely melt into the dough, my party roll cake was the best (most moist) its meringue had been totally adsorbed into dough, while the pizza wreath was a little drier (still good though) its meringue was still visible in the cut slice. Maybe this is the controlling factor for the final moistness of the cake.
In the challenge recipe it states "Beautiful to put together and gorgeous out of the oven, the cake is light and fluffy, barely sweet, the meringue miraculously melts into the dough as it bakes leaving behind just a hint of sweetness and adding to the perfect moistness of the cake." so maybe it is the meringue being absorbed into the dough that decides the final moisture level of the cake.
Yes I did some experimenting with and without meringue; and partially adsorbed and totally adsorbed meringue (sorry no photos I forgot bugger!) it certainly is the meringue being totally adsorbed into the dough during baking that gives it that special moistness and texture to the cake.
The lolly cake I made was well sealed and had only a couple of slashes it was superb even the vegemite and cheese scrolls (unsealed meringue at each end where the meringue could easily run out) where really good but I did bake at 220C for 30 mins so a lot hotter than the recommended I thought it would work better since this is bread and that is the temperature I always use for bread I think it helps the bread seal the ends of the scrolls and absorb the meringue better and the egg wash browns much better to a dark shiny mahogany colour.
Question four
Thanks Audax! Just got home from work and it is a bit late to start now but I will try tomorrow keeping the meringue in. And your saying to use a hotter oven, is that right?
Yes a hotter oven (200°C/390°F to 220°C/430°F) doesn't seem to hurt it at all, I found that I got a better oven spring and the meringue was totally absorbed into the baked dough. I also think that the heavy egg wash really sets much faster than at 180°C/350°F which helps keep the meringue in the cake. If you seal the edges of the rolled logs well I wouldn't worry too much about the meringue escaping from the few slashes where the meringue sets quickly into a soft nougat. With my scrolls I was fairly rough with my seams and the scrolls had open ends with meringue showing and nothing leaked out (again due to the higher temperature which helps expand the dough quickly to stop leakage especially if you using a close fitting baking pan like I did for the scrolls and party cakes I did). The first major reason I used the higher temperature was to get a better colour on the egg wash, then I found that the meringue was absorbed better than at the lower temperature.
I used 200°C/390°F for the pizza wreaths and used 220°C/430°F for the vegemite scrolls and the lolly cake which worked the best I thought.
So try the higher temperature if you wish but keep a close eye on it after 10-15 mins since all ovens are different luckily I have a very good static heat oven at home which helps a lot.
Also I think it is important to make sure all the sugar is dissolved in the meringue and that it is whipped to shiny stiff peaks, which makes for a more stable meringue, a poorly made meringue will melt very very quickly and will pour out of the slashes. My neighhour tried this recipe she hasn't made meringue before and she came over and showed me the oozing juice coming out of the unbaked cake it was 'meringue' liquid it was very grainy in mouth feel.
Good luck with the next batch.
Question five
Anyone successfully defrosted one yet?
About defrosting the cake I have defrosted a couple now and they thaw out very very well, thaw in the fridge it will take overnight or longer to thaw out. When I freeze a cake I cool it completely to room temperature, then I wrap it in paper towel then plastic and finally foil, then freeze it, usually I cut the cake into quarters or slices that way I can thaw out the amount I want. When I defrost I take off the foil layer and let it thaw in the fridge overnight (or longer depends on how cold your fridge is) the paper towel layer absorbs the dew that might form which makes the cake soggy of course the plastic layer stops the cake picking up fridge smells.