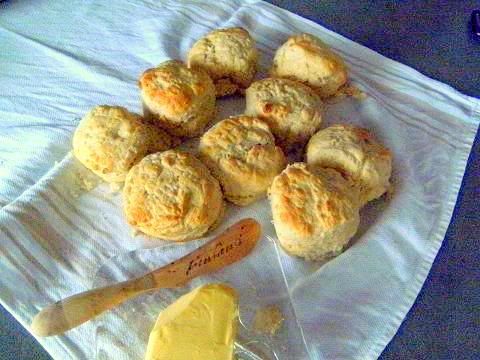

The treat that I'm talking about is the basic scone (also know as baking powder biscuits in North America) my sister really knows how to make them, they are wondrously light with soft sides and a lovely airy crumb – superb with jam and cream. This month I want the Daring Bakers' to share my delight and I invite you to bake a batch of scones to enjoy with friends and family.
For our North American members I wish to clarify what this challenge is all about and try to avoid any confusions. Scones in North American are nearly always triangular in shape have a slightly crisp crust usually covered in sugar and have a soft interior crumb and sometimes are laced with dried fruit (these baked goods in Australia and England are called “rock cakes” since they are usually made to look like “rocky” cakes not wedges), meanwhile biscuits in North American are a round shaped buttery slightly flaky baked good usually eaten with meals (these items in Australia and England are called “scones” and are eaten with butter and jam usually with cups of tea or coffee as a sweet snack). So this challenge (using the North American name) is to make biscuits. Or using the Australian or English name this challenge is to make scones.
To further clarify for our North American bakers this month's challenge is to make biscuits (also called baking powder biscuits) if you choose to make your biscuits using buttermilk as the liquid you are making what are known as “Southern” Biscuits which are one of the most famous examples of home cooking in the Southern States of America (that is they are a baking powder biscuit made with buttermilk). In Australia and England “Southern” Biscuits would be called buttermilk scones. So restating the above, the challenge is to make scones (using the Australian/English name) or to make biscuits (using the North American name). Incidentally if you use cream as your liquid in the challenge recipe the final baked good would be called a cream biscuit in North America or a cream scone in Australia and England.
Scones (biscuits) contain only a small number of ingredients they are fast to make, quick to bake, only cost cents per batch and most importantly are super FUN to eat. In England and Australia scones are eaten with jam and butter usually with cups of tea or coffee mostly as a sweet snack, while in North America they are usually eaten with meals as a savoury side.

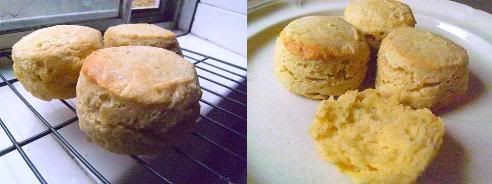
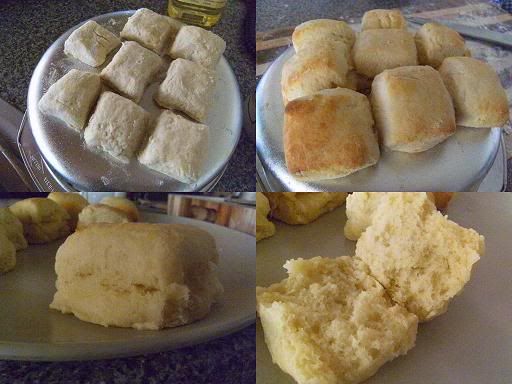
Of course scones (biscuits) have a notorious reputation as being difficult for some people to make comments like “hockey pucks”, “These made great door-stops ” and the like fill the comment sections of most recipe websites. You see scones (can be said as a rhyme with cone and also can be said as a rhyme with gone) are a type of quick bread that is a white flour dough that is raised using chemical agents usually baking powder and/or baking soda. Basic scones contain flour, raising agent(s), butter (or shortening or lard), salt, and milk (or buttermilk or soured milk or cream). Most recipes just say to “rub the fat into the flour” then combine the dry and wet ingredients until “gathered together” and then “lightly knead” the gathered mixture until a soft dough forms, then “roll or pat” out this dough and then “cut” out rounds and bake them in a hot oven. Well how hard could it really be I thought uh-mm as you can see below my first batch wasn't the greatest success … they didn't raise at all and the texture was barely OK I thought … I was left wondered what I had done wrong …
My first attempt at scones (really pretty terrible I thought, no height no tenderness and no flakiness)
So after studying many many (288 websites bookmarked) scone/biscuit recipes and the bakers' comments about these recipes and after doing 16 batches! myself I have acquired a lot of information to help you master the techniques involved I hope that at the end of this challenge that you will be able to make a good if not great scone (biscuit).
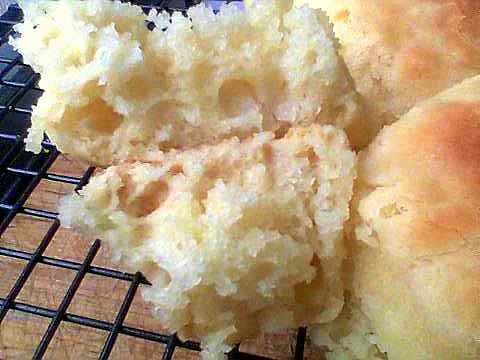
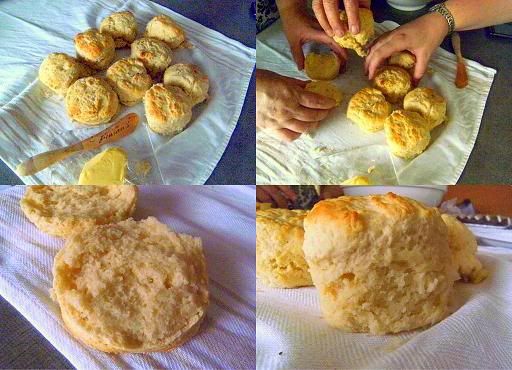
After much research and many attempts … finally some scones (the 14th, 15th and 16th batches) that I wouldn't mind sharing with my sister.
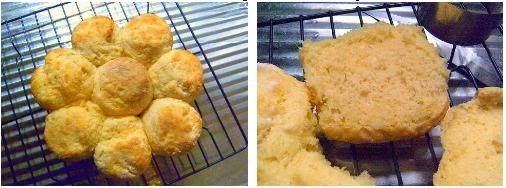
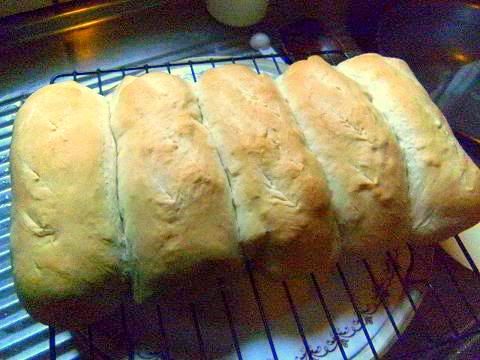
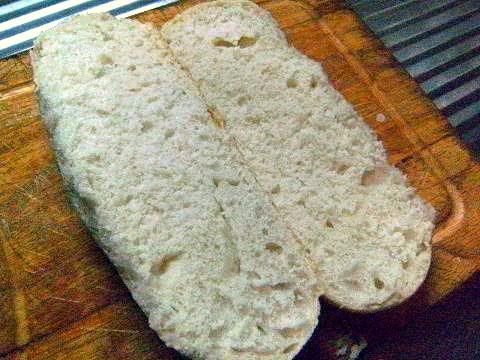
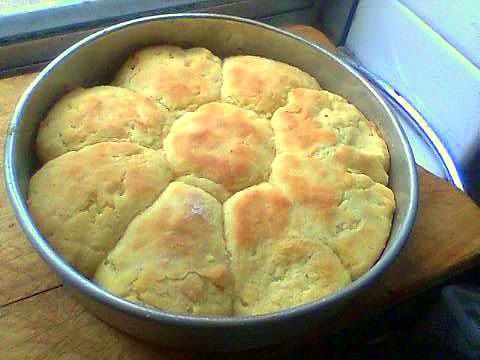
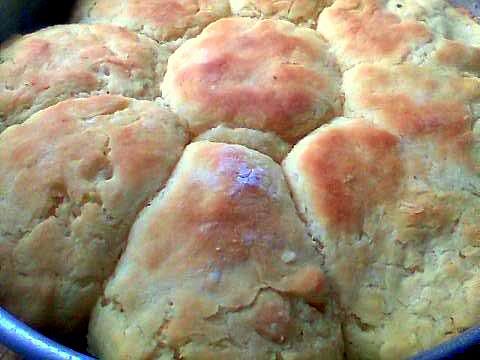
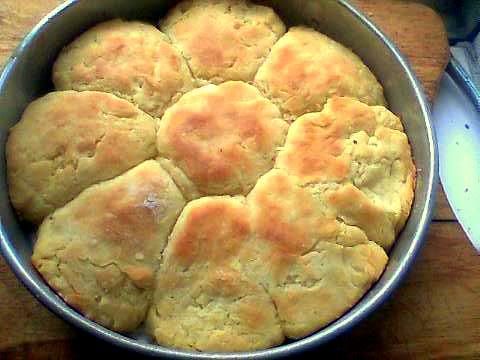
The Classic Australian scone ring (Aussie Damper) – the crumb is very similar to bread
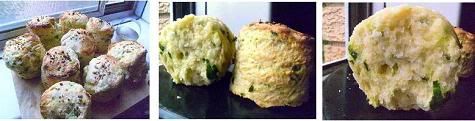
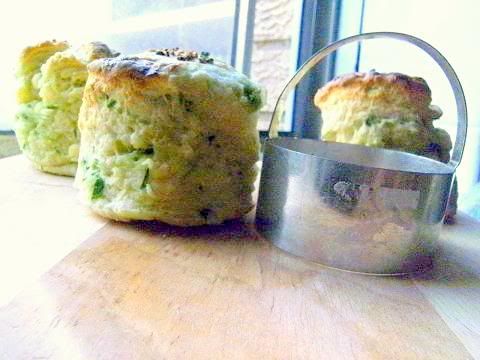
Cheese and chives scones – a “sky-high” light and tender scone flavoured with cheese and chives
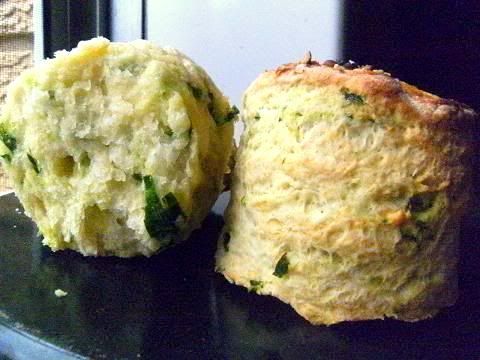
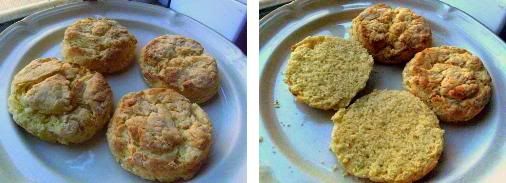
The classic Southern Biscuit (buttermilk scone) – a superbly flaky scone made with buttermilk and laminated to form distinct layers when baked
Fairy Ring
As I mentioned in the challenge posting in Australia and England scones are usually eaten as a sweet treat (with butter and jam) with cups of tea on that theme while doing my research for this challenge I thought I would do a variation on the sweet side of the scone. Here is one recipe that is suitable for kids and adults when you want something special and sweet yet can be made at a moment's notice.
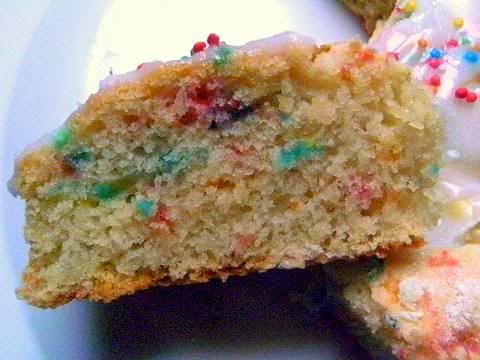
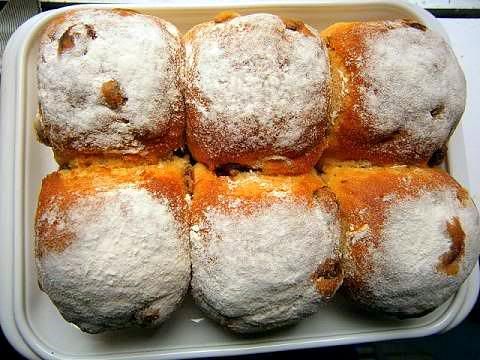
In Australia one of the most popular children's party food item is fairy bread. This is a variation of fairy bread called Fairy Ring made with an Aussie Scone (Damper) ring laced with 100s and 1000s then iced (with some icing sugar and a touch of lemon juice made into a sticky paste) then sprinkled with more 100s and 1000s (coloured sprinkles). My 9 year old niece went crazy with delight and literally squealed with glee when I showed her this Fairy Ring and say I made it especially for her.
Normal (Damper) Scone Ring
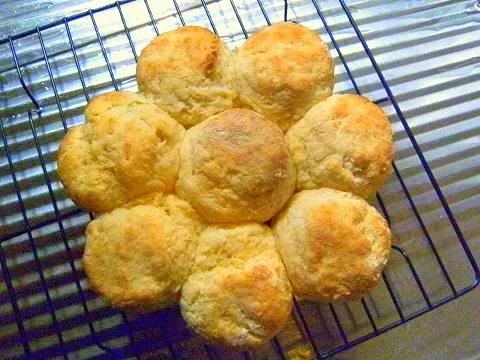
Fairy Ring straight from the oven
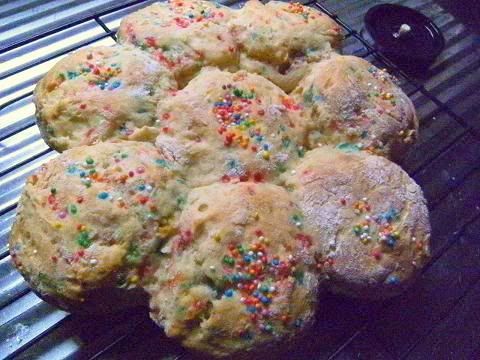
Completed Fairy Ring

Hot Dog Buns
Here is a savoury variation, I made hot dog buns using the basic scone recipe. They worked out great I couldn't believe the crumb and they tasted great with the hot dog and relishes and I made them in under 15 minutes (once the oven was hot enough). I was very surprised how well the basic scone dough complimented savoury food.

Touch of Grace Scones
(Click on the title to go to a great posting about this recipe)
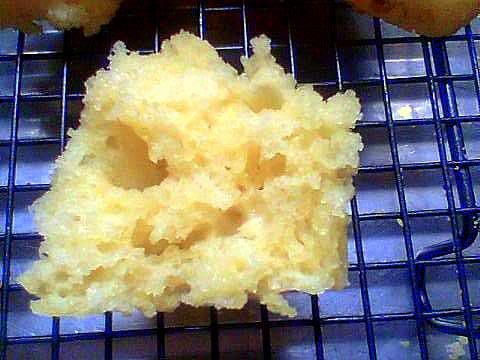
Here is the answer to dry biscuits this recipe is called "touch of grace" biscuits which uses a few simple techniques to create a super moist crumb. These scones are all about tenderness everything is designed to obtain the softest and most tender crumb possible. These are very different from the normal bread-like scones that Australians like with jam and cream. These would be perfect with a savoury meal. They were so buttery with a soft creamy crumb that literally melts in your mouth, the mouth feel is like clouds. As one reviewer lovingly opined "They're squat little puffs you'll want to grab, steaming, from a basket passed over fried chicken or bacon and eggs". The way I make them is slightly adapted from the original recipe, I use a lot of very large pieces of butter and all buttermilk with very low gluten cake flour and some resting time in the fridge. Resting the dough after the buttermilk is stirred into the dry ingredients is essential you would never be able to form the soft balls of dough coated in flour that are the "rounds" in this case and keeping everything cold helps the baking process. While baking the large pieces of butter melt into the flour causing large air holes to form in the baked dough and since we use soft flour (6%) which cannot form flaky layers we thus obtain a feather-light creamy tender crumb infused with the maximum amount of butter that the dough can hold.
These scones are made entirely from cake flour (6% gluten), I used 1 cup of flour, 2 teaspoons baking powder, 1/2 teaspoon baking soda, 1/4 cup very large-sized butter pieces, about 1/2 cup buttermilk and 1/2 teaspoon sea salt. I rubbed in butter making sure most of the fat/flour where large pea sized pieces. I rested the dough after I mixed in the wet ingredients for 10 minutes until cold, during this time the dough "firms" up making it possible to turn it out in one cohesive dough ball onto a lightly floured board. I formed a rectangle of the soft dough floured the top lightly then I stamped out rounds. You could feel the pieces of butter in the formed round The rounds are very soft but can be picked up and placed into the baking dish. Then I place the baking dish with all the formed rounds back in the fridge for 10 minutes until cold then bake. (This procedure is much easier than the original recipe's method and it gives as good results I think). As you can see the crumb is saturated with butter and has masses of large airy pockets to trap your favourite topping. Absolutely delicious.
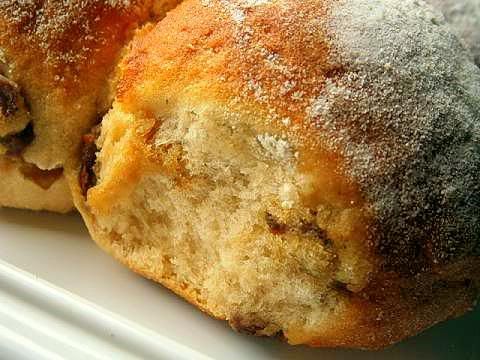
Raisin Scones
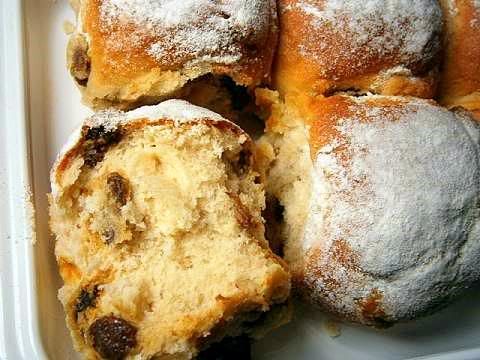
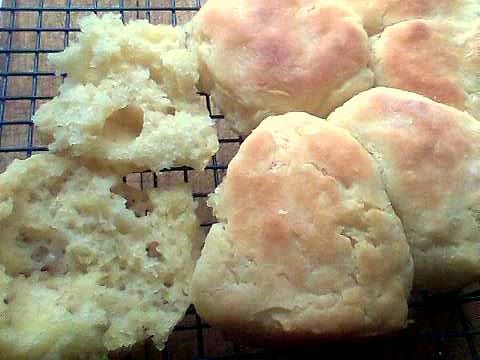
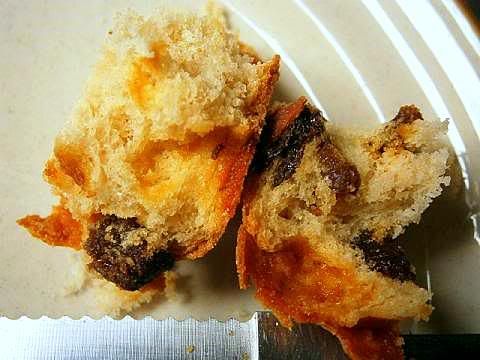
I wanted to make one batch of flavoured scones I went with sweet raisins and some molasses in the dough. I rubbed in the butter until it was like fine sand and I used "OO" cake flour about 7% protein and some cornflour (cornstarch), I was very happy with the look of the baked scones and the crumb was very tender very much like bread which is what I wanted. These were very cute looking but to be honest I like plain scones much better.
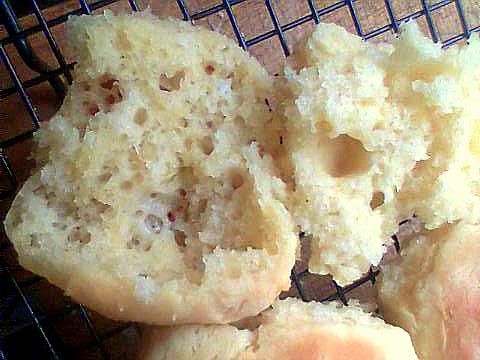
The bread like crumb of the scone so so tasty and soft.
As you can see scones (biscuits) are all about technique since the scones pictured above used the same basic recipe.
Recipe Source: The challenge scone (biscuit) recipe has been especially formulated by Audax Artifex after a large amount of research and experimentation. It is designed to help you master the techniques involved in making scones (biscuits) exactly the way you like them.
Blog-checking lines: Audax Artifex was our January 2012 Daring Bakers’ host. Aud worked tirelessly to master light and fluffy scones (a/k/a biscuits) to help us create delicious and perfect batches in our own kitchens!
Posting Date: January 27, 2012
Challenge Notes:
The Ingredients – since scones contain only a small number of ingredients each should be of the highest quality
Flour – lower gluten (i.e. soft) flours (about 9% or less protein) produce taller and lighter scones than normal plain (all-purpose) flour (about 10%+ protein). But to be honest it wasn't that great a difference so long you sifted the dry ingredients thoroughly at least three times. That is always triple sift the dry ingredients this will ensure that the flour is well aerated and the raising agents are evenly distributed so resulting in light scones. I found that finely milled soft “OO” flour gave the best results but don't worry you can get excellent results with sifted plain (all-purpose) flour. You can use self-raising flour if you wish (remember to leave out the raising agents and salt) in the recipe below it is important to triple sift the self-raising flour as well I like to add about ½ teaspoon of extra fresh baking powder per cup of self-raising flour to ensure a good lift in my scones. In the northern states of America and most of Canada all-purpose flour is generally very hard (high in protein) you can replace for each cup 4 tablespoons of all-purpose flour with cake flour OR for each cup replace 2 tablespoons of all-purpose flour with cornflour (cornstarch). Or you can let the scones rest (20 mins) in the fridge before baking.
Fat – unsalted butter gives the best flavour while lard gives the flakiest texture since it has a much higher melting point than butter so promoting a flaky texture in the final scones. The best compromise is to use a combination of the two in equal measure. I usually use all (unsalted) butter for flavour and health reasons. In most recipes the fat is rubbed into the flour using fingers or a pastry cutter (don't use two knives or forks since it takes too long to cut in the fat using this method). It is best to grate the butter using the coarse side of a box-grater and then freeze it until you need it. Freezing the butter prevents the fat from melting into the flour. The idea is to coat the fat particles with the flour. You are looking for a fat/flour combination that looks like very coarse bread crumbs with a few pieces of butter about the size of peas, the finer you make your fat pieces the more tender the crumb of your final scones. If you want very flaky scones then make the fat pieces large like Lima beans and only lightly coat them in the flour. If your kitchen is very hot you can refrigerate your flour so helping to keep the fat from melting. Don't freeze your flour as this will make it too difficult to rub the fat into the flour. (Typical usage about 1 to 8 tablespoons of fat per cup of flour).
Chemical raising agents – always use fresh raising agents, baking powder deteriorates within two months once the jar is opened, typical usage 1 to 2 teaspoons per cup. Baking powder nowadays is double action – there is an initial release of gas once the dry and wet ingredients are combined and there is another release of gas from the high heat of the oven. If you are using acidic ingredients (such as buttermilk, soured milk, honey, citrus juice, yoghurt, tomato sauce etc) then use an additional ¼ teaspoon of baking soda per cup of liquid to help neutralise the acid and make the final baked product raise correctly. Baking soda is much stronger (x4) in raising power than baking powder. You can make you own single action baking powder by triple sifting together one part baking soda and two parts cream of tartar store in an airtight container. To check if your double action baking powder is fresh place 1/4 teaspoon in 1/2 cup of water it should bubble a lot, then microwave it for 30 secs it should bubble it again. To check your baking soda place 1/8 teaspoon into 1 tablespoon of vinegar (or lemon juice) it should bubble a lot.
Liquid – you can use milk (any sort), buttermilk, soured milk, yoghurt, half-and-half, cream, coconut cream, soda water, even lemon-flavoured soda pop (soft drink) or a combination of these as the liquid in your scones. You can sour regular milk with a tablespoon of cider vinegar or lemon juice for every cup. Just stir it in and let it sit for 10 minutes or so to curdle. Typical usage is 1/3 to 1/2 cup of liquid per cup of flour.
Salt – a small amount of salt (about ¼ teaspoon per cup of flour) helps improve the action of the raising agents and enhances the flavour of the scones.
The Equipment
Baking pans – use dark coloured heavy weight baking pans as these have the best heat distribution and really give a great raise to your baked goods. Many people like to use cast iron skillets for best results.
Measuring cups and spoons – try to accurately measure all ingredients especially if this is your first attempt at making scones (biscuits) remember to scoop the ingredient into the measure and level with a knife. If you can weigh the flour using scales even better.
Scone (biscuit) cutters – use a cutter that is made of sharp thin metal with straight sides and is open at both ends this ensures that the scone will raise straight and evenly and ensures the cut scone is easy to remove from the cutter without compressing the dough. Try to avoid using cutters with wavy sides, thick walled cups, glasses, metal lids, small jars or any cutter with only one opening since it is difficult to remove the cut scones from these without compressing the dough therefore leading to 'tougher' scones. If you cannot get a good cutter you can cut out squares or wedges etc using a sharp knife if you wish.
Rolling pins – most scone doughs are very soft (and wet) so can be easily patted out using your fingers. For a large amount of dough you can use a rolling pin remember to use light pressure from the centre outwards to form an even thickness of dough ready to be cut into scones. Avoid rolling back and forth over the same area as this can overwork the dough.
The Techniques
Triple sift the dry ingredients – sift your dry ingredients from a height this permits plenty of air to be incorporated into the mixture which allows for maximum lightness in your scones and ensures even distribution of all the raising agents and other ingredients.
Rubbing in the fat – this is the stage where you can control how tender or flaky your final scone crumb will be. The more you coat your fat with flour and the smaller the particles of the final mixture, the more tender the end product because you’re retarding gluten formation in the flour (unfortunately the price you pay for this tenderness is that the final dough will be soft and might not raise very well since the gluten isn't developed enough to form a stable structure to trap the gases that are released when the dough is baked). Conversely the larger you leave the pieces of fat (the infamous "pea-sized" direction you always see in scone/biscuit recipes), the flakier the final scones will be (that is the gluten in this case is more developed but you might find that the final baked product is dry and the mouth feel of crumb could be too firm i.e. tough). So summarising the tenderness/flakiness of your scone is achieved in this stage by manipulating the size of the fat particles and how much of the flour is used to coat the fat (the more flour used to coat the fat promotes more tenderness while larger fat pieces promote more flakiness). Either way quickly rub in the grated frozen fat into the dry ingredients using
1)your finger tips – as you lightly rub and pinch the fat into the flour, lift it up high and let it fall back down into the bowl, this means that air is being incorporated all the time, and air is what makes scones light, continue this until you have the desired sized flour/fat particles in the mixture, or
2)a cold pastry cutter – begin by rocking the pastry cutter into the fat and flour mixture continue rocking until all the fat is coated in flour and the desired sized flour/fat particles are obtained.
Moistening and bringing the dough together - add nearly all of the liquid at once to the rubbed-in dry ingredients. When mixing the dough (I use a soft plastic spatula, my sister uses a knife), stir with some vigour from the bottom to the top and mix just until the dough is well-moistened and begins to just come together it will be wet (and sticky). And remember the old saying – the wetter the dough the lighter the scones (biscuits)!
Handling the dough – as most people know it is important not to overwork the dough but what isn't appreciated is that under-working is almost as common a mistake as overworking. Look at my first attempt (the first photo in this article) at making the challenge recipe it is crumbly and a bit leaden and the crumb isn't flaky at all this is due to under-working the dough and making the flour/fat particles too small, it took me about six batches to understand this and not be afraid to handle the dough so the scone (biscuit) would raise correctly. Under-working causes as many problems as overworking. Overworking leads to tough, dry and heavy scones while under-working leads to crumbly leaden ones. If you are not happy with your baked goods look carefully at your final scones (biscuits) and decide if you have under- or over-worked your dough.
Kneading or folding/turning the dough – this is the stage where you can control whether or not your scone has distinct layers by 1) only kneading the dough (for no layering effect) or 2) only turning and folding the dough (for a layering effect). As mentioned above given the same amounts of flour and fat, leaving larger pieces of fat equals more gluten formation and, therefore, flakiness. Leaving smaller pieces of fat equals less gluten formation and, therefore, tenderness. Your dough at this stage of the recipe will be a mixture of different gluten strengths since it is almost impossible to make a totally homogeneous dough at home. The major idea at this stage of the process is to exploit these gluten differences to achieve a desired degree of lamination (layering) in the final baked good. That is at this stage your dough (after you have added the liquid and mixed it until it just holds together), will have different layers of relatively gluten-rich (tougher) dough (the more floury parts of the dough), and layers of relatively gluten-free (tender-er) dough with small pieces of fat (the more fatty parts of the dough). So at this point if we only lightly knead the dough these layers will become less distinct which means the dough will become more homogeneous so producing a more even and more tender crumb when baked. But if at this stage you only fold and turn the dough (as shown below in pictures) over itself, these different layers will remain intact but will get thinner and thinner with each fold and turn, so when the fat melts and the liquid turns to steam in the oven, this steam pushes the tougher layers apart, leading to an overall flakiness and a layering effect in the scone crumb (see picture of the buttermilk biscuit above). So if you want an even more tender crumb just lightly knead (much like you would knead bread but with a very very light touch) the turned-out dough a few times until it looks smooth. If you want to form layers (laminations) in your final baked goods do a few folds and turns until it looks smooth. Always do at least one light knead to make the final dough structurally strong enough to raise and hold its shape whether you are aiming for a smooth tender crumb or a flaky layered crumb.
Pat or roll out the dough – since most scone (biscuit) doughs are soft (and sticky) it is best to use your fingers to gently pat out the dough once it has been kneaded or folded and turned. Use a very light touch with little pressure while forming the dough rectangle to be cut into rounds for the scones. If you want tall scones then pat out the dough tall, about 3/4 inch to 1 inch (2 cm to 2½ cm) thick is about right.
Cutting out your scones – use a well-floured scone (biscuit) cutter for each round that you stamp out from the dough. That is dip your cleaned cutter into fresh plain flour before each separate cut. Do not twist the cutter while stamping out the scone, push down firmly until you can feel the board then lift the cutter the round should stay inside the cutter then gently remove it from the cutter and place the round onto the baking dish. You can use a sharp knife to cut out other shapes if you wish from the dough, also the knife should be floured before each cut as well.
Baking your scones – always preheat your oven when baking scones. Place each scone almost touching onto the baking dish this encourages the scones to raise and also keeps the sides soft and moist. If you want crisp sides widely space your scones on the baking dish. Don’t over-bake your scones. Over-baking for even a minute or two will dry your scones out. As soon as the sides begin to turn brown and are set, remove them from the oven. Immediately, place the scones on a wire rack—the hot pan will continue to dry the scones.
Extra comments about resting the dough – I found in my researches that a number of respected sources mentioned resting the dough in various stages in the recipe. Surprisingly this advice is sound. I found that if you rested the just mixed dough (in the fridge) for 20 minutes there was a huge improvement in the dough's handling qualities and the final scones height, lightness and crumb were outstanding. Also I found that if you rest your patted out dough covered in plastic for 10 minutes in the fridge that the rounds are easier to stamp out and the final baked goods raise higher and have a better crumb. Also you can rest your stamped out rounds in the fridge for a couple of hours without harm so you can make your scones place them into the fridge and then at your leisure bake them later great for dinner parties etc. This is possible because modern baking powder is double action, i.e. there is another release of gas when you bake the rounds in the heat of the oven.
Troubleshooting
Problems with bitter after-taste or dry chalky mouth-feel
The biggest problem that scone/biscuits can sometimes have is an after-taste (sometimes described as metallic or a salty chemical taste) or the mouthfeel is dry and chalky (i.e. the crumb is tough and doesn't have enough moisture).
If the problem is the after-taste try these tips
- use freshly opened raising agents, many people claim old baking powder has a stronger taste
- look for a single action baking powder (that only uses baking soda and cream of tar tar with a little cornflour) or make your own, since some double action baking powders can have metallic salts in them which some people can taste even in small quantities. Also keep in mind that homemade baking powder works faster and at a lower temperature, so put your recipe together quickly
- look for a double action baking powder that uses non-metallic ingredients in it, check the ingredients listing on the packet.
- use less baking powder
- if you used an acidic liquid (buttermilk etc) and did not use some baking soda with the normal baking powder then some of the acid in the liquid wouldn't have been neutralised so leaving some salts behind causing the salty aftertase, that is make sure you are using the correct combination of agents for the liquids that you use, see the link below for full details about this.
- use only baking soda and an acidic liquid (buttermilk) like in the famous Irish Soda bread which very few people complain about having an aftertaste
- use bakers' ammonium (available from King Arthur's flour) it was one of the most common chemical raising agents in the old days before modern baking powder, it smells like ammonia when baking but the ammonia smell totally dissipates and this chemical leaves nothing behind. I use it a lot in my baking it really gives baked goods that old-fashioned taste that people really can pick up on also it gives cookies extra crispness when baked.
See here for a comprehensive posting on baking powder/baking soda and how to use them in recipes.
See here for the most interesting discussion on the use of baking soda and baking powder
If the problem is the mouthfeel try these tips
- try smaller sized scones and bake them quickly in a very hot oven and make the dough wetter since large sized scones using a drier dough baked in a moderate oven will give you a dryer crumb therefore a dry chalky mouthfeel
- over-handled dough will lead to a dry mouth
- eat them immediately fresh out of the oven, scones do really suffer (they become dry and tough) when stored for any length of time
- try using more fat about 1/4 cup+ per cup of flour - more fat gives moister crumb. Also try using all shortening, since shortening contains no water or milk solids it gives a very tender crumb.
- use this great recipe they are called "a touch of grace" biscuits they are the most tender and moist biscuits (scones) that I have had.
- some people claim that a very hot oven is best to start the baking process then lower the temperature to moderate to finish baking the scones
The problem lopsided scones
About lop-sided scones this is usually caused by uneven cutting out of the scone. Some hints
1. Clean and flour the scone cutter (by rubbing off any wet dough and then dipping the cutter into fresh flour the entire height of the cutter) every time you stamp out each round. Remember not to twist when you are stamping out the scones. If you are using a knife remember to clean and flour it for each cut.
2. Try to pat out or roll out the dough as evenly as possible.
3. Did you sift the dry ingredients three times? (uneven distribution of ingredients can lead to uneven scones).
4. Try to get the scone out of the cutter by applying gentle even pressure on the entire scone circumference that way you do not compress just one place so making that area less tender so raising less when cooked.
5. Turn the cut scone upside down onto the baking dish, since this side will be flatter than the patted out top surface.
6. Only glaze the tops of the scone, a small amount of liquid on the sides will inhibit raise in that area.
7. Some people like to use a fork and prick some holes in the top of the unbaked scones supposedly this helps the scone raise evenly.
8. Also some people like to use their thumb and press a small hollow into the top of the scone supposedly this helps the scone raise evenly.
9. A good article about "making the perfect scone" see here it goes through a lot of the best scone recipes by master bakers.
10. Try this recipe and its method from Bakers' 911 which seems to make straight-sided scones even from wavy-sided cutters
How to test baking soda
1. Place a 1/4 teaspoon of baking soda into a tablespoon of vinegar it should bubble a lot.
How to test your single action baking powder
1. Place a teaspoon of baking powder into a cup, add 1/4 cup room temperature water it should bubble a lot.
How to test your double action baking powder
1. Place a teaspoon of baking powder into a cup, add 1/4 cup room temperature water it should bubble a lot.
2. Wait 30 secs and then place your cup into the microwave heat for about 30 secs until about 180F it should bubble again.
3. If it doesn't then discard and buy a new jar.
How to test your self-raising flour - add one tablespoon of S.R. flour into some hot water it should bubble a bit. Or try adding some vinegar and see if it bubbles. Usually SR flour is only good for about three months.
The problem an unreliable oven
1. Try and use heavy grade dark metal baking dishes which give the best heat distribution.
2. If your oven heating cycle is unreliable (varies the temperature a lot) lower the temperature to hot 220C (430F), preheat the oven along with a heavy metal baking dish for a good 20 mins then bake the scones on the baking dish which acts as a heat sink helping to bake the scones more evenly. Try to bake smaller sized scones which helps with a constantly varying temperature.
3. If your oven has hot spots which mine does just rotate the dish at about 3/4 of the total baking time.
The problem my dairy-free margarine doesn't do a good job of cutting in
1. Just melt the margarine and add it to the liquid and proceed as normal (this is the best you can do if the margarine is "bad for cutting-in or just bad for scones" in the first place).
Mandatory Items: You must make one batch of basic scones (i.e. basic biscuits using the North American name). The challenge recipe has been designed to be fast, very cheap and easy to follow so allowing for multiple attempts to be made until you can achieve your desired result. I encourage you to make a couple of batches to see how small changes in technique can obtain vastly different final baked products. I estimate all of my 16 experimental batches cost less than $4 and took about four hours, so please do take this opportunity to explore the possibilities of the different techniques and advice that have been presented here in this challenge. I have included a number of links to the most popular scone (biscuit) recipes (and variations) in a number of countries feel free to use these if you can make a good basic scone (biscuit) already.
Variations allowed: A number of variations (cheese and chives, herb, etc) on the basic challenge recipe are included use them if you wish.
Preparation time: Scones: Preparation time less than 10 minutes. Baking time about 10 minutes.
Equipment required:
Large mixing bowl
Baking dish
Measuring cups and spoons (optional)
Flour Sifter (optional)
Board (optional)
Scone (biscuit) cutter (optional) or knife (optional)
Dough scraper (optional)
Spatula (optional)
Weighing scale (optional)
Cooling rack (optional)
Pastry brush (optional)
Basic Scones (a.k.a. Basic Biscuits)
Servings: about eight 2-inch (5 cm) scones or five 3-inch (7½ cm) scones
Recipe can be doubled
Ingredients:
1 cup (240 ml) (140 gm/5 oz) plain (all-purpose) flour
2 teaspoons (10 ml) (10 gm) (⅓ oz) fresh baking powder
¼ teaspoon (1¼ ml) (1½ gm) salt
2 tablespoons (30 gm/1 oz) frozen grated butter (or a combination of lard and butter)
approximately ½ cup (120 ml) cold milk
optional 1 tablespoon milk, for glazing the tops of the scones
Directions:
1. Preheat oven to very hot 475°F/240°C/gas mark 9.
2. Triple sift the dry ingredients into a large bowl. (If your room temperature is very hot refrigerate the sifted ingredients until cold.)
3. Rub the frozen grated butter (or combination of fats) into the dry ingredients until it resembles very coarse bread crumbs with some pea-sized pieces if you want flaky scones or until it resembles coarse beach sand if you want tender scones.
4. Add nearly all of the liquid at once into the rubbed-in flour/fat mixture and mix until it just forms a sticky dough (add the remaining liquid if needed). The wetter the dough the lighter the scones (biscuits) will be!
5. Turn the dough out onto a lightly floured board, lightly flour the top of the dough. To achieve an even homogeneous crumb to your scones knead very gently about 4 or 5 times (do not press too firmly) the dough until it is smooth. To achieve a layered effect in your scones knead very gently once (do not press too firmly) then fold and turn the kneaded dough about 3 or 4 times until the dough has formed a smooth texture. (Use a floured plastic scraper to help you knead and/or fold and turn the dough if you wish.)
6. Pat or roll out the dough into a 6 inch by 4 inch rectangle by about ¾ inch thick (15¼ cm by 10 cm by 2 cm thick). Using a well-floured 2-inch (5 cm) scone cutter (biscuit cutter), stamp out without twisting six 2-inch (5 cm) rounds, gently reform the scraps into another ¾ inch (2 cm) layer and cut two more scones (these two scones will not raise as well as the others since the extra handling will slightly toughen the dough). Or use a well-floured sharp knife to form squares or wedges as you desire.
7. Place the rounds just touching on a baking dish if you wish to have soft-sided scones or place the rounds spaced widely apart on the baking dish if you wish to have crisp-sided scones. Glaze the tops with milk if you want a golden colour on your scones or lightly flour if you want a more traditional look to your scones.
8. Bake in the preheated very hot oven for about 10 minutes (check at 8 minutes since home ovens at these high temperatures are very unreliable) until the scones are well risen and are lightly coloured on the tops. The scones are ready when the sides are set.
9. Immediately place onto cooling rack to stop the cooking process, serve while still warm.
Variations on the Basic recipe
Buttermilk – follow the Basic recipe above but replace the milk with buttermilk, add ¼ teaspoon of baking soda, increase the fat to 4 tablespoons, in Step 3 aim of pea-sized pieces of fat coated in flour, in Step 5 fold and turn the dough, rounds are just touching in the baking dish, glaze with buttermilk.
Australian Scone Ring (Damper Ring) – follow the Basic recipe above but decrease the fat to 1 tablespoon, in Step 3 aim of fine beach sand sized pieces of fat coated in flour, in Step 5 knead the dough, in Step 7 form seven rounds into a ring shape with the eighth round as the centre, glaze with milk.
Cream – follow the Basic recipe above but replace the milk with cream, add ¼ teaspoon of baking soda, in Step 3 aim of beach sand sized pieces of fat coated in flour, in Step 5 knead the dough, rounds are just touching in the baking dish, glaze with cream.
Cheese and Chive – follow the Basic recipe above but add ¼ teaspoon of baking soda, after Step 2 add ½ teaspoon sifted mustard powder, ¼ teaspoon sifted cayenne pepper (optional), ½ cup (60 gm/2 oz) grated cheese and 2 tablespoons finely chopped chives into the sifted ingredients, in Step 3 aim of beach sand sized pieces of fat coated in flour, in Step 5 knead the dough, rounds are widely spaced in the baking dish, sprinkle the rounds with cracked pepper.
Fresh Herb – follow the Basic recipe above but after Step 3 add 3 tablespoons finely chopped herbs (such as parsley, dill, chives etc).
Sweet Fruit – follow the Basic recipe above but after Step 3 add ¼ cup (45 gm) dried fruit (e.g. sultanas, raisins, currents, cranberries, cherries etc) and 1 tablespoon (15 gm) sugar.
Wholemeal – follow the Basic recipe above but replace half of the plain flour with wholemeal flour.
Wholemeal and date – follow the Basic recipe above but replace half of the plain flour with wholemeal flour and after Step 3 add ¼ cup (45 gm) chopped dates and 1 tablespoon (15 gm) sugar.
Pictorial guide to the challenge recipe
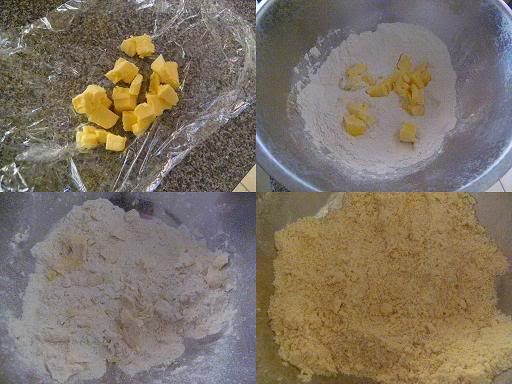
I was at my brother's house and we had a hankering for a baked treat so I decided to make the challenge recipe also I needed some photos of the challenge recipe being made for this posting. My brother isn't a cook, all he had to hand as equipment was concerned was a mixing bowl,a thin walled 20 cm (8 inch) cake tin and a knife, he didn't even have a cup measure only mugs so I improvised.
As you can see in the collage below I roughly chopped some butter (I eye-balled about 2 tablespoons) and froze it. Then I throw the frozen cubed butter onto one mug of cold self-raising flour I couldn't sift the flour since my brother doesn't own a sifter. Then I proceeded to rub in the butter with my fingers until I got pea-sized fat pieces coated in flour.
I added the liquid (½ mug of cold lite-milk) to the rubbed-in fat/flour mixture until I got a sticky dough I turned this out onto a floured board, I lightly floured the top of the sticky dough then I kneaded it once then I patted it out into a rectangular shape then I proceeded to fold and turn the dough. Notice that you fold 1/3 of the dough over itself then the other 1/3 over that and turn it 90° degrees. Notice the lines on the broad this will help you understand how to do the folding and the turning.

I did a couple more folds and turns and used a well-floured knife to cut out squares of prepared dough.

Here is a close-up of the finish patted-out dough notice how you can see the fat particles in the dough this is what causes flakiness in the final baked scone.

I used the inverted cake tin as my baking dish and baked the scones in a very hot oven for 10 minutes they worked out really well I thought. Notice the nice central lamination in the scone and the great crumb and how well they rose in height.
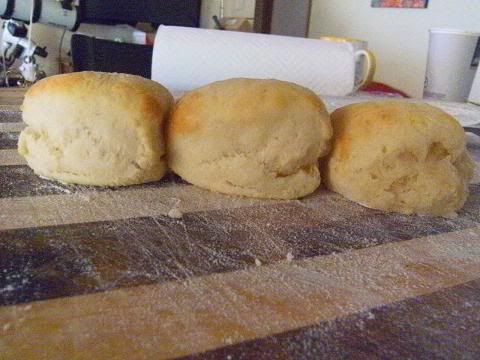
I placed two unbaked scones in the fridge to test whether resting them for 20 minutes helped improve the raise of the final baked product. As you can see the left scone and the middle scone are taller than the right scone which was baked immediately after it was cut out from the dough. So don't worry if you cannot bake the scones straight away they do better with a little resting time.
Videos of my sister making scones (baking powder biscuits) – using a very popular Australian recipe
(http://www.taste.com.au/recipes/8163/basic+scones)
Part 1 – my sister making the scones (baking powder biscuits)
(http://www.youtube.com/watch?v=ZF9YJiHZ1K0)
Part 2 – my sister showing off her scones (baking powder biscuits)
http://www.youtube.com/watch?v=GorStLKSoMo)
Pictures of my sister's scones
Storage & Freezing Instructions/Tips:
Scones are best eaten warm. Scones (biscuits) are really easy to store – bag the cooked and cooled scones and freeze until needed then reheat in a moderate hot for a few minutes.
Additional Information:
Australia’s most popular scone recipe uses lemon-flavoured soda pop and cream as the liquid
(http://figjamandlimecordial.com/2010/08/08/lemonade-scones/)
A great English scone recipe this uses more sugar and fat and has an egg
(http://www.instructables.com/id/Perfect-English-Scones/)
Classic Southern Buttermilk Biscuits recipe by Alton Brown
(http://www.foodnetwork.com/recipes/alton-brown/southern-biscuits-recipe/index.html)
An index of North American recipes
(http://allrecipes.com/Recipes/Bread/Biscuits-and-Scones/Biscuits/Top.aspx)
Another index of North American recipes
(http://www.breadexperience.com/biscuit-recipes.html)
Three great Australian recipes
(http://www.smh.com.au/lifestyle/homestyle/blogs/tried-and-tasted/how-to-bake-the-perfect-scone-20110504-1e7xn.html)
An index of Irish recipes
(http://www.littleshamrocks.com/Irish-Bread-Scone-Recipes.html)
An interesting discussion on “what makes a scone a scone”
(http://chowhound.chow.com/topics/810928)
Videos of Alton Brown making biscuits (scones) with his granny (super cute to watch)
Episode one ( http://www.youtube.com/watch?v=d3QuQSdjMVE)
Episode two (http://www.youtube.com/watch?v=Qcz4JQUwY9Q)
Links to advice about chemical raising agents
http://www.seriouseats.com/2010/06/what-is-the-difference-between-baking-powder-and-baking-soda-in-pancakes.html
http://www.kingarthurflour.com/tips/quick-bread-primer.html
Disclaimer:
The Daring Kitchen and its members in no way suggest we are medical professionals and therefore are NOT responsible for any error in reporting of “alternate baking/cooking”. If you have issues with digesting gluten, then it is YOUR responsibility to research the ingredient before using it. If you have allergies, it is YOUR responsibility to make sure any ingredient in a recipe will not adversely affect you. If you are lactose intolerant, it is YOUR responsibility to make sure any ingredient in a recipe will not adversely affect you. If you are vegetarian or vegan, it is YOUR responsibility to make sure any ingredient in a recipe will not adversely affect you. The responsibility is YOURS regardless of what health issue you’re dealing with. Please consult your physician with any questions before using an ingredient you are not familiar with. Thank you! :)[/quote]