Blog-checking lines: The Daring Bakers’ February 2012 host was – Lis! Lis stepped in last minute and challenged us to create a quick bread we could call our own. She supplied us with a base recipe and shared some recipes she loves from various websites and encouraged us to build upon them and create new flavor profiles.
Posting Date: February 27, 2012
Recipe Source: The basic quick bread recipe is from Sara Schewe. The prune bread recipe was my Aunty Ann’s recipe. The Meyer Lemon Loaf and Green Onion, Cheddar & Asiago Beer Batter Bread were adapted from Recipe Girl (http://www.recipegirl.com/2008/08/13/meyer-lemon-loaf/ & http://www.recipegirl.com/2007/05/30/cheddar-chive-beer-bread/ ). The Pumpkin Bread with Maple Cream Cheese Filling was adapted from Dana Ramsey’s recipe located on Just a Pinch Recipe Club.
Basic Quick Bread
Makes one 9” x 5” (23×13 cm) loaf
Recipe from Sara Schewe
Ingredients
2 cups (480 ml) (250 gm/9 oz) all-purpose (plain) flour
1 cup (240 ml) (225 gm/8 oz) granulated sugar
1 teaspoon (5 ml) (5 gm) baking soda
1/2 teaspoon (2½ ml) (3 gm) fine sea salt or table salt
1 cup (240 ml) buttermilk or soured milk*
1 large egg
1/4 cup (60 ml) mild- or non-flavored oil, like canola
1 teaspoon (5 ml) flavored extract, such as vanilla or almond
for the glaze
1/3 cup (80 ml) (35 gm/1-1/3 oz) confectioners’ (icing) sugar
1-2 teaspoons (5-10 ml) milk
Directions:
- Preheat oven to moderate 350ºF/180ºC/gas mark 4. Grease a 9×5 inch (23×13 centimeter) loaf pan with butter and line with parchment paper cut to fit the length and width of the pan, with enough overhang to allow easy removal after baking. Grease the top sheet of parchment.
- In large bowl, whisk flour, sugar, baking soda and salt to combine. Make a well in the center and set aside.
- Lightly whisk (butter)milk, egg, oil, and extract to combine. Pour into well and stir until just mixed into a batter. The batter will be lumpy and may still show a few streaks of flour.
- Pour batter into prepared pan. Bake for 40-50 minutes, or until a cake tester comes out clean. Cool in pan on wire rack for 10 minutes, then remove from pan and cool completely before slicing. Drizzle with glaze, if desired.
- For the glaze: Slowly whisk confectioners’ (icing) sugar and half of the milk, adding more milk as needed to thin the glaze to the desired consistency.
Note: To make soured milk, combine 1 cup milk (240 ml) with 1 tablespoon (15 ml) vinegar or lemon juice and let sit for 10 minutes.
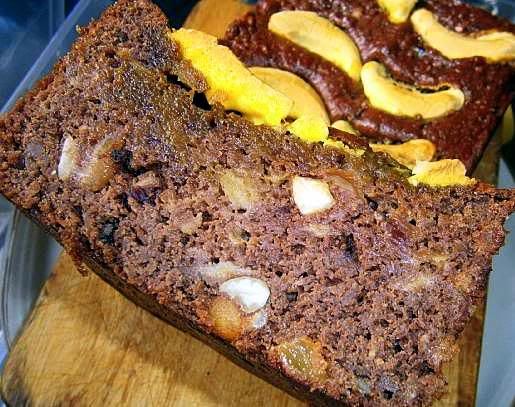
Roasted banana and coconut cream bread
I make banana bread at least once a week (an oversupply of bananas and it's super easy and quick to make and most of my friends and family love it) so I have developed a good feel for making it any way I want, below are some general guidelines on how to manipulate the ingredients and what techniques to use to obtain the banana loaf you want.
For this challenge I made a brunt butter, brown sugar, coconut cream, roasted banana loaf. I roasted 4 bananas until they were like syrup I combined this with brunt (actually well browned) butter, brown sugar I used coconut cream for the liquid soured with some lime juice. I wanted a dense moist bread-like loaf, so I used the two bowl method to make the quick bread.
This is the set of general guidelines to get the texture, mouth feel and moisture levels I want for the final loaf
Firstly about the texture of the interior (or crumb)
1. the creaming method (i.e. use an electric mixer to beat the butter and sugar until pale and fluffy about 5 minutes then beat in the eggs and then fold in the dry ingredients) produces a light well-aerated loaf with a cake-like crumb
2. the two bowl method (sift the dry ingredients in one bowl and combine the wet ingredients in another bowl then mix (usually) the dry into the wet) produces a “heavier and denser” loaf with a bread-like crumb
Secondly about the mouth feel, for most quick mix recipes as a general rule – less butter and sugar in a recipe makes it more bread-like, while more butter and sugar produces something closer to cake. So it is best to use the two bowl method when doing low-fat versions and the creaming method for high fat versions
1. Low fat version use the lowest amounts of sugar, butter (you can use apple sauce instead) and lite sour cream (no eggs), stir the sugar and butter together until well mixed but still grainy add the other wet ingredients, sift the dry ingredients in another bowl, combine gently.
2. Medium fat version use the middle amount of sugar, butter, sour cream and one egg
3. Extreme fat version use the highest amount of sugar, butter and use 2 eggs (no sour cream), cream the sugar and butter until pale and fluffy, add eggs one at time beating well until incorporated add all the other wet ingredients mix well, add the sifted dry ingredients, combine gently.
Thirdly the ratio of dry to wet gives different levels of moistness versus denseness
1. Equal ratio batter: This batter has a dry:liquid ratio of 1:1. Which gives a very moist and dense loaf.
2. Bread ratio batter: This batter has a dry:liquid ratio of 3:1. Which gives a moist but fluffy loaf. (This is the same ratio of flour:water as in normal bread)
3. Stiff ratio batter: This “batter” has a dry:liquid ratio of 7:1 This batter will result in a very light and fluffy baked good.
Here a great link to a video of a chef making banana bread well worth watching http://foodwishes.blogspot.com/2012/01/banana-bread-thats-okay-to-make-early.html
Ratios for banana bread (based on one cup of flour)
1 cup flour (any sort or combination of flours is fine) (½ cake flour & ½ whole wheat is great)
1½ teaspoons baking powder
½ teaspoon baking soda
2 large bananas
optional 1 tablespoon kecap manis (Indonesian sweet soya sauce) this really adds a wonderful depth of flavour & colour to the banana mash (if using do not add extra salt to the recipe)
¼ teaspoon of salt
1/4 – 1/2 cup of sugar (for extreme flavour can use 1 cup sugar per cup of flour)
2 – 4 tablespoons butter (or oil) (for extreme flavour can use ½ cup butter per cup of flour)
1/4 – 1/2 cup sour cream (any sort full-fat or lite is fine) (for extreme moisture use 1 cup sour cream per cup of flour) (you can use buttermilk, coconut cream, almond milk, yoghurt etc if you want)
1 large egg, lightly beaten (or use 2 eggs and don't use any sour cream) (you can use another 4 tablespoons of sour cream if you do not want to use eggs in the recipe)
½ teaspoon vanilla extract
1 teaspoon cinnamon, ground
optional ½ teaspoon instant coffee
optional ¼ teaspoon cayenne pepper (really adds a lovely intensity to the banana and kecap manis mash)
optional 1/8 teaspoon cloves, ground
optional 10-12 banana sweets (lollies) for decoration
Additions (add an extra ½ teaspoon of baking powder per addition to the recipe above if using)
½ cup chopped nuts (or chopped soaked dried fruit)
½ cup chopped chocolate chips
¼ cup cocoa powder, (not Dutch-processed) sifted
¼ cup bran (or crushed bran cereal or wheat germ flakes)
¼ cup coconut, desiccated or flakes (not sweetened)
¼ cup maraschino cherries, chopped
Method
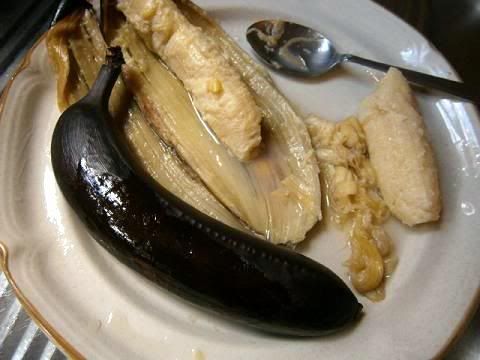
1. Roast the bananas in their skins in a preheated moderate 350°F/180°C/gas mark 4 oven for 15-20 minutes until black. Carefully remove banana flesh from the skins then mash well with any liquid released from the banana. Add the kecap manis and/or cayenne pepper if using mix until well combined. Cool and reserve.
2. If you are using browned butter gently heat the butter in a saucepan until it browns to desired colour. The darker the colour the deeper the flavour. Set aside until firm.
3. In one bowl sift the flour, baking powder, baking soda and cinnamon (and if using the salt, cocoa powder, ground cloves or instant coffee).
4. In another bowl using a wooden spoon or a plastic spatula lightly cream the sugar and butter together (about 1 minute) this will produce a bread-like loaf (if you use a mixer to cream [about 5 minutes] the sugar and butter until pale and fluffy the final loaf will be light textured and the crumb very cake-like), add the egg(s) one at time beating each time until well incorporated add the roasted banana mash, sour cream, vanilla extract and any additions. Mix until well combined.
5. Add the dry ingredients to the wet ingredients mix until just combined there should be lumps and a few wisps of flour in the batter. (If you have used the creaming method then fold in the dry ingredients until just combined.)
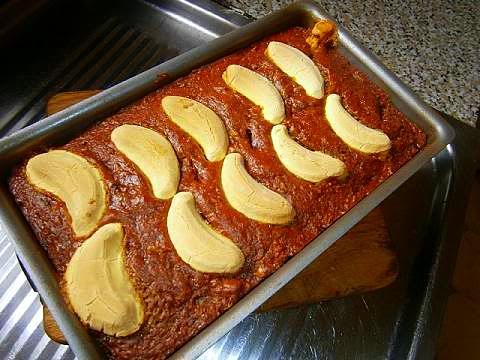
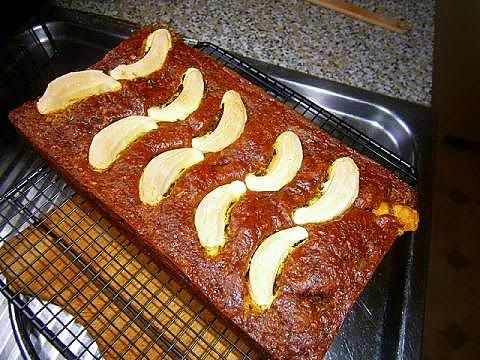
6. Spoon the batter into a greased large loaf [23cmx13cmx7cm (2litre)/9”x5”x3”(4.5 pints)] pan, carefully level the top. (The loaf pan should be a little under 3/4 full, it will rise to the top of the pan when baked). Decorate with banana sweets if desired.
7. Bake in a preheated moderate oven 325°F/160°C/gas mark 3 for 60-70 minutes or until a skewer comes out clean. (Check at 50 minutes). Muffins take about 20-30 minutes (check at 15 minutes).
8. Leave in pan until warm (about 15 minutes) remove to wire rack cool to room temperature, cover in foil then plastic, refrigerate overnight.
9. This banana bread improves with age. The bread will store on the counter for three days if well covered and about ten days in the fridge.
The roasted banana (the skin goes black when baked)
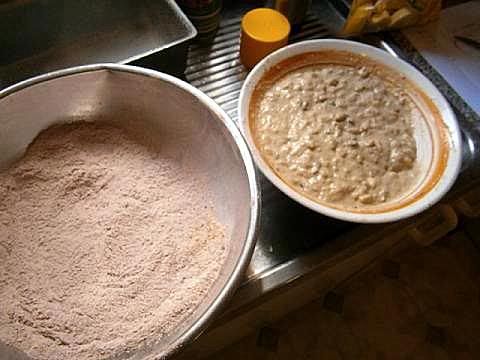
The mixed wet ingredients and the sifted dry ingredients
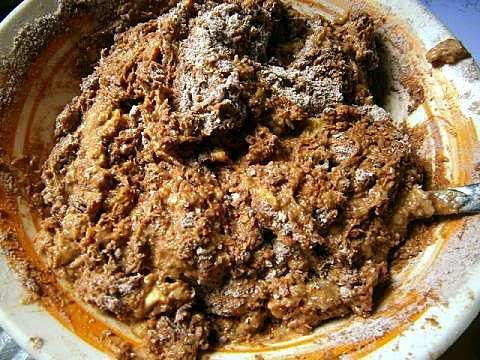
The mixed batter notice the lumps and the wisps of flour in it, the flour will be fully incorporated when the batter is spooned into the baking pan
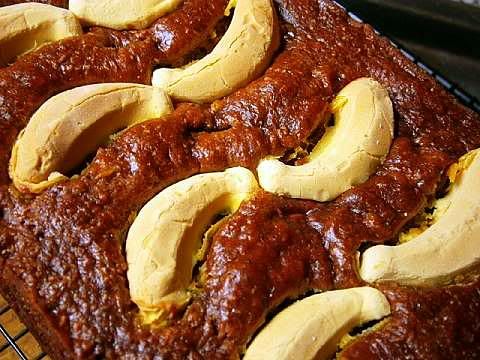
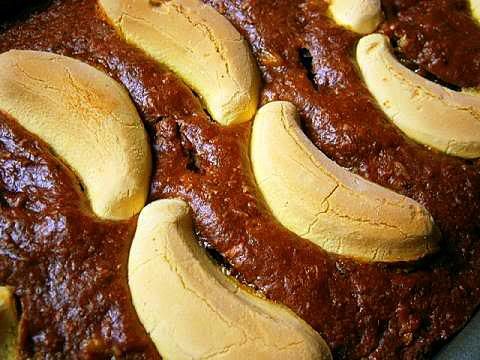
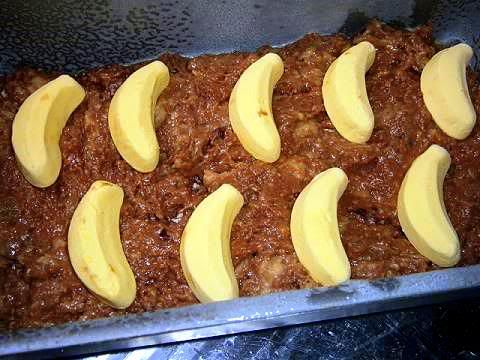
Unbaked loaf decorated with banana sweets (lollies)
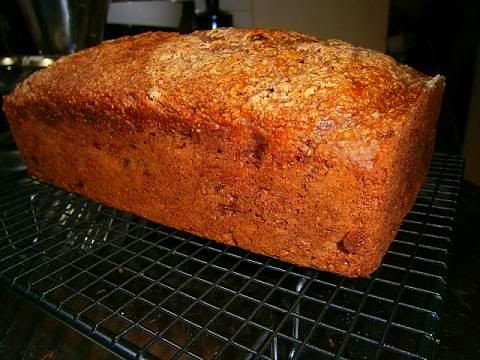
The finished loaf after one hour of baking
If you are a follower of the “ratio” cookbook the ratio by weight for baking quick bread is 2 parts flour: 2 parts liquid: 1 part egg: 1 part fat. To fill a 9” x 5” (23cm x 13cm) loaf pan, you will need 240 grams of flour, 240 grams of liquid of any kind, 120 grams egg (2 of them) or egg substitute & 120 grams of fats. This ratio also works for making muffins. By volume you will need 1¾ cup flour, 1 cup liquid, 2 eggs, ½ cup fat (plus 2 teaspoons baking powder and about 1/2 cup of sugar plus additions).
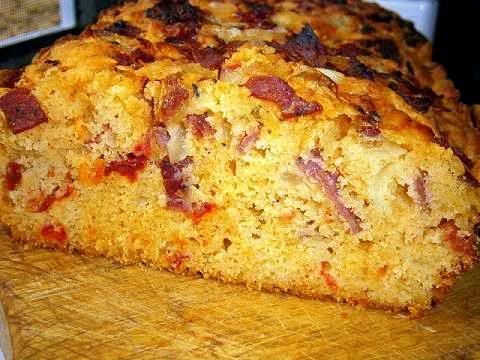
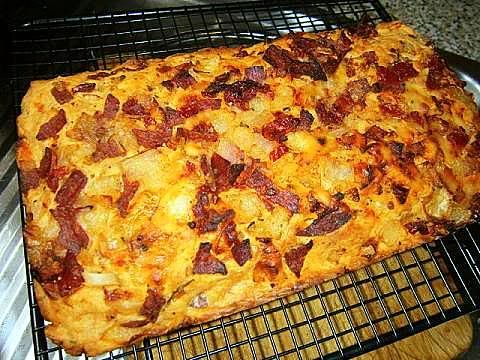
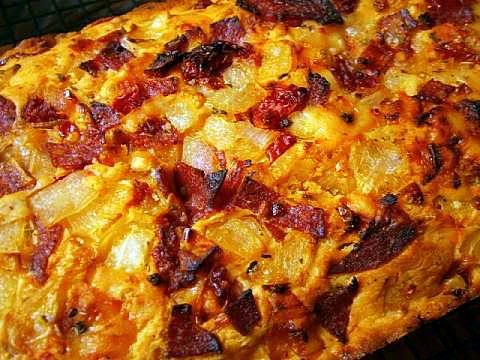
Quick Italian pizza loaf
Italian herb, sun-dried tomato, spicy sausage and blue cheese quick bread
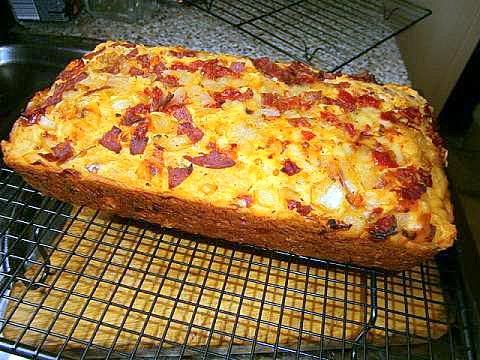
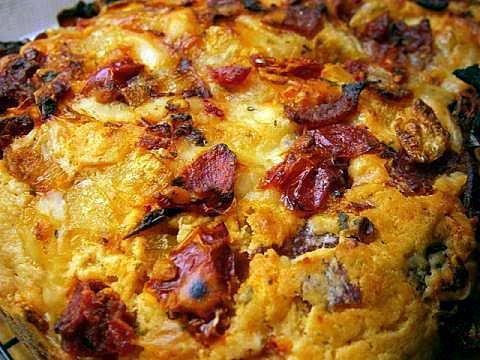
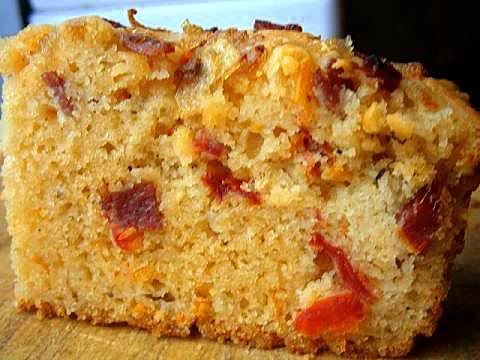
I needed a really strongly flavoured quick bread, I followed the basic savoury recipe, 2 cups soft self-raising "OO" flour and 1/2 teaspoon baking soda with these additions 1/4 cup chopped sun-dried tomatoes (with 2 tablespoons of the oil in the jar), 2 tablespoons dried Italian herbs, 1/4 cup crumbled blue cheese, 3/4 cup sour cream, 1 egg, one small chopped onion fried with one chopped spicy sausage and 1/4 cup high quality olive oil, I used 3 tablespoons of the fried onion and spicy sausage as a topping. When I was mixing the batter I could see the dough expanding, I spooned it into the loaf pan and baked it at moderate 325F/165C/gas mark 3 for 40 minutes. The aroma from the loaf was so good it smelt like a pizza baking. I was really pleased with the look of the loaf. The cut loaf was so yummy it had a thin crisp crust with a soft tender crumb choke full of flavour!
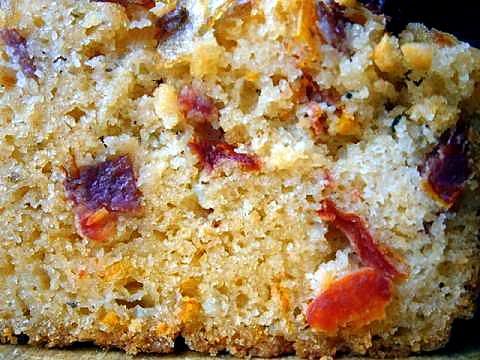
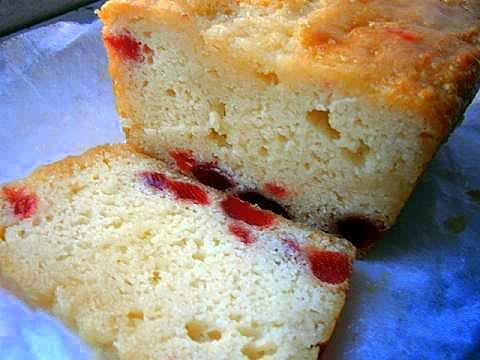
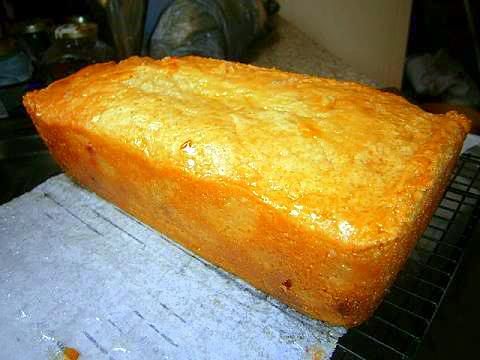
Cherry Almond Semolina Syrup Cake
My favourite flavour profile for quick bread is cherry and almond, I used 1 cup almond meal, 1 cup of very fine semolina (soaked in some almond milk), 4 tablespoons gluten flour, 1 cup chopped cherries, 2 eggs, 1/4 cup vanilla sugar, 4 tablespoons rice bran oil, 1 cup sour cream, 2 teaspoons of natural almond extract, 1 teaspoon of cherry extract. I used 1 cup of sugar syrup to soak the cake after it was baked. This cake took almost two hours to bake at the recommend temperature! It is best to refrigerate the bread for a day before serving. The crust was thin, crisp and sweet while the crumb was soft tender and very tasty one of my better examples of my favourite cake. It is such a pretty cake and the tasty is luscious.
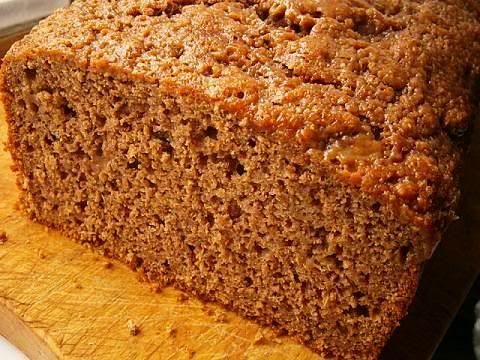
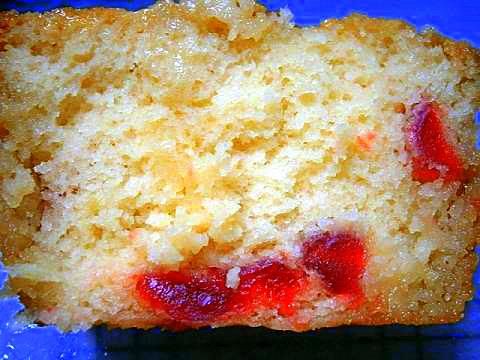
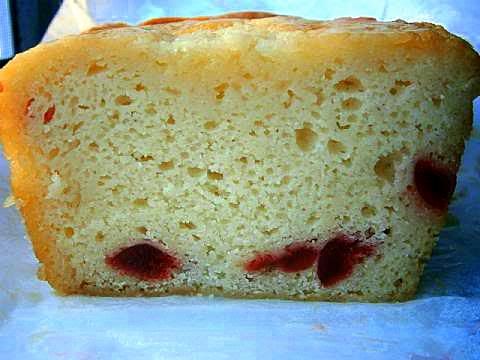
I made this loaf a couple of days ago, I wanted to share how the crumb improves with some aging. After storing in the fridge cover in foil and plastic the loaf cuts cleanly and the density of the crumb is firm, so much better after a rest.
Freshly sliced
Two days later rested in the fridge
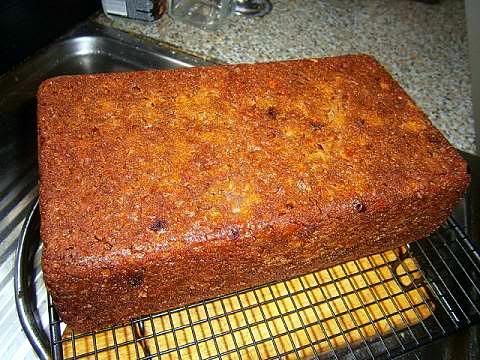
Black cardamom bread

I thought that I would make a flavour profile that was based on spices, I dug around my spice box and came up with this spice mix
1 tablespoon black cardamom
1/2 star anise
2 cloves
1/4 teaspoon cinnamon
1/4 teaspoon nutmeg
1/4 teaspoon allspice
1/8 teaspoon ginger
I used 1 cup of roasted parsnips and 1/2 cup of pureed prunes as the moisture content of the loaf. A really tasty and unusual flavour combination.
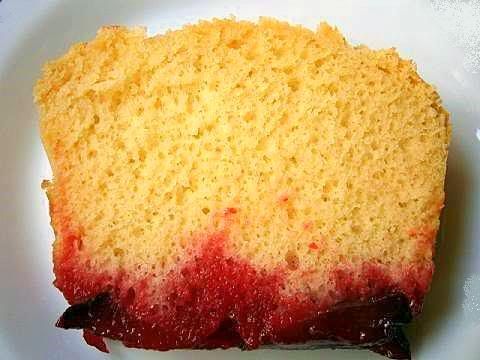
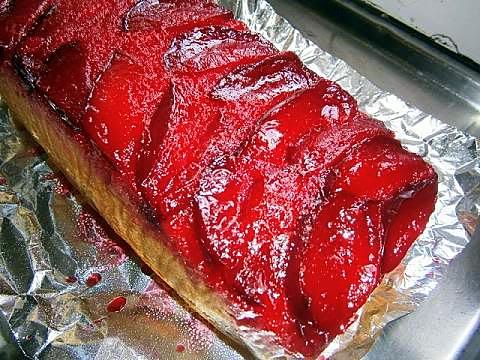
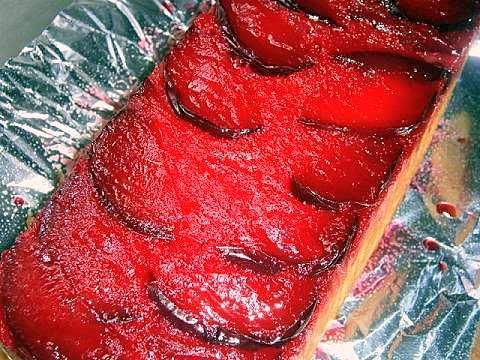
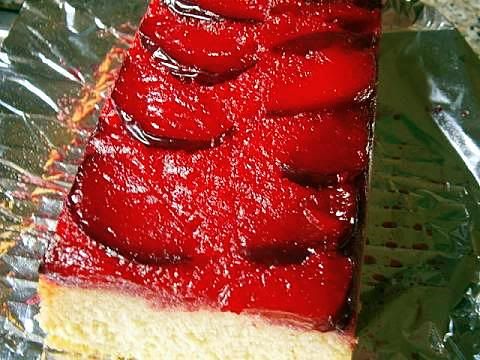
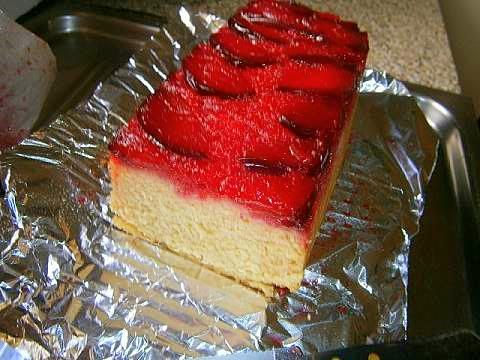
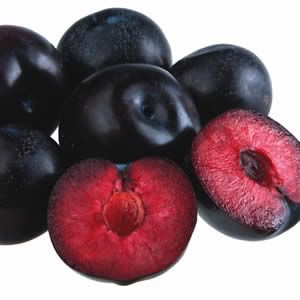
Upside down blood plum loaf
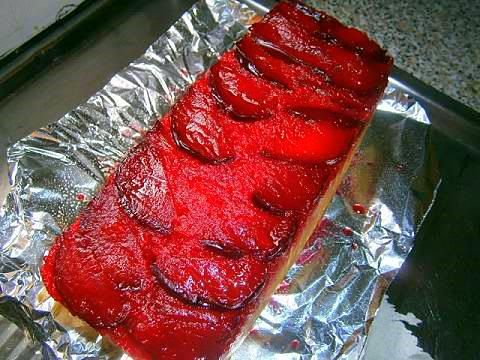
The local gourmet fruit and veggie shop had cute little blood plums on special ($2/kg about $1/lb) so I thought I would make an upside down loaf with them. I sliced up four plums and laid them out decoratively on the base of a parchment paper lined loaf tin, then I made some boozy plum sugar syrup (¼ cup white sugar, 2 tablespoons plum brandy and 2 tablespoons blood plum juice simmered until thick and glossy) and poured that over the sliced plums then I made up the quick bread batter; the dry ingredients were 2 cups of soft “OO” flour sifted with 2 teaspoons of baking powder, ½ teaspoon baking soda and ½ teaspoon salt, the wet ingredients were ¾ cup lite sour cream, 2 eggs, 2 tablespoons non-flavoured oil. ½ cup vanilla sugar and 2 tablespoons of plum brandy. I used the two bowl method to combine the wet into the dry. I baked the loaf for 60 minutes at moderate 325ºF/165°C/gas mark 3. Then I cooled the loaf in the pan then I un-moulded the loaf. I was very very happy with the look of the topping it was so neon bright with a lovely red transparency. The loaf was superbly flavoursome the brandy taste was mellow and combined well with the blood plum flavour overall a nice looking treat for the afternoon and not much harder than the normal quick bread recipe (i.e. without the fruit topping).
A picture of blood plums (photo from the internet I forgot to take one)
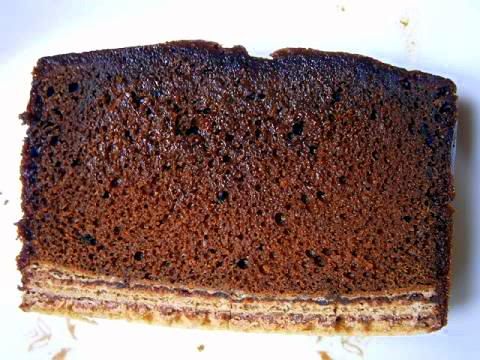
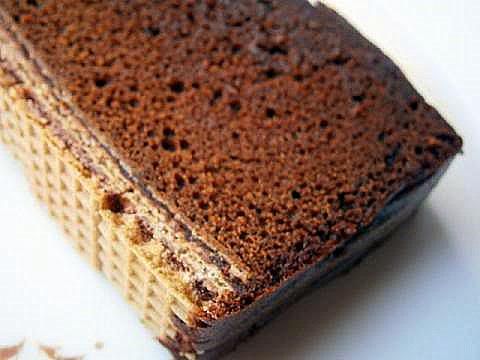
Maximum Intensity Chocolate Quick Bread

You can intensify the flavour of chocolate in a recipe by using a combination of techniques. The easiest is to use a combination of melted unsweetened (not dark) chocolate and cocoa powder which has a much stronger chocolate flavour than each individual ingredient tasted separately. Using espresso coffee or vanilla or chilli or kecap manis (used separately or in combination) greatly enhances the taste of the flavour compounds found in chocolate. Also steeping the cocoa powder in boiling water intensifies the taste of chocolate.
To obtain the intense chocolate flavour of this quick bread I combined
1. melted semi-dark chocolate mixed with vanilla sugar, 2 tablespoons of kecap manis (sweet Indonesian soy sauce) and 1/4 teaspoon of chilli powder and
2. cocoa powder which was steeped in 1/4 cup boiling hot espresso coffee and I used
3. chocolate wafers to form an "upside down layer" (so when the bread is turned out the wafer layer becomes the base).
I used the creaming method to make the bread.
You can tell you have a strong chocolate taste when there is a "reddish" hue to the chocolate colour in the cake which shows that the flavour compounds have been fully extracted from the cocoa.
I really like the simple elegant look of this treat.
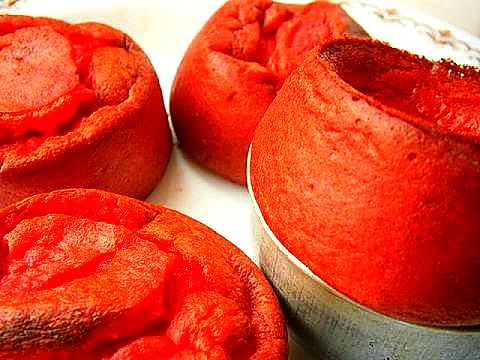
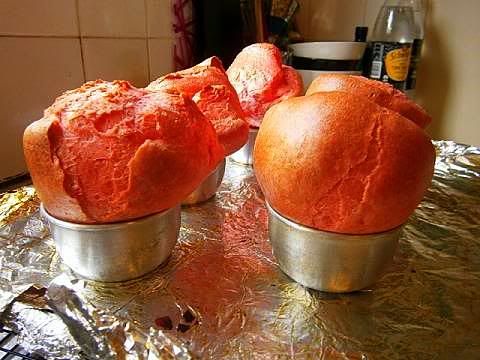
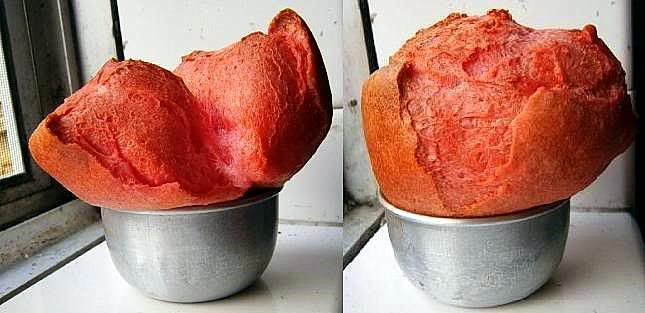
Cherry coconut cream popovers
I thought I would do flavoured popovers as an experiment, I used the recipe that Renata linked to and substituted the cow's milk with coconut cream and used some home-made sour cherry extract also I accidentally used my 5% cake flour which I don't think was the correct choice for this recipe. They smelt wonderful while baking. I think I will have to do them again since the coconut cream made the batter too heavy for the popovers to rise correctly. Even if they sunk once out of the oven they tasted delicious. I think I will use coconut milk for my next batch and see if that will correct the heaviness of the batter.

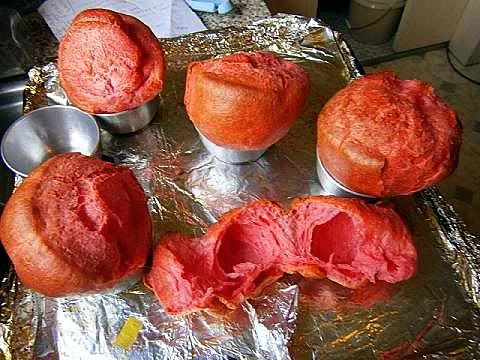
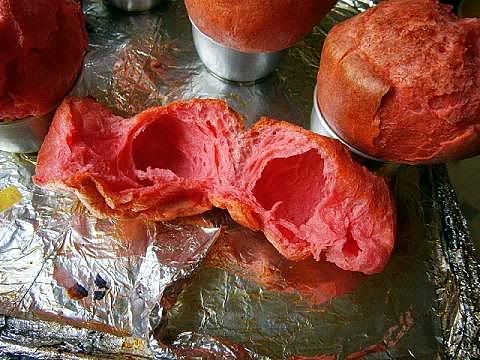
Cherry coconut milk popovers
I made another batch of popovers using coconut milk and less cherry extract they worked out beautifully they rose about three times in height and had one large central hole in the popover perfect for filling with some lovely flavoursome morsel. See this recipe but replace the milk with coconut milk and 1 tablespoon of cherry extract. Also I baked them in a preheated very hot oven 450F for 15 mins and then 400F for 20 mins. I used 1/2 cup aluminium baking pans filled about 3/4 with the rested (30 mins) batter.
Popovers
1 cup plain (AP)flour (bread flour is best, I used AP flour for the recipe)
1 cup milk or coconut milk, room temperature
2 large eggs, room temperature
1 tablespoon non-flavoured oil
extra oil, for the popover baking pans
1/2 teaspoon salt
1 teaspoon to 1 tablespoon sugar
Optional 1 tablespoon extract; vanilla, cherry etc
Directions
1. Place a small amount of oil in each popover baking pan. Place pans onto a baking sheet.
2. Preheat oven with the baking pans on a baking sheet to very hot 450F/230C.
3. Mix the flour, salt and sugar together in a large bowl.
4. Form a well in the flour pour in the milk and the eggs whisk together until just combined with no lumps. I usually transfer the mixed batter to a jug with a long narrow spout which makes pouring out the batter much easier
5. Rest the batter on counter for at least 15 mins (an hour is best). Do not stir again. DO NOT refrigerate the batter.
6. Quickly remove the baking sheet and pour the batter into each pan about 3/4 full. The batter should sputter in the oil. Return to oven.
7. Bake in the preheated very hot 450F/230C oven for 15 min then lower the heat to hot 400F/200C and bake for a further 20-25 mins until risen and well coloured. DO NOT OPEN the oven during this time.
8. Remove from the oven and pierce a small hole into the side of the popover this allows steam to escape return the popover to the cooling oven to dry out completely which stops the popover from collapsing.