The May Daring Bakers’ challenge was hosted by Linda of make life sweeter! and Courtney of Coco Cooks. They chose Apple Strudel from the recipe book Kaffeehaus: Exquisite Desserts from the Classic Cafés of Vienna, Budapest and Prague by Rick Rodgers.
The award winning strudel I baked Apple, chocolate and coconut

Apple, coconut, Chinese five spice, red wine, and cacao sauce strudel

Poppy seed and sweet cream cheese strudel

When I saw that the challenge was strudel I thought yipppppps isn't that when you get some soft dough and stretch it so that it's thinner than paper almost transparent, while at the same time it must remain strong enough to hold the rich filling and wrap some finely chopped apples, nuts and spices and bake the lot. I thought that stretching the dough was a highly skilled technique that took many years of practice and that this was going to be a REAL challenge. But as usual I thought to myself “You only gain skills by doing it even if it is only going to be an average job”. I made up the dough and let it is rest for a few hours. The vinegar and the resting helps the gluten in the flour to relax and when its ready the dough loses its elasticity but stays resistant enough to hold the filling. Then I began to stretch and stretch and....
Well I'm getting ahead of myself firstly make up the dough (see recipe below) then you place the dough on a floured sheet and gently spread it out using the back of your hands,expanding it gradually in all directions with your knuckles. If the pastry has been properly kneaded, the result will be a thin, transparent sheet of pastry. It doesn't matter if the pastry has some small tears. When the pastry is fully extended, the filling is distributed on top and then, with the aid of the sheet, the pastry is rolled up on itself to obtain the characteristic strudel form. The sheet is also useful for transferring the strudel to the baking sheet.
Strudel is a simple pastry, which is assembled in layers, brushed with clarified melted butter in such a way that once baked, it looks like puff pastry. Clarified butter is essential as it allows the layers of pastry to puff well and separate from one another. If common melted butter is used, the whey present in it would soak the pastry and wouldn't let it puff as well.
How to make clarified butter
Using clarified butter seemed to make a more crispy end result. A small point but usually it is many small things working together (to make the pastry flaky and crispy) that makes for a wonderful end result.
Clarified butter (or ghee as it is called in India) is very easy to make. Just melt the butter slowly. Let it sit for a bit to separate it will form three layers
1. foam on top (there is only a little of this)
2. clarified butter layer (this is thickest layer it is coloured light yellow) and
3. whey (milk solids) on the bottom ( a smallish layer of white liquid).
Skim off the foam that rises to the top, and gently pour the butter off of the milk solids, which have settled to the bottom. A stick (8 tablespoons) of butter will produce about 6 tablespoons of clarified butter.
I thought that I would go for it and do several until I got it right and strudel stretching would be another skill that I would acquire because for the Daring Bakers' challenges.
The first few I did worked out OK but I wasn't very satisfied but I did work out how to stretch the dough out to twice the recommended size and I got some idea about the amount of filling and the number of strudel layers needed to make a nice dessert.
The strudel pastry is a wonder to work with, it actually wants to help you stretch it as large as possible.
I recommend to all bakers try this recipe it is a must to have in your skill set.
Refrigeration seemed to work really well for my sausage rolls, berry and the cherry strudels they were still good 5 days later with flaky layers on top - cool to room temp then cover loosely with paper (place a few pieces of paper loosely around the strudels this traps any moisture released into the air-tight container from the cooling pastries) put into the fridge in an air-tight container wait until it is the same temp as the fridge remove paper and keep the item in the container enjoy for the next few days fresh and crisp. Refrigeration has a very drying effect on foods so it is always better to cover food (also it stops your pastry picking up flavours from other foodstuffs) so keep the strudel in a container to retain freshness and prevent it becoming to dry.
The process of making a strudel
Stretching the dough

It is paper thin

Filling placed on the stretched dough (breadcrumbs have been spread over the dough) this case potato, chilli sausages and onion gravy filling

Rolling the filling in the dough

Rolled and filled strudel ready for the oven

Glazed strudel with nigella seed topping

Baked strudel
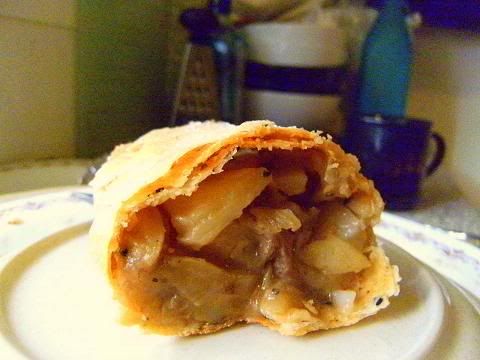
In fact this strudel was a total disaster I forgot to spread about 3 tablespoons of the remaining melted butter over the dough using my hands. And so it wasn't anywhere near as flaky as the other strudels I did and the pastry was very bland. But you can see the importance of spreading the toasted breadcrumbs (which I did) over the dough because the crumbs make little pockets of air that expand which helps to separate the layers apart. Butter which contains water/fat does the rest of the separating by creating steam and adds flavour to the pastry. As you can see I got reasonable separation of the layers even without the butter. This was very instructive to me because it explains a lot why we do the steps we do in the recipe. The DBers is always a learning experience for me!!!
Another thing I found out was that even slight temperature changes (from draughts etc) while stretching the dough will make it very tough, in my case I left the dough on the counter that has the hot water system (which makes the counter slightly warmer than the rest of the room counters and table) and I found that stretching the dough immediately would result in a tough pastry now I leave the dough to rest on the another counter that is the same temperature as the table I will be stretching the dough. This little thing really made a huge difference to the end result.
Also my neighbour suggested using clarified butter because the whey in normal butter makes the pastry soggy this tip made a great difference.
The numerous strudels I made
Cherry strudel


Mixed berries, preserved fig and cream cheese and tropical fruits

I'm very eager for this challenge since I have no experience with this pastry and I had to make a savoury strudel. Since I have a lot of cold roast veggies in the refrigerator I thought I would do roasted potato, roasted whole garlic, roasted red Spanish onion, oyster mushrooms, with oyster sauce filling. I coated the strudel with nigella (black onion) seeds and pepper. It smelt wonderful while it was baking. I followed the advice I got from other DBers (especially Kristine-CA) and only did 2 or 3 layers of the pastry. Yes they are much much better with a few layers and the ratio of filling to pastry seems to matter a lot.
I'm a little amazed how 2 or 3 layers of paper thin pastry and can hold this filling, you can see how soft the veggies were I could cut them perfectly cleanly and the slice held together. These were great I really liked them a lot one of the better savoury treats I've had in a long time. Also I liked how you can see the whole garlic and the mushrooms in different slices.
Strudel of roasted potato, roasted whole garlic, roasted red Spanish onion, oyster mushrooms, with oyster sauce filling


Strudel of apple, coconut, Chinese five spice, red wine, and cacao sauce strudel. I pre-poached the apples in the red wine and five spice cooled and then added some fresh coconut and the cacao powder. It formed a very thick filling for the strudel. I glazed the strudel in icing sugar and cacao powder. I made sure that the apple flavour was predominate and the rest were over- and under-tones. Five spice has mainly cinnamon, and smaller amounts of nutmeg, aniseed, chilli and orange peel. This was very nice and perfect for a sophisticated afternoon tea. I think I got the hang of doing the pastry and the filling.
Strudel of apple, coconut, Chinese five spice, red wine, and cacao sauce


Beef Wellington Strudel

I first seared the outside of the veal roast to get a nice dark brown colour and let it cool to room temp and then wrapped it in the strudel pastry and then into the oven for 30 mins. Make sure the roast is the correct size to cook in that time. In fact it was really good and the guests *oooed and umhhhed* and were impressed and the meat was just right - rare for me and my guests. There will be some liquid but I put some extra breadcrumbs on the bottom to absorb it the pastry will tear a little at the bottom because of the expanding crumbs but that is no real problem in fact it makes the top look even better because the tears show off the many layers of the Wellington.

Good news I put in this strudel (very reluctantly actually kicking and screaming I kept saying it was a huge waste of time) into a big pastry competition and I got first prize in the professional section there were over 40 entries!!!
Award winning strudel of apple, chocolate and coconut


And this is only my sixth strudel I've ever made I'm so very proud (I was too embarrassed to mentioned it to the judges when they awarded the prize a $200 book voucher). They said they were impressed with and I quote its many flaky layers, authentic rustic looks, the flavour combination apple, chocolate and coconut and the filling had a mouth-melting jelly consistency. LOL LOL I actually laughed out loud when they said that! I'm still in shell shock mode. Thanks to Kristine-AC especially and the other DBers for the great advice.
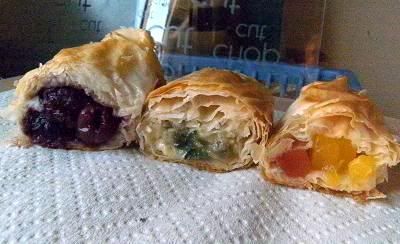
I made these in a hurry for a child's party.
Top left Sausage rolls Top right Green figs/sweet cheese
Bottom left Cherries/sweet cheese Bottom right Blueberries/sweet cheese

I made a poppy seed and sweet cream cheese strudel for a party (this was requested as a nice surprise for the party girl).
Poppy seed and sweet cheese strudel


I think that I understand how to do strudels now and only after 14 of them! This was a FUN challenge for me and I just love how the other BDers also found the dough a wonder to work with. Nearly everyone expressed fear when approaching strudel dough strectching yet all overcame this most excellent challenge. Thank you again to our hosts Linda of make life sweeter! and Courtney of Coco Cooks.
Apple Strudel
Preparation time
Total: 2 hours 15 minutes – 3 hours 30 minutes
15-20 min to make dough
30-90 min to let dough rest/to prepare the filling
20-30 min to roll out and stretch dough
10 min to fill and roll dough
30 min to bake
30 min to cool
Apple strudel
from “Kaffeehaus – Exquisite Desserts from the Classic Cafés of Vienna, Budapest and Prague” by Rick Rodgers
2 tablespoons (30 ml) golden rum
3 tablespoons (45 ml) raisins
1/4 teaspoon ground cinnamon
1/3 cup plus 1 tablespoon (80 g) sugar
1/2 cup (1 stick / 115 g) unsalted butter, melted, divided
1 1/2 cups (350 ml) fresh bread crumbs
strudel dough (recipe below)
1/2 cup (120 ml, about 60 g) coarsely chopped walnuts
2 pounds (900 g) tart cooking apples, peeled, cored and cut into ¼ inch-thick slices (use apples that hold their shape during baking)
1. Mix the rum and raisins in a bowl. Mix the cinnamon and sugar in another bowl.
2. Heat 3 tablespoons of the butter in a large skillet over medium-high. Add the breadcrumbs and cook whilst stirring until golden and toasted. This will take about 3 minutes. Let it cool completely.
3. Put the rack in the upper third of the oven and preheat the oven to 400°F (200°C). Line a large baking sheet with baking paper (parchment paper). Make the strudel dough as described below. Spread about 3 tablespoons of the remaining melted butter over the dough using your hands (a bristle brush could tear the dough, you could use a special feather pastry brush instead of your hands). Sprinkle the buttered dough with the bread crumbs. Spread the walnuts about 3 inches (8 cm) from the short edge of the dough in a 6-inch-(15cm)-wide strip. Mix the apples with the raisins (including the rum), and the cinnamon sugar. Spread the mixture over the walnuts.
4. Fold the short end of the dough onto the filling. Lift the tablecloth at the short end of the dough so that the strudel rolls onto itself. Transfer the strudel to the prepared baking sheet by lifting it. Curve it into a horseshoe to fit. Tuck the ends under the strudel. Brush the top with the remaining melted butter.
5. Bake the strudel for about 30 minutes or until it is deep golden brown. Cool for at least 30 minutes before slicing. Use a serrated knife and serve either warm or at room temperature. It is best on the day it is baked.
Strudel dough
from “Kaffeehaus – Exquisite Desserts from the Classic Cafés of Vienna, Budapest and Prague” by Rick Rodgers
1 1/3 cups (200 g) unbleached flour
1/8 teaspoon salt
7 tablespoons (105 ml) water, plus more if needed
2 tablespoons (30 ml) vegetable oil, plus additional for coating the dough
1/2 teaspoon cider vinegar
1. Combine the flour and salt in a stand-mixer fitted with the paddle attachment. Mix the water, oil and vinegar in a measuring cup. Add the water/oil mixture to the flour with the mixer on low speed. You will get a soft dough. Make sure it is not too dry, add a little more water if necessary.
Take the dough out of the mixer. Change to the dough hook. Put the dough ball back in the mixer. Let the dough knead on medium until you get a soft dough ball with a somewhat rough surface.
2. Take the dough out of the mixer and continue kneading by hand on an unfloured work surface. Knead for about 2 minutes. Pick up the dough and throw it down hard onto your working surface occasionally.
Shape the dough into a ball and transfer it to a plate. Oil the top of the dough ball lightly. Cover the ball tightly with plastic wrap. Allow to stand for 30-90 minutes (longer is better).
3. It would be best if you have a work area that you can walk around on all sides like a 36 inch (90 cm) round table or a work surface of 23 x 38 inches (60 x 100 cm). Cover your working area with table cloth, dust it with flour and rub it into the fabric. Put your dough ball in the middle and roll it out as much as you can.
Pick the dough up by holding it by an edge. This way the weight of the dough and gravity can help stretching it as it hangs. Using the back of your hands to gently stretch and pull the dough. You can use your forearms to support it.
4. The dough will become too large to hold. Put it on your work surface. Leave the thicker edge of the dough to hang over the edge of the table. Place your hands underneath the dough and stretch and pull the dough thinner using the backs of your hands. Stretch and pull the dough until it's about 2 feet (60 cm) wide and 3 feet (90 cm) long, it will be tissue-thin by this time. Cut away the thick dough around the edges with scissors. The dough is now ready to be filled.
Tips
- Ingredients are cheap so we would recommend making a double batch of the dough, that way you can practice the pulling and stretching of the dough with the first batch and if it doesn't come out like it should you can use the second batch to give it another try;
- The tablecloth can be cotton or polyester;
- Before pulling and stretching the dough, remove your jewellery from hands and wrists, and wear short-sleeves;
- To make it easier to pull the dough, you can use your hip to secure the dough against the edge of the table;
- Few small holes in the dough is not a problem as the dough will be rolled, making (most of) the holes invisible.
Happy birthday to faery's-kitchen one of my favourite bloggers

