This month's challenge was to make an edible container for a very sweet maple syrup mousse. So I, Evelyne of the Cheap Ethnic Eatz blog, wanted to share a bit of my maple syrupy home with you for this months’ Daring Bakers’ challenge. Now the dish I am offering up for preparation is not at all a traditional recipe but rather my own creative inspiration which includes some of the “Cabane à Sucre” elements. Since Lisa and Ivonne challenged me to include an edible container I decided to make a Maple Mousse served in a baked Bacon Cup. No worries bacon fearers, we have alternatives for you.
Blog-checking lines: The April 2011 Daring Bakers’ challenge was hosted by Evelyne of the blog Cheap Ethnic Eatz. Evelyne chose to challenge everyone to make a maple mousse in an edible container. Prizes are being awarded to the most creative edible container and filling, so vote on your favorite from April 27th to May 27th at http://thedaringkitchen.com!
Maple Mousse:
Ingredients:
• 1 cup (240 ml/ 8 fluid oz.) pure maple syrup (not maple-flavoured syrup)
• 4 large egg yolks
• 1 package (7g/1 tbsp.) unflavoured gelatine
• 1 1/2 cups (360 ml. g/12 fluid oz) whipping cream (35% fat content)
Directions:
1. Bring maple syrup to a boil then remove from heat.
2. In a large bowl, whisk egg yolks and pour a little bit of the maple syrup in while whisking (this is to temper your egg yolks so they don’t curdle).
3. Add warmed egg yolks to hot maple syrup until well mixed.
4. Measure 1/4 cup of whipping cream in a bowl and sprinkle it with the gelatine. Let it rest for 5 minutes. Place the bowl in a microwave for 45 seconds (microwave for 10 seconds at a time and check it in between) or place the bowl in a pan of barely simmering water, stir to ensure the gelatine has completely dissolved.
5. Whisk the gelatine/whipping cream mixture into the maple syrup mixture and set aside.
6. Whisk occasionally for approximately an hour or until the mixture has the consistency of an unbeaten raw egg white.
7. Whip the remaining cream. Stir 1/4 of the whipped cream into the maple syrup mixture. Fold in the remaining cream and refrigerate for at least an hour.
8. Remove from the fridge and divide equally among your edible containers.
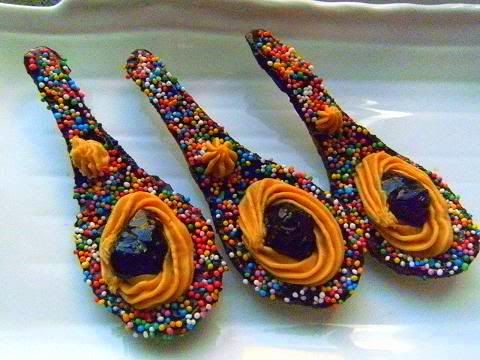
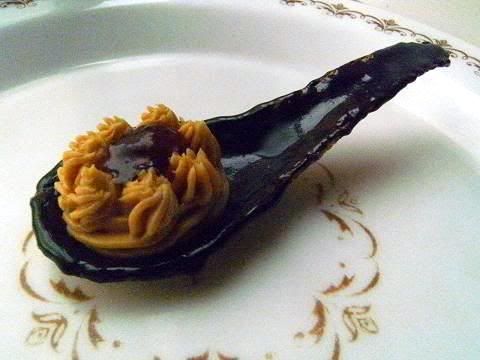
Chocolate bacon brioche spoons with maple syrup peanut butter mousse and blueberry preserves
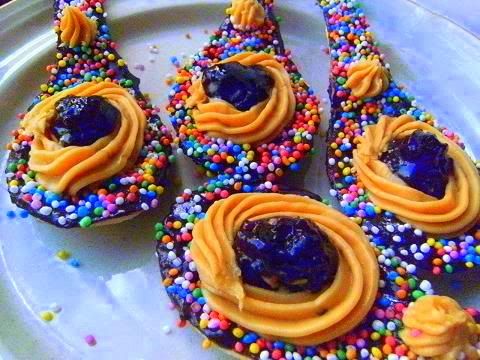
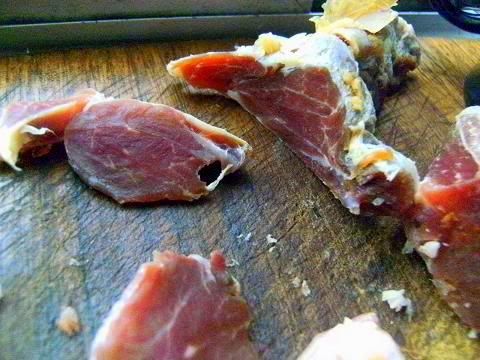
Yes I know the above is a bit over the top but I lived in Calgary Canada for a year and where I lived there was an annual neighbourhood competition to see who could come up with the most “over-the-top” combination of bacon, maple syrup and chocolate (plus whatever else you wanted) that could be served as finger food so I have some experience with the challenge flavour profiles. I had some lovely salted semi-cured speck in the fridge I used that. Well about maple syrup I love it with very salty fried ham products and I found out during the "over-the-top" competition that I love maple syrup with peanut butter and blueberry preserve on brioche, so I thought I would combine all of these flavours into one container.
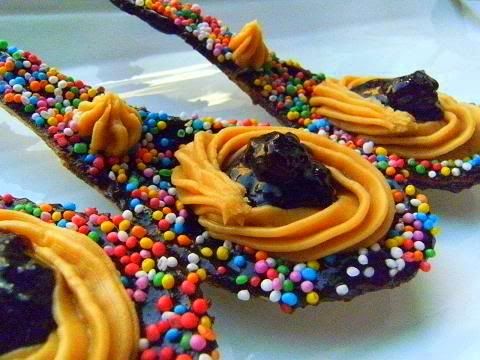
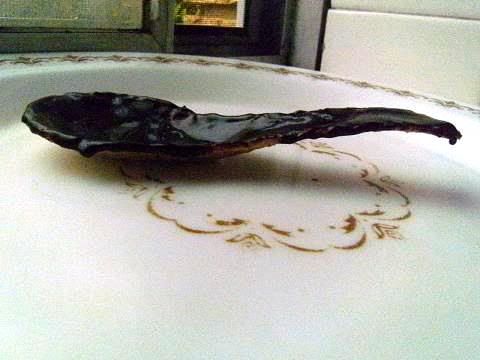
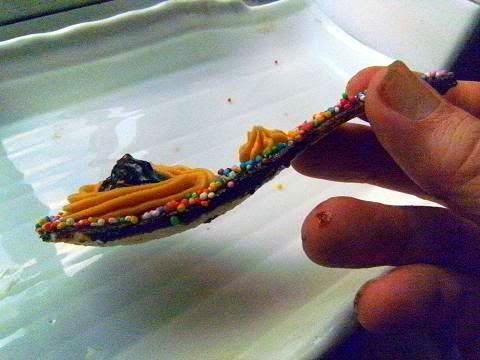
Firstly I made brioche spoons these would form the backbone of the finger food since bacon etc is hard to form into a clean spoon shape so the brioche spoon would do that. After the spoons had baked and cooled and hardened I coated the spoons with chocolate glaze and onto this I placed the fried speck and cut it to the same shape as the spoon, I coated the bacon again in chocolate glaze and let it set hard. I made up the maple syrup mousse as per the challenge and added a lot of smooth peanut butter to it to make it have a piping consistency, then I piped the mousse onto the spoon and added a central dollop of home made blue berry preserve, and decorated it with 100s and 1000s (coloured sprinkles) to add a local Australian touch.
One day old brioche pieces being shaped into a spoon that is toasted in the oven

Toasted brioche spoons - the spoons crisp up and harden once cooled and are very sturdy

Salted semi-cured speck (a very salty type of semi-cured pork)
Cut and shape the fried speck onto the brioche spoon
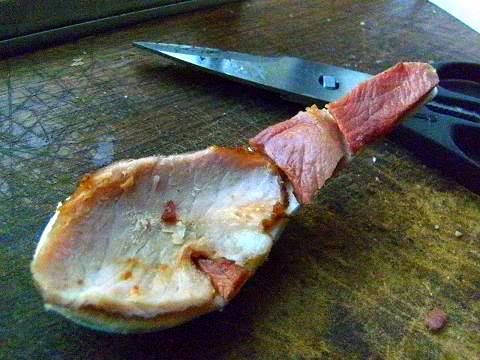
Coat the speck covered spoon with the melted chocolate glaze and let it set

Decorate the chocolate bacon brioche spoon with piped maple syrup and peanut butter mousse and place a dollop of blueberry preserve in the centre and sprinkle 100s and 1000s over the handle and sides to complete
.

Yes it is finger food
Yum Yum
This is the finger food without the 100s and 1000s but I think it is more "over-the-top" with them so I used them
Chocolate glaze recipe
2 parts cocoa powder
2 parts brown sugar
1/2 part maple syrup
1/2 part butter, melted
Combine all ingredients in a small bowl until smooth and glossy. If needed you can place the glaze in a microwave oven for a few seconds if you need to soften it to paint the spoons.
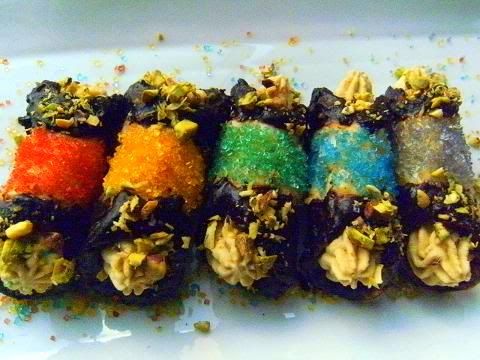
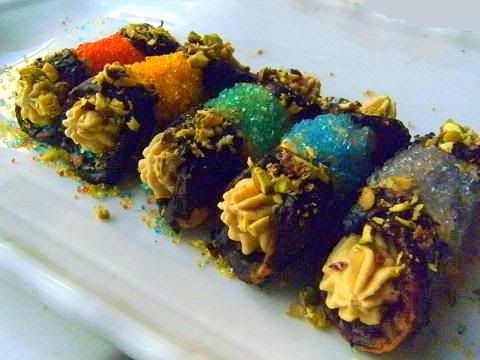
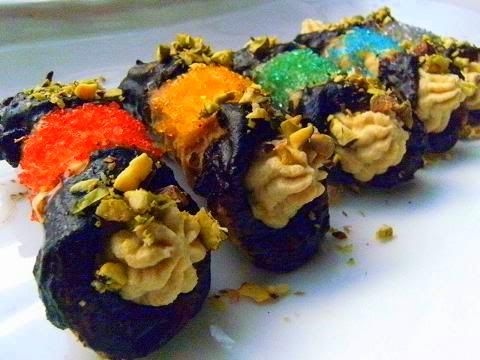
Maple Syrup Whiskey Liqueur Cannoli filled with Maple Syrup Mousse
I had a BBQ (for adults) to go to this afternoon so I thought I would make some maple syrup whiskey liqueur cannoli shells and fill them with the challenge maple syrup mousse with a little (well to be honest a lot LOL) of the liqueur. Maple syrup goes well with rye whiskey and any liqueur goes well at a BBQ.
All good cannoli recipes use wine in them I replaced this with home-made maple syrup whiskey liqueur (reduce to one quarter 1 part maple syrup and add enough good quality rye whiskey to get back to the original consistency of the syrup) also I replaced the white sugar in the original cannoli recipe with maple syrup I had to add some more flour to get the correct consistency they really really are MAPLE AND WHISKEY flavoured and seem to ooze booze into room.
A fun very adult treat for the BBQ this is so so delicious and they really are boozy. My car smelt of a brewery when I got to the BBQ.
My friends called them boozy woozy cannoli yes a merry time was had by all at the BBQ. I loved the crisp maple syrup/whiskey cannoli shell against the creamy soft (rye whiskey and maple flavoured) filling a wonderful mouth feel contrast this was the best aspect of the recipe (apart from all the alcohol of course hehehe). Also the colour of the filling is such a lovely pale beige that looks so good against the dark chocolate edges and green pistachio nut pieces.
I wish you could smell this recipe it is so so good and the taste of whiskey and maple syrup with a hint of chocolate and pistachios nut yum yum. Since maple syrup isn't as sweet as normal white sugar I had to coat some of the shell with coloured sugar crystals so cute.
Maple Syrup Whiskey Liqueur Cannoli Shells
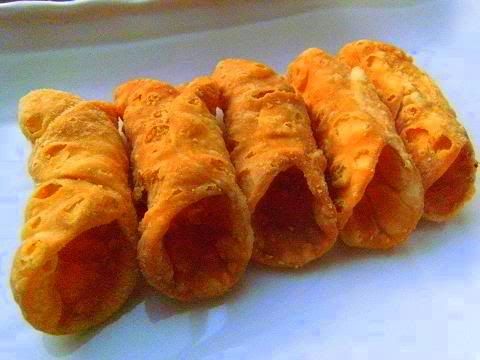
Finished cannoli
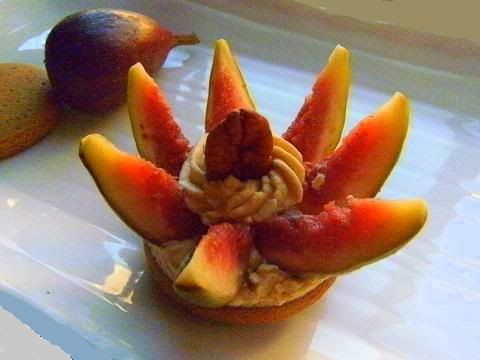
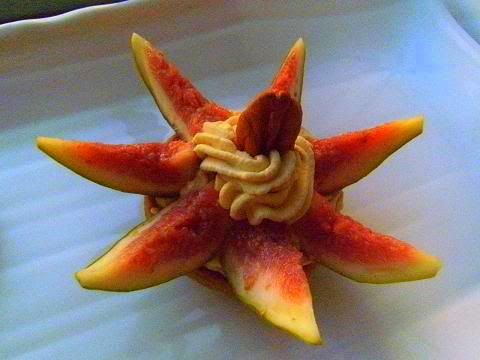
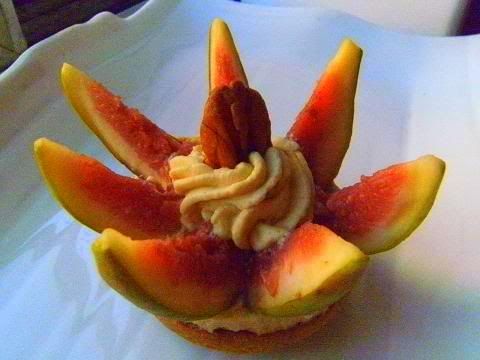
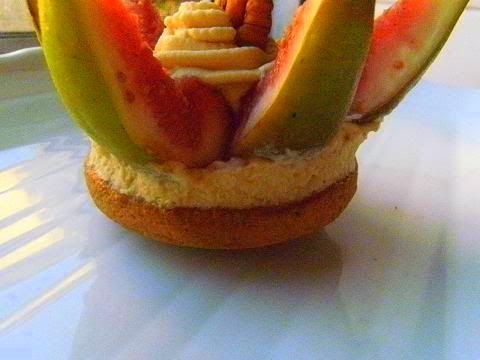
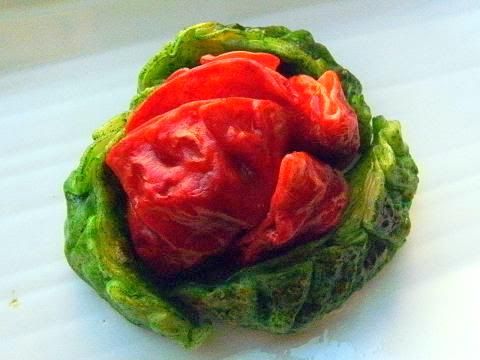
Gingernut bowl with lime glazed fig flower and maple syrup mousse
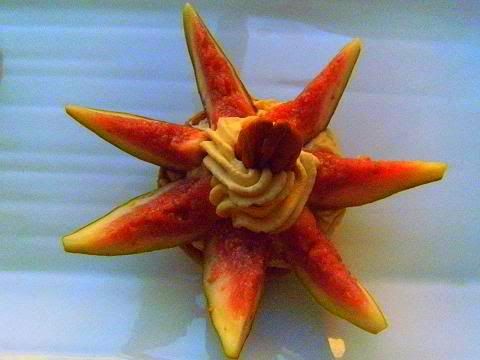
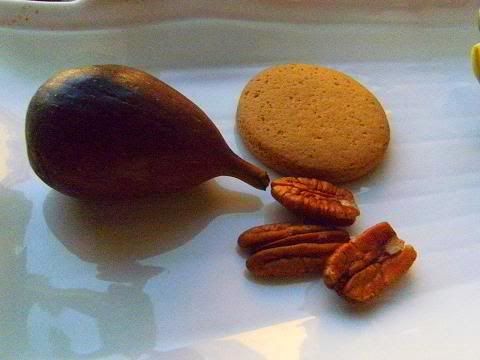
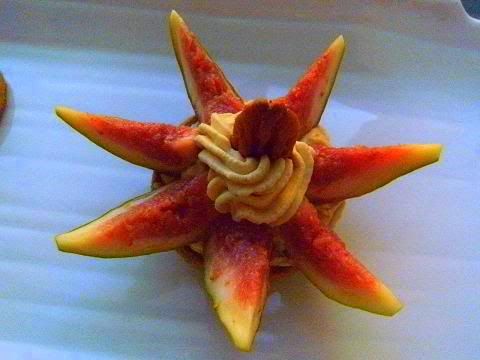
These are so cute, the local fruit and vegetable shop had a great special on figs (eight for $2) I couldn't resist using them for this challenge. I made a bowl from gingernut biscuits (called gingernut cookies in North America) by heating the biscuits until soft then I moulded them over a small bowl to get the correct shape and let them cool. I then baked the fig until soft and cut it open and brushed it with a reduced lime molasses glaze to get a vibrant colour. Then I filled the biscuit bowl with the mousse and arranged the glazed fig flower on the mousse and piped some more mousse in the centre of the flower and garnished it with a pecan nut.
Some of the simple ingredients used
Finished Gingernut bowl with lime glazed fig flower and maple syrup mousse
Underneath view of the bowl and mousse base, notice the shape of the bowl
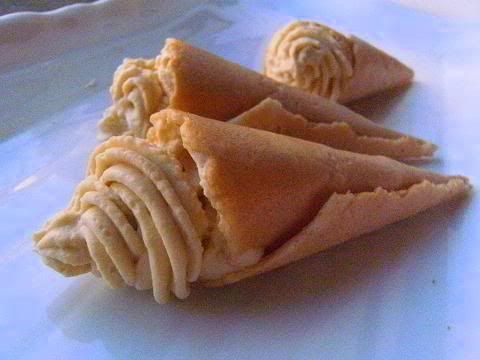
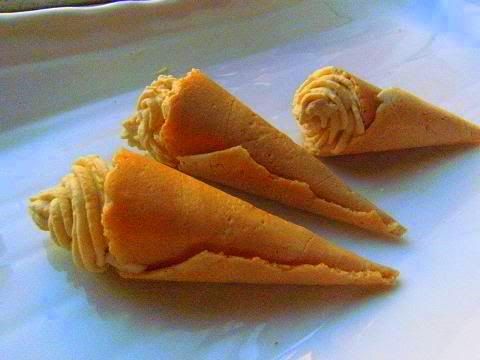
Maple mousse ice cream cones
The tuile cones were incredibly difficult to make but they look so elegant and dainty they are about 1.5 cm long, I filled them with almost frozen mousse and placed them into the freezer to set hard. They are a nice light touch at the end of a big dinner.
Tuiles (said as twheels) are thin crisp cookies made from a batter that is spread onto a baking sheet (usually using a stencil) and baked for a few minutes and when set and still hot you can shape them into what ever shape you wish using a mould or using your fingers. See this link it gives you full details and recipes I used the first batter recipe it is great. I used an old ice cream lid made from plastic and cut out the stencil and spread the batter into the stencil and then baked the batter for 6 minutes until set then I used a cone of wood covered in thin metal as the shaping tool. You can place the cookies back into the oven to re-soften them if you need to. Also only do a couple of cookies at one time.
Use this stencil shape found here to make your cone, my stencil had jagged edges to make the cone look rustic, but try with smooth edges the first time makes things easier. Only do a couple of tuiles at one time, and remember that you can reheat the cookie again and again if you need to reshape it to the correct shape. Use your fingers first to shape the still-hot cookie again makes things easier if it works.
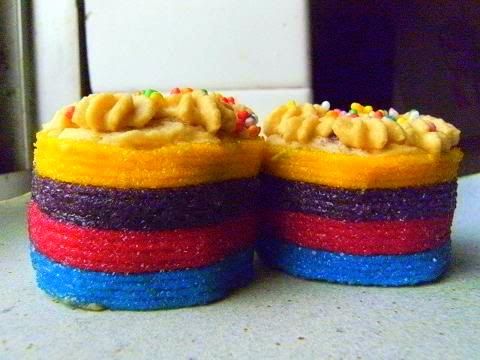
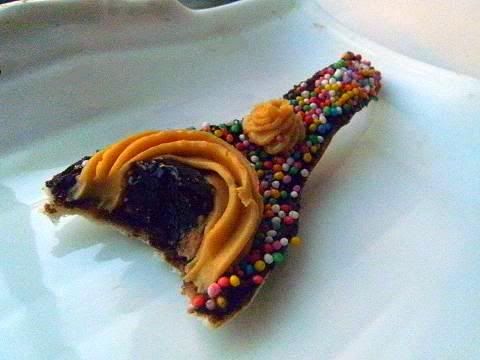
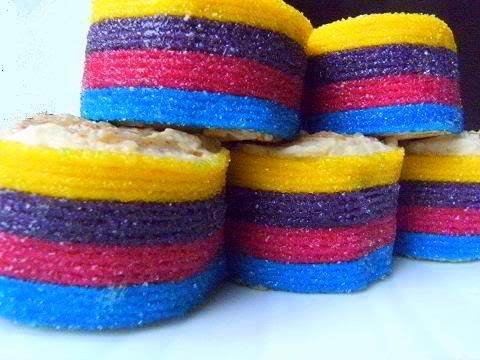
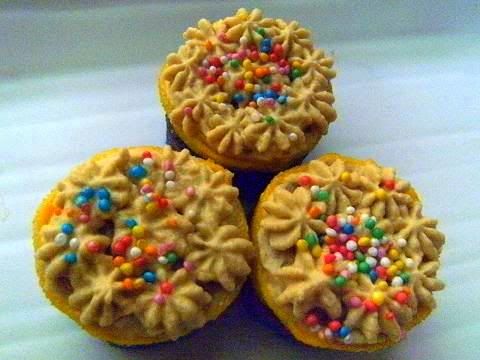
Sour glazed maple syrup petit fours
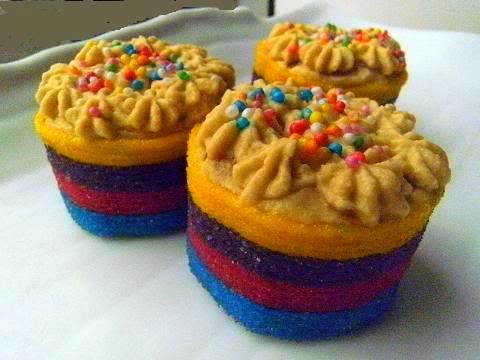

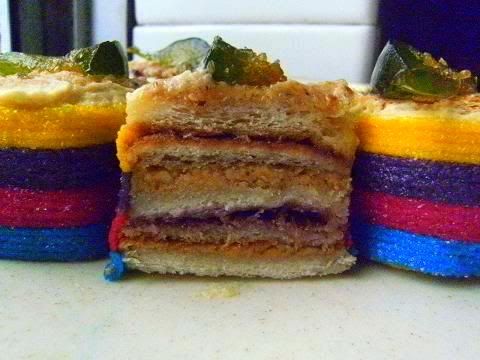
I wanted to create a container that countered the extreme sweetness of the maple syrup mousse. Also I wanted to make petit fours for an afternoon tea party I'm having later today. I decided on sour fruit leather glaze (this is extremely sour in a good way) I thought this would be a great contrast to the mousse, also it is highly coloured and has a wonderful stripe pattern that adds a touch of elegance. The interior of the petit fours are layers of walnut sponge alternatively spread with the maple syrup mousse, fig & cashew nut butter, and home-made mulberry jam when I had about six layers I covered the entire stack in mousse and covered it in the striped sour glaze. I added a thin layer of piped maple mousse stars with a light sprinkle of 100s and 1000s on the top to complete the petit fours.
At the tea party the petit fours were gone in a flash, I loved the initial sourness of the glaze which was immediately countered by the sweetness of the interior and the mouth feel oh oh the mouth feel the glaze had softened (after being in the fridge for an hour or so) to give it a sensuous harmony with the interior filled sponge layers, the nuts really added a nice crunch to the mouth feel. This was a great success as to mouth feel and flavour profile.
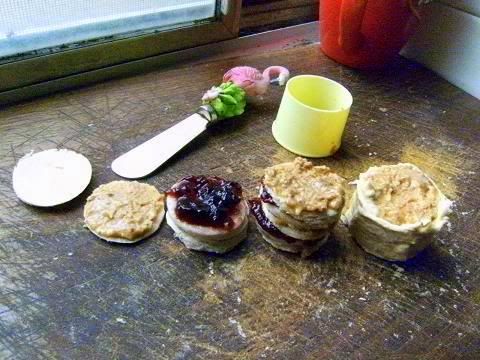
The process of making the petit fours
1. A sponge circle
2. Spread fig & cashew nut butter on the sponge circle
3. Stack with another sponge circle spread with the mulberry jam
4. Stack with another sponge circle spread with maple syrup mousse and continue until you have six layers
5. Spread the exterior of the stack with mousse
Cover the exterior with the patterned sour glaze
Cover the top with small piped mousse star and lightly sprinkle with 100s and 1000s
A cut-view of the interior of the completed petit fours
Completed petit fours
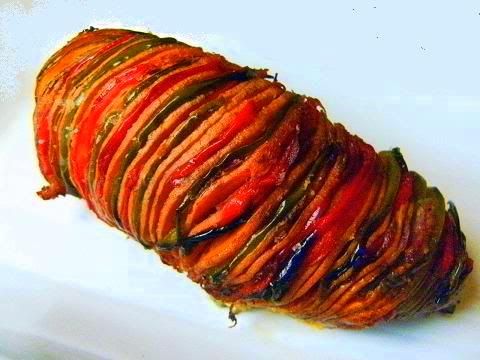
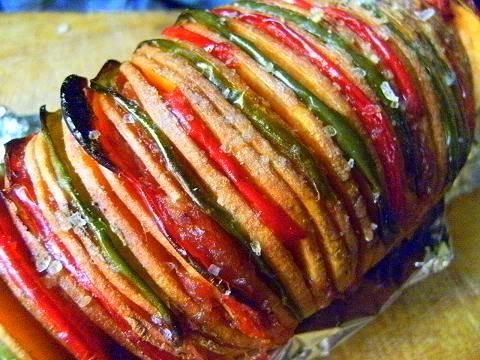
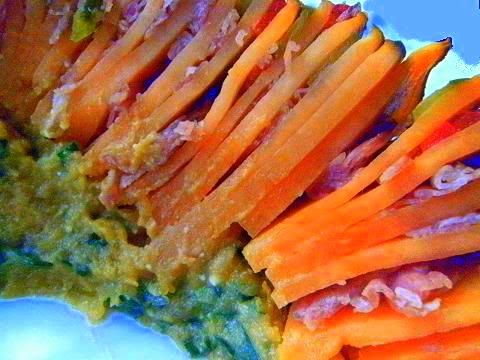
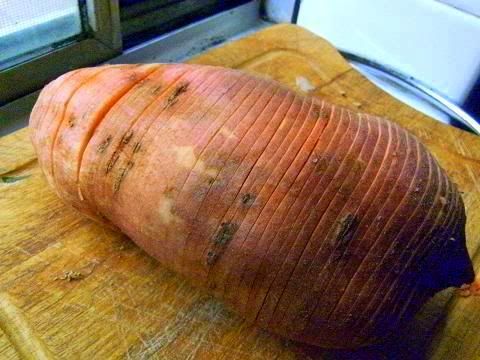
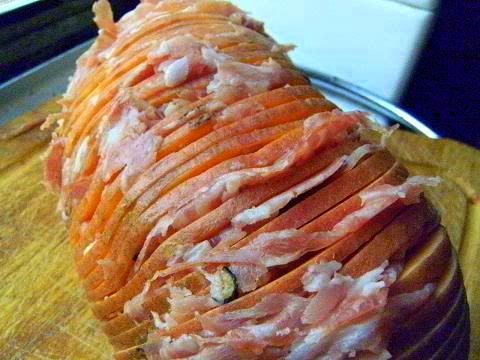
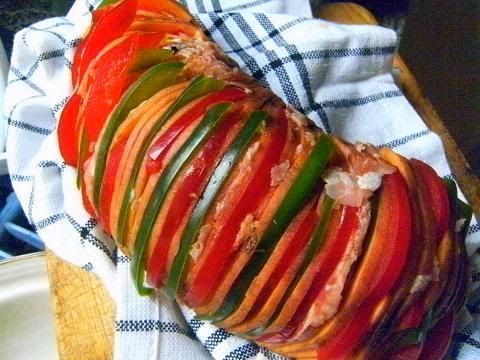
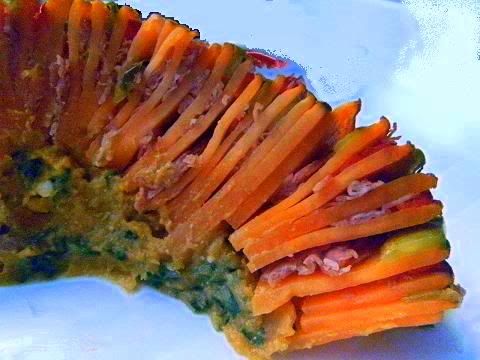
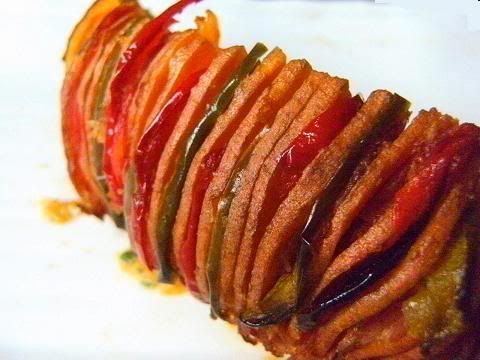
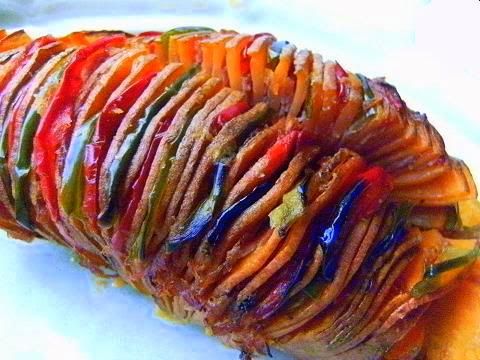
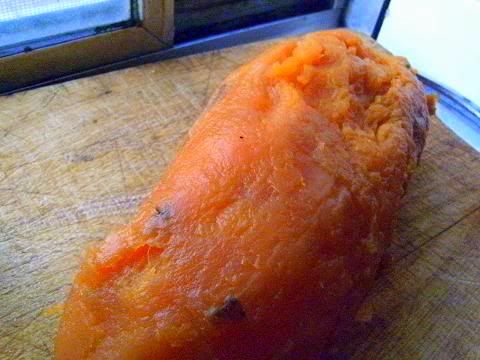
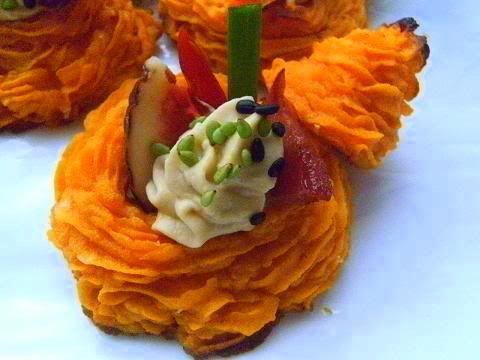
Deluxe Stuffed Ridge Back Sweet Potatoes
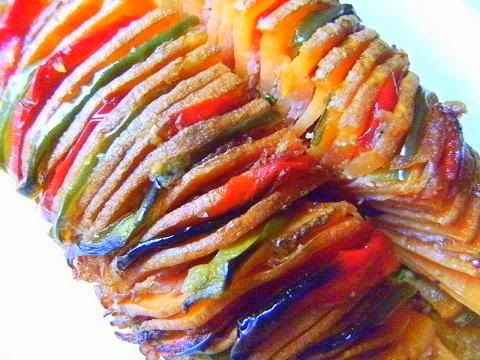
Roasted sweet potato and maple syrup mousse are a match made in heaven and teamed with salt cured ham salami is sublime. So I decided to make ridge back sweet potatoes (when baked the top of each ridge becomes very crispy while the texture of the bottom half's interior is soft, fluffy and creamy) using this flavour profile, but to add a special touch to them I stuffed the sweet potato two ways, in the top slits I added salt cured ham salami slices with red and green capsicum slices, (for a savoury flavour, crunch and decoration) then this was baked for 1 hour and 20 minutes when cooled I made a hollow in the bottom of the sweet potato and stuffed this with a mixture of the maple syrup mousse, creamy salty "Danish" feta cheese, sweet potato mash and a load of chopped chives (for a sweet flavour with a creamy texture), then I re-baked it for 15 minutes to re-heat it. I couldn't stop licking my fingers when I was photographing this dish, the finished dish looks like a huge lolly and the internal pattern looks so impressive when you slice into it.
The special point of interest in the dish is that the top half of the baked sweet potato is savoury (because of the capsicum and the salt cured ham salami) with a crisp mouth feel (because the top of each ridge becomes crisp like a potato crisp) while the bottom half is sweet (with a touch of savoury) with a soft fluffy creamy mouth feel (due to the soft maple syrup mouse, mashed sweet potato, the creamy salty "Danish" feta cheese and chives), the contrast of the crispy savoury crunchy ridges against the soft creamy sweet bottom is delightful. Each bite is thrilling I really liked this recipe. A lot of work but worth it, each large sweet potato (about 60 ridges) takes about 20 mins to prepare. It looks spectacular when you slice open the baked sweet potato a wonderful dinner party dish.
This recipe works so well because the flavour of sweet potato goes so well with either sweet or savoury flavoured ingredients.
Large sweet potatoes

Make about 60 thin slits about 3/4 the way through the sweet potato try to make the cuts even and thin (great practice for your knife skills) and don't cut all the way through
Stuff each slit with a thin slice of salt cured ham salami
Then add a thin slice of red and green capsicum (bell pepper) into the slits in a decorative pattern, drizzle with 2 tablespoon of olive oil and some sea salt crystals
Bake for 1hr 20 mins or until tender check with a small sharp knife
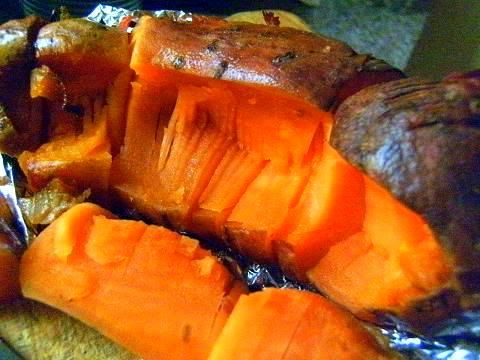
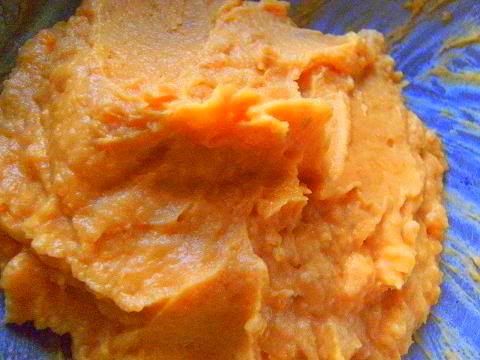
Hollow out the bottom of the baked sweet potato, reserve the crispy bottom crust of the sweet potato
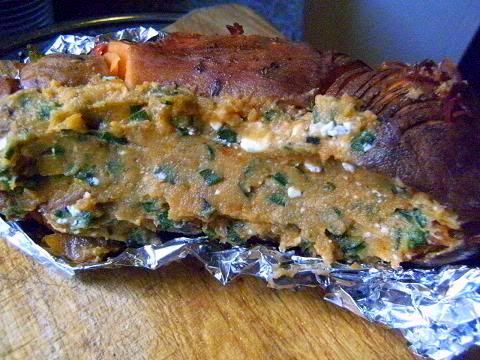
Stuff the hollow with the filling of maple syrup mousse, creamy salty "Danish" feta cheese, sweet potato mash and chopped chives (the filling is super delicious just on its own), replace the reserved baked bottom crust
Bake again to reheat to finish the recipe
Interior of the ridge back sweet potato
Exterior of the ridge back sweet potato
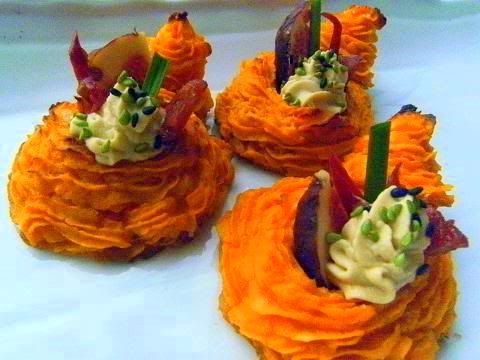
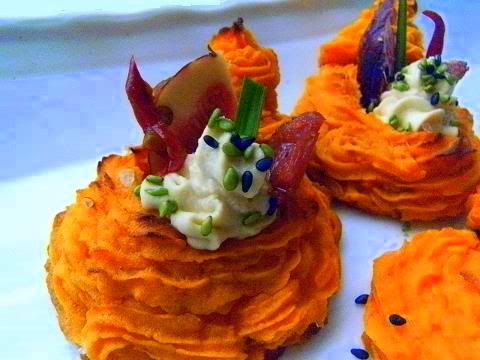
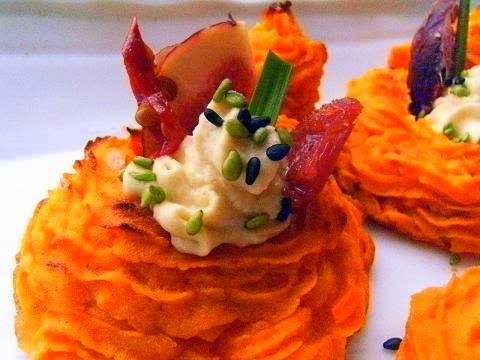
Duchess Sweet Potato Nests filled with savoury maple titbits
I made egg white meringue nests but with the maple syrup mousse the final dish was too sweet so I thought a while and decided to make something that looked like a meringue nest but was made from a vegetable.
Since sweet potato and bacon goes so well with the maple syrup mousse I decided to make Duchess potato nests but instead of using normal white potatoes I substituted with sweet potatoes. I baked the sweet potatoes then mashed them with a maple syrup and white balsamic vinegar infusion and piped them into nests and lids. I filled them with the maple syrup mousse, fig, fried speck, chive, chilli and I added a sprinkle of green wasabi sesame seeds and black bamboo sesame seeds. The filling garnishes are very important to the final flavour and mouth feel of the dish. The figs, chives and the fried speck add the savoury/salty notes while the wasabi/bamboo sesame seeds and chilli strip add the hot spicy notes that are needed to balance the maple mousse and sweet potatoes. The speck titbit adds a lingering salty after taste and a delightful chewy mouth feel that contrasts against the soft sweet that is noted when first biting into the treat, also the chive titbit adds a lovely onion/garlic soft after taste that really enhances the savoury notes. It took me a number of tries to get the correct combination and size of titbits to balance the sweet potato nests. It is amazing how leaving out any one of the titbits really made a huge difference to the final flavour and mouth feel profile.
Baked sweet potato
Mashed sweet potato with maple syrup/white balsamic vinegar infusion
Piped nests and lids they are baked at 260°F (180°C) for 30 mins
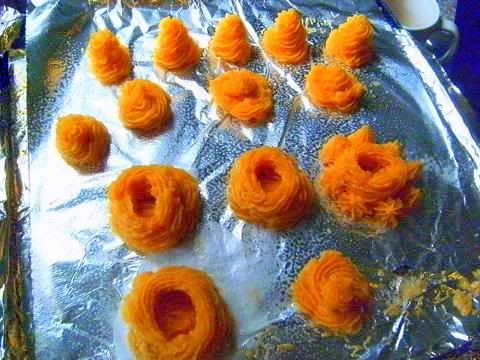
Finished nests
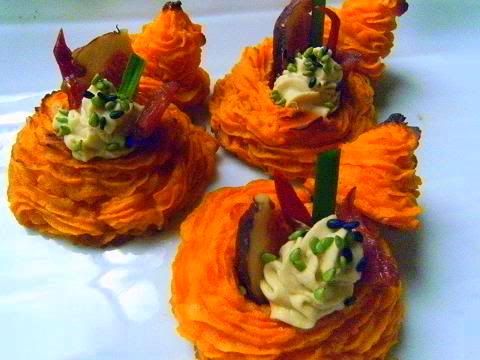
Close up of the titbit garnishes, maple syrup mousse, fig, chive, fried speck, chilli, green wasabi sesame seeds and black bamboo sesame seeds
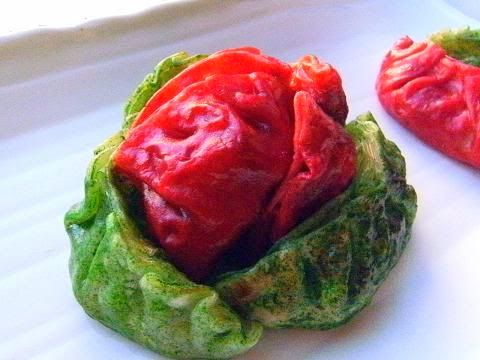
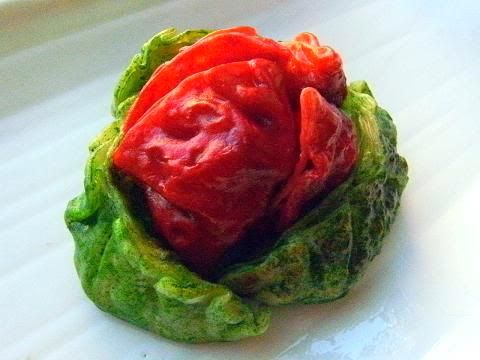
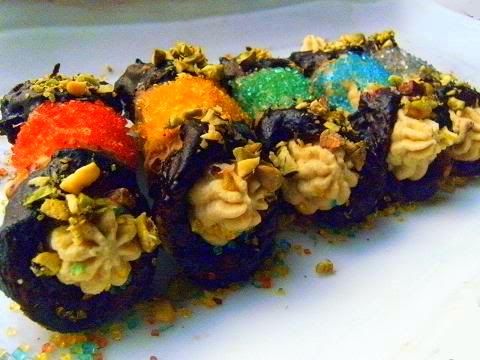
Waratah Potsticker Dessert Flowers
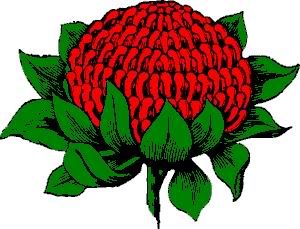
I “volunteered” to make the dessert course for the local footy (rugby) club annual party, their emblem is a waratah (a very large red and green flower see below). I have to make about sixty of these in the kitchen in the club house.
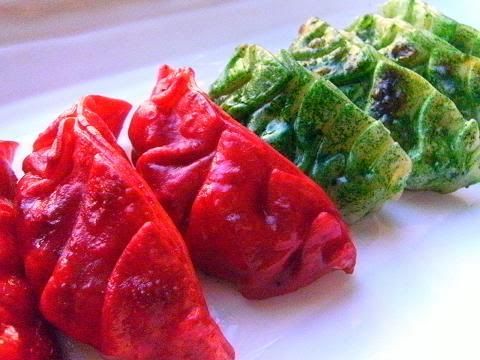
So I thought I would make a dessert that looked like a waratah, the basic containers are naturally coloured potstickers (Chinese dumplings), the red ones are filled with maple syrup mousse and a raspberry dark bitter chocolate ganache the green ones are filled with maple syrup/white chocolate mousse and a lime/white balsamic vinegar reduction. The red colouring is an sugar oil infusion of beetroot/strawberry/redcurrant/red paprika the green colouring is an sugar oil infusion mint/barley grass powder/spearmint, these infusions are brushed onto the fried and steamed potstickers then the potstickers are grilled (broiled) until the coloured shells are hard and shiny. Then the flower shape is formed from the warm coloured potstickers. The potstickers up until the colouring and grilling stages could be made ahead (then they can be frozen if needed) so on the night I can easily and quickly do the final stages (colouring and grilling) without too much hassle and worries.
A very impressive looking dessert and the taste is so yummy. There is a wonderful contrast of the crisp coloured shell and the soft oozy filling. Also I thought the overall flavour combination is very appealing.
The individual potstickers
Red – maple syrup mousse and a raspberry dark bitter chocolate ganache

Green – maple syrup/white chocolate mousse and a lime/white balsamic vinegar reduction
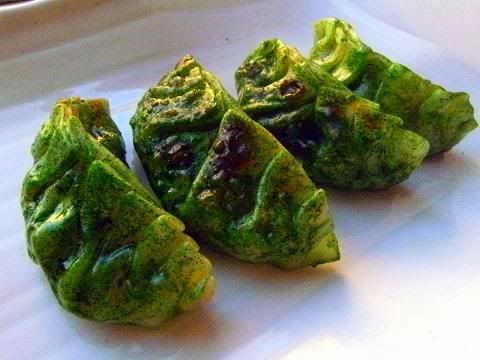
Red and green potstickers
Finished waratah flower dessert
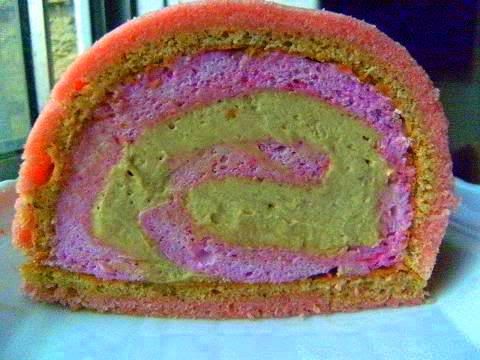
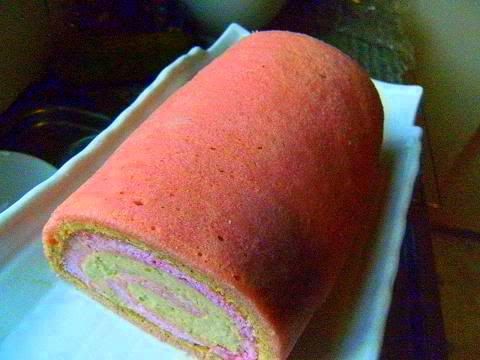
Jocande encased raspberry pavolva roll filled with maple syrup mousse
Since pavolvas are the national dessert of Australia and New Zealand I had to make one for the challenge, a slightly harder variation of the pavolva is the pavolva roll (meringue roulade) where you bake the pavlova as a sheet and then roll it up (Swiss/jelly roll style) with a filling. Pavolva rolls have a melt-in-your-mouth lightness and are the ultimate in show-off cooking, yet are fairly simple and can be made in less than 35 mins.
I made a raspberry pavolva roll (using raspberry jelly (jello) crystals folded into the whipped egg whites to add colour and flavour) filled with the maple syrup mousse but I thought that was a little too easy (and I thought that the meringue wasn't really a container for the mousse). So I made a raspberry jocande sponge and covered the filled pavolva roll with it (so giving the pavolva roll a container). It looked so pretty I liked the many layers and the taste was delicious and the different mouth feels was a pleasant surprise to the normal pavolva roll. The jocande sponge layer adds a perfect outside layer to the pavolva roll which sometimes can be a little messy.

Raspberry Pavlova Roll (Roulade) with maple syrup moussse
Ingredients
4 large egg whites
125g caster sugar
2 teaspoons white vinegar
1x85g packet raspberry jelly crystals
500mls prepared maple syrup mousse
Method
Preheat the oven to 180°C (160°C fan/gas mark 4). Line a 25cm x 30cm x 2cm Swiss/jelly roll tray with non-stick baking paper then set aside. In a large clean bowl, whip at medium speed the egg whites until they form soft peaks. While continuing to whip at high speed, gradually rain in the 125g caster sugar over 3 minutes. Then whip a further 3 minutes or more (it can take up to 12 mins in total to dissolve all of the sugar into the egg whites) until all the sugar granules have dissolved test a small amount of meringue between your fingers you shouldn't feel any grittiness.
Add the white vinegar and jelly crystals then fold in with a metal spoon very gently until combined. With an off-set spatula or similar, smooth the mix onto the prepared tray. Bake for 10-15 minutes (until the meringue is crisp and slightly browned on the outside edges, has doubled in height and when touched lightly in the central area feels springy) check by tasting a small central piece off the top it shouldn't taste like raw egg whites don't worry the mousse filling will cover any imperfection caused by testing. Remove from the oven and leave to cool for 10 minutes.
Lay a piece of fresh greaseproof paper out and flip the meringue over onto it, carefully pull away the used paper and discard. Cut off the very crisp edges to form straight broader for the meringue layers.
Smooth the maple syrup mousse evenly over the roll. Roll up widthways, pulling away the paper underneath as you go. Place onto a fresh piece of baking paper. Place in the fridge for at least 30 minutes. Keep chilled until serving time.