Basic Recipe by Helen McSweeney, of Tartelette
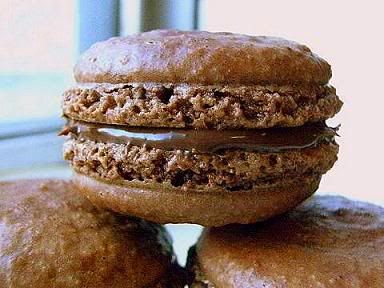
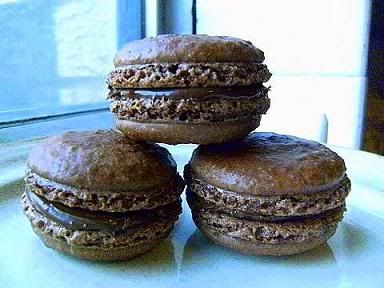
Macarons have a bad reputation for being very tricky to make and girl are they expensive to buy in Paris they are $US5 each ($6.25 Australian dollars) and in the Sydney there are $100/kg WOW. I have been thinking of doing them for some time to see if they really are hard and what the fuss is all about but never got around to do them. So with encouragement from Trissa I decided now was the time. She sent me some great information from which I found out that macarons can be made by three methods – the French method which uses a simple medium stiff meringue or the Italian Method which uses a heated sugar syrup poured over a soft meringue or the Spanish Method which uses beaten egg whites (with higher sugar content), added to almond mixture. The French method is easier but can be temperamental (by most accounts from food bloggers) and requires aged egg whites and the piped shells need to be rested for an hour at least before baking while the Italian method is more complex but gives more consistent results and can use fresh egg whites and you can bake the piped shells immediately when formed.
For my first try at making these I decided to do the French method since Helen of Tartelette had written a long article called Demystifying Macarons (in Dessert Magazine #2 p36-43 see this link and go to page 38) on this method which gave a whole host of tips and hints on the process. Firstly you have to age your egg whites for 2-3 days i.e. place your whites in a container covered with a paper towel and leave out on the counter this evaporates water from the whites which makes the meringue more stable or if you are in a hurry microwave the fresh egg whites
for 10-20 seconds on medium high speed. This mimics the ageing process close enough to save the three day wait. Then she suggests using icing mixture (pure icing sugar with about 3% cornflour). Also the mixing of the 'macaronage' (that is how the almond meal and sugar is added to the whipped egg whites) is the most critical process firstly fold fast to allow some air to escape from the meringue and then fold more slowly and no more than 50 stokes.
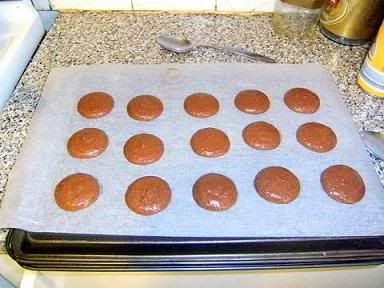
I did the recipe twice - the first time exactly as written then a second time using the directions and notes in red. One thing I have learned doing baking is to understand your oven (eg hot spots, temperature heating times) and when doing a new recipe it is usual you will have to tweak the method a little to suit your style. So I followed the recipe exactly as given then I looked at the results (see below) and then did small adjustments to the given recipe to get the best results.
Basic French Meringue Macaron (a link is here)
100g weighed egg whites from about 3 eggs (aged for 2 days preferable 3 days or you can microwave the fresh egg whites for 10-20 secs medium power this minics the ageing process)
(Most professional recipes also add 1-2 tsp of powdered egg whites which helps to stablise the whipped meringue)
50 gr. granulated sugar
200 gr. powdered sugar, sifted (The 1st time I used pure icing sugar, 2nd try icing mixture)
110 gr. Blanched almonds, whole or ground (both batches I used very fine almond meal)
3 teaspoons cocoa powder, sifted
1. In a stand mixer fitted with the whisk attachment, whip the egg whites (and powdered egg whites if using) to a foam, gradually add the sugar until you obtain a glossy meringue. As soon as the meringue can be turned upside down without falling out of the mixing bowl is just right. A lot of other recipes call for castor (super fine) sugar.
2. Combine the whole peeled almonds and powdered sugar in a food processor and give them a quick pulse if you use already ground almonds (that you have ground yourself separately) it will break the powdered sugar lumps and combine your almonds with it evenly. If you use whole almonds, pulse thoroughly for a minute or so. I used fine almond meal (in Australia you can obtain very finely ground almond meal) added the mixed and sifted powdered sugar and cocoa powder then combined with the fine almond meal using a spatula. Most recipes insist on pure icing sugar (i.e. no cornflour so I thought I would try both). The tant pour tant (the almonds and sugar) should not be over mixed while processing because the nuts can become too oily - add vanilla in the tant pour tant to reduce oil leakage. Some sites suggest that the almond meal ideally should be allowed to dry at room temperature for up to one week prior to using.
3. Add them to the meringue, and start to give quick strokes at first to break the mass and slow down. The whole process should not take more than 50 strokes. Test a small amount on a a plate: if the tops flatten on its own, you are good to go. If there is a small beak, give the batter a couple more folds. The batter has the consistency of very thick cold honey and will 'flow' for a very short time after piping this helps smooth out small imprefections in the piped shell. I did between 30-35 stokes to combine all the ingredients. You can smooth out a very small beak by using a slightly moist finger make sure you do not drop any water on the maracon shell which will cause a blister to form see here . It is better to undermix than to overmix since placing the batter into the piping bag will help distribute the almond meal, sugar and egg whites. You have a good consistency to the batter if by the time you have finished piping the whole tray, the first macarons you piped have lost the small beak and small imperfections in the shell.By the way, for those of you who sometimes end up with a too-stiff mixture and are afraid of mixing further, add a teaspoon or two of eggwhite (normal, not whipped) and mixing in quickly and gently. It seems to be a very effective repair — much more attractive than thick, lumpy macarons with piping nipples.
4. Fill a pastry bag fitted with a plain tip with the batter and pipe small rounds (1.5 inches in diameter) onto parchment paper baking sheets. It is much easier if you draw circles on the parchment paper so you will get even sized shells. Pipe vertically over the centre of the traced circle, about 5 mm above the tray surface. Try to do the piping in one smooth motion which gives the smoothest shell. Pipe shells in an alternating pattern so that the shells are offset to each other (not lined up in rows) such as 6 shells in the first line then 5 shells this gives a better heat flow and makes for more evenly baked batch of macarons. Confidently bang the completed baking pan of shells down onto the counter to release any air bubbles and to help smooth the shell of small beaks and imperfections.
5. Preheat the oven to 300 degrees F. Let the macarons sit out for an hour (I did 1 hour the 1st batch and 4 hours the 2nd time) to harden their shells a bit and bake for 10-12 minutes, depending on their size. Let them cool completely before filling. I pre-heated the oven to 350 degrees F and then turned down the temperature to 325 F as soon as the shells were in the oven. Both times I used two baking sheets turned upside down stacked on top of each other to bake the macarons. Doubling up the tray delays the heat cooking the Macaron from the bottom. This insures that the outer surface is dried up first before the inside starts to lift it up. This is what makes that all important ‘foot’ & the smooth surface that is not cracked. I baked the shells for 8 minutes and then turned the baking sheet around and baked for a further 4 mins then I turned up the heat as high as possible and baked for two minutes longer). Temperature seems to be the most variable parameter in baking macarons some sites suggest 285F for 13-15 mins while some other sites preheat the oven to 390F and then drop the temperature to 320F to finish baking. The most common temperature seems to be a constant 300F. Most ovens have hotspots (usually near the back of the oven) you can place folded tin foil or another small baking pan on a lower oven rack in these spots to even out the temperature.
6. Pipe or spoon some of your filling on one shell and sandwich with another one.
Comparsion of the two batches
I noticed that the 2nd batch released from the parchment paper absolutely cleanly not one little piece stuck to the paper and the bottoms were bone dry (no slightly tacky streaks as the first time which wasn't a problem really). And the 'feet' were much higher (though I like the look of the smaller feet myself) which macaron-lovers adore though I think are a little untidy looking. And they could be filled within 10 mins of cooling and the shells were super crisp and the inside was soft and chewy and with the nutella/coffee/chilli filling was really really good.
I worked out it costs about 31 cents per macaron.
Comparsion of the two batches (first batch on right hand size) clearly the second batch was about 30% higher and 30% bigger in height and size and they were a little more crispy
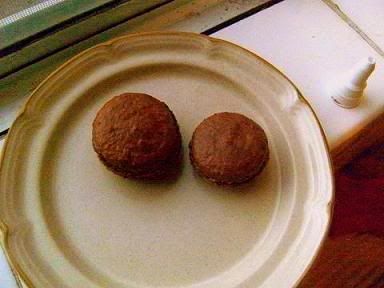
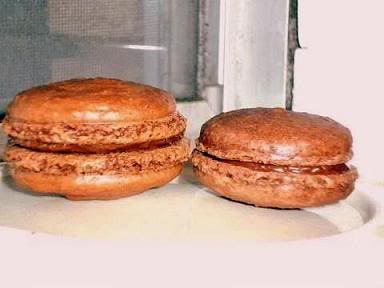
First batch

Second batch

Resource
David Lebovitz web page on macarons which has an extensive listing of links about making macarons.
Syrup and Tang A macaron round-up which goes through both methods in great detail and has many links to other resources.
31 comments:
Gorgeous results! The feet and shaping are superb - I can only imagine the flavor is just as stunning.
I'm still too scared to attempt these, especially not after all my failed genoises. I'm glad that you posted a non DB dessert!
They are beautiful and look so perfect! Wow, I'm impressed!!!
Cheers,
Rosa
Hi Audax,
When you put the two macs using different methods side by side you can see what a big difference between the two... I wonder if it is the icing mixture... Can't wait to see the variations!
one of my "to bake" list...macarons!
these macarons are mouth-watering !
@ haleysuzanne - they were delicious I left the shells in the fridge to dry the crusts and they are much better that way - crust shell and soft chewy inside and with that coffee/nutella/chilli filling WOW.
@ Steph - yes I was a little apprehensive but nothing done nothing gained.
@ Rosa - why thank you for your comments high praise coming from such a person as you. Thanks.
@ Trissa - I think it the higher temperature mainly and the icing mixture to a less extent.
@ Confession Nook - yes they have been on my "to do" list forever now it's done.
Seriously, Audax, is there nothing you can't do? These are amazing!
I have always admired Helen's perfect macarons but never gathered the courage to do them.
After seeing your lovely macarons, I've decided I'm going to make some soon.
Thanks for the detailed comparisons.
Audax! What a coincidence!! I love your side notes on the preparations..Very useful information. I somehow missed the cornflour in Helen's instructions. I don't know how I missed that but I must have read over it. Yours came out beautifully! I was rather happy with my second try as they came up so much better then the first, but I will definitely be making these again in different flavours and I will for sure keep your notes at hand!
We must have indeed been visiting each other at exactly the same time... Haha... How funny is that!
Oh. Mon. Dieu. These look delish!
WOW! That looks like quite an undertaking Audax! I have never actually had macarons.. Fantastic pictures, awesome effort & great instructions. They look beautiful! I am impressed, as always!
BEAUTIFUL :D , I have been going around the bushes with the macarons they kind of intimidate me (ha ha ha I have faced snakes and other creatures but I am scared of these macarons)...but with your instructions I know it will be eaasy although I imagine they won't be as gorgeous as yours...hummm let's see if I can bake a batch these weekend :D thanks you gave the courage I need....oOoOoh my Lord what did I get myself into :s
Trying macarons again shortly Audax. I've tried the italian method just once, and obviously was confused by the 'flowing magma' description of the correctly mixed macaron mixture, and way over mixed till it really 'flowed', even though it was in under 50 strokes. I've never tried macarons ever before, and didn't know they should be soft, so ended up cooking until crisp through..oops. they were still nice, but I'd like to make some as they should b. I'll update on my site when I'm done and let you know how I go :)
Audax, these are Perfection +++. I am so happy that you have made them. Your work is brilliant and you make everything looks so easy. I am like many others, a scaredy cat when it comes to macaroons and haven't attempted them as yet even I have been collecting info for the last year. I have been following Julia in Brisbane on http://melanger.wordpress.com/ as she has made various macarons flavours for her upcoming wedding.
Are you also going to try the Italian method??? Please let us all know.
Chocolate macarons, yummy!
They are really, really beautiful!
Thanks for all the instructions.
Great job Audax! And so detailed - thanks for all the info. Looks like it's possible to open the oven and turn them halfway then? I've always been put off because my oven has hot-spots and I was worried if I opened the oven, they'd collapse like a souffle!
They look great Audax - amazing how they cost 31 cents each to make and yet are purchased at US$5 each!
Just amazing as always Audax
Wow wow WOW ... I love your scientific approach and all of your pictures ... and so many variations. You are an inspiration
Gorgeous!!!
As always your creativity amazes me! Very impressive. I love every mallow flavor, and that strawberry cream marshmallow roll is awesome!
WOW!You never cease to amaze me. Great tip and recipe for corn syrup as its not available everywhwere.
You have outdone yourself, as usual! Great job, and very informative post! I definitely need to try that technique for shaping the mallows sometime! AWESOME!
Well done!!! It took me several attempts till I got something macaron-looking. Now I can get good result almost always but some times they are a little bit holled under the shells.
OMG. I didn't know macarons where so so so expensive... Better to bake them at home, no doubt.
I always love to find another person who is obsessed with the macaron like me! :) I've not had success with the French method. I'm sticking with the Italian. Almost 100% each time now!
Superb! Love all the different versions you did and that flour mould is inspiring! Where on earth do you find the time for all this!!!
hi! love the fact that you take your time and explain things. now I think I'll give it a try.
One question though. are thawed egg whites already considered as aged egg whites?
Thankyou so much for a wonderful post, Audax! I've attempted macarons once before (for Mothers' Day) and they literally left me in tears. Out of 100, 1 shell looked as it should (but broke coming off the baking paper!), and the rest failed miserably.
Following your instructions I've made 2 batches with 100% success!!
The tip on the double lined trays and to stop beating the meringue at the exact moment it is turn upside-down-able are what I think nailed it, and the oven temperature worked perfectly in my dodgy electric oven. Thankyou thankyou, and I can't wait for what you come up with next!!!
Your post inspired me to make macarons! Thanks to the awesome recipe and your helpful tips, I was able to make them too! =]
Thank you for all of your notes on these little hamburgers. Couple Qs: is your oven temperature for convection or traditional oven? Have you tried the Italian method? Thanks in advance./bjfp
Post a Comment