Today is exactly my one year anniversary for food blogging and being a member of the Daring Kitchen yeah and what fun it has been. For my anniversary I taught myself to bake macarons.
I have done two batches using the French method found below. I used a mini-food processor to grind the almond meal to obtain very smooth shells has compared to the last time where I used almond meal.
The flavours are:-
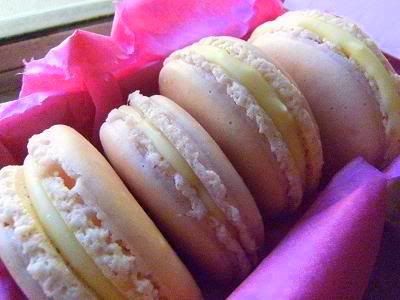
Pink - wild cherry/pomegranate/almond macarons with a filling of white mint chocolate ganache. Both almond and pomegranate boosts the flavour of cherry - these where intensely cherry flavoured. And the cooling effect of the white mint filling was a delicious countertaste to the cherry.
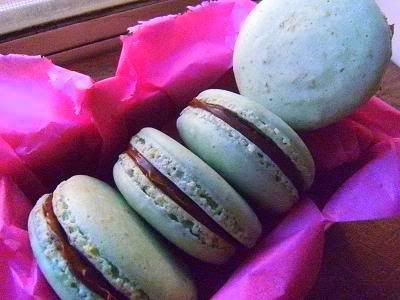
Green - pistachio/spearmint macarons with a filling of dark coffee chocolate ganache with a dash of chili powder. The macaron sheels were so pretty flecked with green pistachio and the combination of flavours was very smoothing and stimulating at the same time.
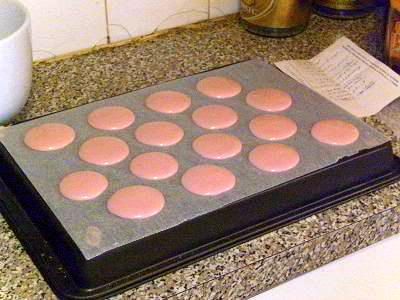
The piped wild cherry macarons (notice the alternating rows of piped shells and the small smears of batter in each corner under the parchment paper that hold fast the parchment paper to the pan when piping the macarons. Always use two baking pans stacked on top of each other as here to encourage the formation of the feet of the macarons.)
Wild cherry/pomegranate/almond macarons with a filling of white mint chocolate ganache
pistachio/spearmint macarons with a filling of dark coffee chocolate ganache with a dash of chili powder (Tastespotting #52161)
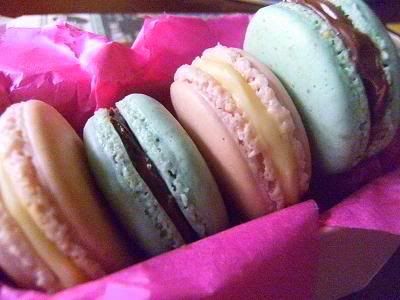
Mixed Box of Macarons
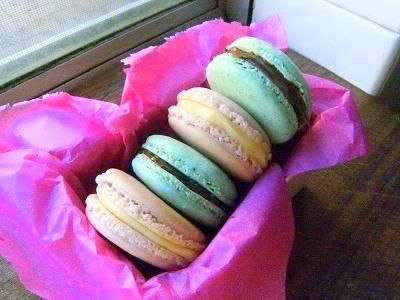
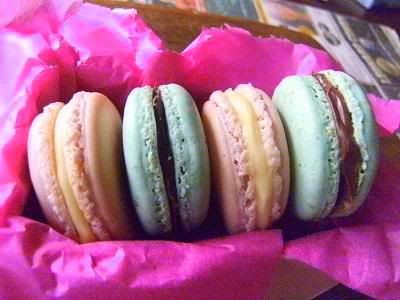
Below is the standard macaron recipe from Helen of Tartelette The red text are the alterations I did to the basic recipe to suit my oven and style of baking. Most of the tips and hints are from Helen's article and the other sites referenced below in resources.
Basic French Meringue Macaron (a link is here)
100 gm weighed egg whites (approximately 3 large egg whites) (aged for 2 days preferable 3 days or you can microwave the fresh egg whites for 10-20 secs medium power this mimics the ageing process)
2 tsp powdered egg whites (optional) which helps to stablise the whipped meringue
50 gm (1/4 cup) table sugar (I used castor [super-fine] sugar since most sites suggest using it)
200 gm (1-1/2 cup) powdered sugar, sifted (I used icing mixture about 4% cornstarch but most recipes insist on pure icing sugar that is no cornstarch but this is almost impossible to obtain in the USA I used icing mixture to test)
110 gm (1 cup) blanched almonds, whole or ground (I used a mini food processor to grind the meal)
1. In a stand mixer fitted with the whisk attachment, whip the egg whites (and powdered egg whites if using) to a foam, then gradually add the sugar until you obtain a glossy meringue. It is done as soon as the meringue can be turned upside down without falling out of the mixing bowl. The meringue is about ready when it starts to become shiny. I used castor (super fine) sugar the original recipe had normal table sugar. Add your powdered flavourings and colourings just before the meringue is ready, if you are adding liquid flavourings or colourings definitely use 2 tsps of egg whites in the meringue. I found it takes 1/2 again in time to beat the egg whites when I used powdered egg whites.
2. Combine the whole peeled almonds and powdered sugar in a food processor and give them a quick pulse if you use already ground almonds (that you have ground yourself separately) it will break the powdered sugar lumps and combine your almonds with it evenly. If you use whole almonds, pulse thoroughly for a minute or so. I used a mini food processor to finely grind the meal I placed the meal into a bowl added the sifted powdered sugar combined using a spatula and shifted the mixture twice I found that this makes mixing the 'macaronage' (the whipped meringue and nut meal together) much easier. Most recipes insist on pure icing sugar (i.e. no cornflour but this is very hard to obtain in the USA and I felt I should use it in this recipe). The tant pour tant (the almonds and sugar) should not be over-mixed or over-heated while processing because the nuts can become too oily - add vanilla in the tant pour tant to reduce oil leakage. Some sites suggest that the almond meal ideally should be allowed to dry at room temperature for up to one week prior to using. You can bake the nut meal of 5-10 mins at 140C (285F) to dry it. When using other nuts use 50% almond since almonds have the least oil content of all nuts. You can add dried zests or dried herbs at this stage and grind them along with the nut meal if you wish.
3. The macaronage stage - Add the tant pour tant (the icing sugar and nut meal mixture) to the meringue, and start to give quick strokes at first to break the mass and slow down. The whole process should not take more than 50 strokes. Test a small amount on a a plate: if the tops flatten on its own, you are good to go. If there is a small beak, give the batter a couple more folds. I found the correct timing is when the macaronage starts to become shiny again. The batter has the consistency of very thick cold honey and will 'flow' for a very short time after piping this helps smooth out small imprefections in the piped shell. I did between 30-35 stokes (a half batch takes about 12-15 stokes) to combine all the ingredients. At first use a spatual and mix quickly (about five stokes) and then more slowly and carefully combine the macaronage from the bottom of the batter then going up the sides while turing the bowl this folding technique will effectively mix the macaronage. You will find that it is difficult at first to incorparate the sifted almonds and icing sugar into the meringue but after about the initial quick mixing it becomes much easier. You can smooth out a very small beak by using a slightly moist finger make sure you do not drop any water on the maracon shell which will cause a blister to form see here. It is better to undermix than to overmix since placing the batter into the piping bag will help distribute the almond meal, sugar and egg whites. You have a good consistency to the batter if by the time you have finished piping the whole tray, the first macarons you piped have lost the small beak and small imperfections in the shell. By the way, for those of you who sometimes end up with a too-stiff mixture and are afraid of mixing further, add a teaspoon or two of eggwhite (normal, not whipped) and mixing in quickly and gently. It seems to be a very effective repair — much more attractive than thick, lumpy macarons with piping nipples. If you have overmixed the batter (the test batter spreads too much) you can add more tant pour tant (sifted almond meal and icing sugar) and test the batter again.
4. Fill a pastry bag fitted with a half inch (13mm) plain round tip with the batter and pipe small rounds 1.5 inches (40mm) in diameter about 1 inch (25mm) apart onto parchment paper baking sheets. It is much easier if you draw circles on the parchment paper so you will get even sized shells. Take some of the macaronage from the beaters and smear a little on each corner of the pan and place the parchment paper on the pan this stops the paper from moving while you are piping. The best piping technique is to pipe vertically about 5 mm above the tray surface directly over the centre of the traced circle using one smooth squeeze of the piping bag until it the macaronage has almost spread out to the size of marked circle on the parchment, this will give you circular shells instead of mishapen ones. Do not use a spiral of batter to form your shell. Move the pan and not the piping bag so you can pipe directly over the centre of each marked circle on the parchment paper. Try to do the piping in one smooth motion which gives the smoothest shell. Pipe shells in an alternating pattern so that the shells are offset to each other (not lined up in rows) such as 6 shells in the first line then 5 shells this gives a better heat flow and makes for more evenly baked batch of macarons. I found that small piped shells had a more pronounced dome shape and higher feet than larger piped shells (if using the same macaronage and same baking method). You can save your macaronage if it has been slightly overmixed by piping small shells. Confidently bang the completed baking pan of shells down onto the counter to release any air bubbles and to help smooth the shell of small beaks and imperfections.
5. Preheat the oven to 300 degrees F (150C). Let the macarons sit out for an hour (I did about 2hrs you can do up to 4 hrs) to harden their shells a bit and bake for 10-12 minutes, depending on their size. Let them cool completely before filling. I pre-heated the oven to 350 degrees F (175C) and then turned down the temperature to 325 F (160C) as soon as the shells were in the oven. I use two baking sheets turned upside down stacked on top of each other to bake the macarons this helps in the baking process. The stacked upside down baking sheets ensure slow even heat distribution underneath the shells which means the outer surface is dried up first before the inside starts to lift it up. This is what makes that all important ‘foot’ and a smooth surface that is not cracked. I baked the shells for 6 minutes and then turned the baking sheet around and baked for a further 4 mins then I turned up the heat as high as possible and baked for two minutes longer watching to make sure that the shell did not brown). Temperature seems to be the most variable parameter in baking macarons some sites suggest 285F (140C) for 13-15 mins while some other sites preheat the oven to 390F (200C) and then drop the temperature to 320F (160c) to finish baking. The most common specified temperature seems to be a constant 300F (150C) try this temperature first then try 320F (160C) then try 285F (140C). Most ovens have hotspots (usually near the back of the oven) you can place folded tin foil or another small baking pan on a lower oven rack in these spots to even out the temperature. If your macarons are browning try placing an empty baking sheet on a shelf above your shells this delays the heat from above, Remove the shells from the parchment paper once they are cooled. They are fragile when hot.
Removal of sticky shells
If your shells are crisp, the feet have formed and are firm but the bottoms are sticky do one the following
a. If the shells are only slightly sticky then dry the baked shells at room temperature that is leave on the paper and let them air dry for a few hours or overnight on a wire drying rack - they will not "sweat" and in fact macarons store at room temperature really well and really need a few days to taste their best. It's a matter of patience they will dry out.
b. If the shells are really sticky use a very low drying temperature (i.e. a cooling oven which will not cook the shells anymore) until you can remove them safely. That is turn the oven off for 10 mins and then place the stuck macarons back in the cooling oven with the door ajar this helps dry out the shells and not cook them. I usually leave them for an hour in the cooling oven and then check to see if I can remove them.
c. You can steam them off using a small amout of steam from a few drops of water or a spritz with water (or a slightly moist paper towel) placed on top of the hot baking sheet and under the parchment paper with the sticky shells which is the traditional solution and mentioned in nearly all recipes but to be honest I don't like this method too much it's too hit-and-miss and I never know how many drops of water to use or how much spraying to do (or how moist to make the paper towel) this method is too finicky I feel.
6. Pipe or spoon some of your filling on one shell and sandwich with another one.
I worked out it costs about 31 cents per macaron.
Storage
Frozen unfilled macaron shells store very well for about 1 month. When you want to serve move the frozen shells into refrigerator to thaw overnight and about an hour before serving fill and then allow to get to room temperature.
Filled macarons last two to three days at room temperature and up to a week in the fridge. Pierre Hermé recommends they are best after four days. Bring to room temperature before serving.
Resources
There are three methods for making macarons:-
French - which uses a simple medium hard meringue
Italian - which uses a heated sugar syrup to stablise the meringue
Spanish - which uses extra sugar in the meringue to help stablise it
Tartelette had written a long article called Demystifying Macarons (in Dessert Magazine #2 p36-43 see this link and go to page 38) on the French method which gives a whole host of tips and hints on the process.
David Lebovitz web page on macarons has an extensive listing of links about making macarons.
Syrup and Tang A macaron round-up which goes through the French and Italian methods in great detail and has many links to other resources.
Julia @ Mélanger has a beautiful description of the Italian method
Mecotte has a long descripton of the Italian method.
The Spanish method is detailed in this article
33 comments:
Amazing! I love the way they look and the flavour combinations. I made some custard the other day and have some spare egg whites - now I know what I'm going to be doing with them!
Just lovely colours and flavours. Beautiful. Great that you can get the French method to work for you so well. I guess it is what you're used to after a while! I would never switch from my beloved Italian version.
They look so beautiful and sound so exotic- wild cherry/pomegranate and pistachio/spearmint!!! MMMMmmmmmm Can't wait for the next edition!!!!
I have a novice question - At what stage and how do you add flavours and colours?
Thank you for the advice - I have yet to pluck up courage for macarons but I think this will help. Beautiful collection.
Your macarons rock!!!
I appreciate the detailed instructions which makes all the difference. Thanks.
Once the rains are gone, and humidity is a bit lower, I am definitely trying these out.
Gorgeous! I've never had macarons, but these look amazingly professional - I might just have to try them =D. Congratulations on a year of blogging!
Oo, I love your new batch of macarons Audax! So great that you made all those lovely flavours... I am planning to make them again soon as well, but in a few weeks I am will be on holiday, so not sure when I'm gonna have the time to do them. But looking at yours makes me want to bake them again right now!
Happy anniversary! I thoroughly enjoyed reading the very-detailed macaron making process. Very informative. Thanks for sharing again!
So pretty!
Wow! Your macs look so perfect...
HAPPY BIRTHDAY!!! And congratulations for your blog.
Audax! I just can't believe its your first attempt! I gave a try long back and it came out 90% fine..but a bit outta shape :) its on my blog though!
Btw! Congratulations on your blogoversary! :)
Happy Anniversary!! Your macarons look fantastic! Those flavors are divine. I really, really, really need to get my butt to a bakery and try some of these. I've never had one! (gasp!)
Joyeux anniversaire ma chère Audax ! tu as beaucoup de talent et j'espère que tu vas continuer à nous les partager pendant encore beaucoup d'années.
tes macarons sont vraiment très réussis et j'aime beaucoup les parfums que tu y as mis !
Happy Blogiversary, Aud! Your macarons are beautiful and the flavors so unique and mouth watering. I love the touch of mintom both of them! I went through a period last summer where all I did ws practice making macarons in various flavors. Mine never turned out as gorgeous as yours, but summer humidity is probably NOT the best time to make these! Again, beautiful job, and as always, so creative with your flavorings. The passion you possess when it comes to cooking and baking, is so amazing!
Thanks for giving such great tips and feedback in your process. The pictures looks fabulous and I love the flavor combinations you made. Once I got the technique down, macarons are fun to make--it's actually relaxing now. :)
What a lovely and colorful way to celebrate your blogiversary! The combinations sound terrific. I've enjoyed finding your blog fairly recently (via the Daring Bakers pages), and look forward to following many more years of yummy recipes from you. :-)
I can't believe you've only been blogging for a year, congrats! And your macarons rock .. they are absolutely gorgeous. Way to go!
Oh, what pretty macarons! They look like jewels! You are very talented...
Cheers,
Rosa
Congratulations! Your macaroons are absolutely perfect!
these look wonderful! this was a really informative read, thanks!
Happy Blog Anniversary!
You are as of now... the macarons master! Yup!
WOW! I'm amazed by how well you succeeded! Bravo... and a very happy anniversary!
These look fabulous and yummy!!! I've never had a macaroon in my life...this might be my next project.
Have a great week and thanks for the kind comment!
Cheers,
Rosa
Congratulations! 1 year is quite an accomplishment!
As I said before, Congrats on a year! I've got something for you over at my blog =D.
Awesome! Beautiful colors and delicious flavors - love the wild cherry/pomegranate!
Happy Anniversary!
Congratulations! On the O-N-E!
Macarons look fabulous with terrific flavor combinations.
Congratulations and thank-you. This was very helpful!
Laura
Happy Blogversary, Audax! It's hard to imagine what we would do without you. You are the DK czar and have an insatiable sense of curiosity and creativity in the kitchen. Thanks for all you do.
They look fantastic - so pretty. I would love to know what you used as cherry/pomegranate flavouring?
Just found the flavoured tea info!
huhu
Post a Comment