

This month's challenge was to make doughnuts! We could decide if we would like them to be a cake or yeast doughnut. Lori are host gave recipes for two types of yeast doughnuts (one filled) and two types of cake doughnuts. Also included was a recipe for gluten-free doughnuts. She strongly encouraged us to get creative with your toppings and fillings. The sky was the limit! Lori said to "Feel free to dip them in chocolate, sprinkle them with sugar, or fill them with preserves, custard, or whatever you like". We could even get really creative and try making a savory doughnut! How about filling a doughnut with cheese and some herbs?
This was a marvellous challenge so bakers on the forum mentioned how delicious and easy the recipes were and that this was their first time deep frying and it wasn't that hard to do.
I decided to try the yeast doughnut recipe by Alton Brown.
Alton Brown's Yeast Doughnuts
This recipe (the first challenge recipe) produces absolutely and utterly the best doughnuts I have ever had; the interiors of the doughnuts are soft, fluffy and airy (light-as-a-feather) and the crusts are thin and crisp. The doughnuts are mildly sweet and with a coating of icing (powdered) sugar they are perfect. An absolutely marvellous recipe! It is best to think of the dough as an artisan (high-hydration) bread dough i.e. very soft and sticky. Work it gently and try to keep as much air in the dough when you are handling it. I have a lot of experience working with high-hydration (high ratio of water to flour) soft and sticky doughs so I had no problems with this recipe. If you feel the initial dough mixture is too sticky and soft don't add flour just let the dough rise; during this time the water will hydrate (wet) the flour and the dough will become less sticky and firmer (it will always be a soft dough) and the gluten will develop. Only add flour after the first rising (and only on the counter and the cutting tools you are using).
A few comments on this recipe
1. I used butter since I hate the fat-sticking-to-the-roof-of-my-mouth-feel that shortening produces and also vegetable shortening is impossible to find in Australia.
2. It is best to weigh the flour if possible 23 oz or 650 gm or 4⅔ cups (of settled flour straight from the bag do not fluff up the flour first just measure the cup volume straight from the bag I checked 4⅔ cups of flour does equal 650 grams/23 oz) this amount produces a sticky batter-like cake-dough, very unlike normal bread-dough, this is how it is meant to be. Resist the temptation of adding more flour to make the dough like normal-bread-dough it is meant to be very sticky and like a very thick cake-batter the dough will become less sticky during the first rising. So please resist the urge to "correct" the recipe’s measurements. Just do what the recipe says and you won't be disappointed. As the dough (sticky batter) rises, the water absorbs into the flour and the final mixture will become more like a normal soft dough.
3. The dough is very yellow (as compared to normal bread dough) mainly due to the use of butter and eggs.
4. You should “pour” the soft dough into the rising bowl. And let it rise the dough will become less sticky and more firm but it will be soft dough. And it rises a lot so use a large bowl. The dough might take up to 2 hours (even longer) to double in size; rising time depends on: how much kneading you did, temperature and humidity:- so don't worry too much if nothing happens after an hour just wait it will happen.
5. You can keep the (first-rise) dough in the refrigerator up to four days before you roll it out and second-rise and deep-fry it.
6. I only needed a tiny amount of flour (about 1 tablespoon) on the counter to 'pat' out the soft dough to 3/8 inch (9mm) thick to do the cutting of the doughnut shapes. I lightly floured the cutting tools so they wouldn't stick to the soft dough.
7. I used a small piping connector to cut out the inner 'hole' of the doughnut.
8. I had no trouble lifting the cut-out and risen doughnuts from the counter into the hot oil. I used my lightly-floured fingers and hands to lift the risen doughnuts no problems.
9. Cooking the doughnuts only took about 30 seconds each side I used a thermometer to check the oil temperature. If you do not have a thermometer you can test the temperature by placing a small piece of white bread in the oil it should brown in about 60 seconds. If the oil is too cold the doughnuts will absorb the cooking oil and will became very greasy and if the oil is too hot the outside of the doughnut will cook too quickly while the inside will still be doughy.
10. I used rice bran oil which has a very high smoke point 490°F/254°C and has a very mild (almost flavourless) taste, I particularly dislike canola oil for deep-frying since it has a fishy/strange taste and odour to it, though I do use a combination of canola oil and olive oil for most of my shallow frying.
11. If you like your doughnuts sweet increase the sugar to ½ cup.
Special notes if you are making the dough by hand (not using a machine to mix the dough)
1. I have made high-hydration doughs many hundred's of times so I have a lot of experience with them.
2. The dough will be to sticky to knead by hand without adding a lot of extra flour and it will be very messy so if you are making the dough by hand, just roughly combine the dough ingredients using a plastic scraper (see first picture below) or wooden spoon. No need to knead too much; a longer resting/rising time is equivalent to kneading that is if you only roughly knead for one minute or so and let the dough rise for a longer time this is equivalent to kneading for a longer time. I only roughly combined the dough ingredients for a minute with a plastic scraper and let the dough rise for about 1½ hour (½ hour longer than the stated time in the recipe) which made the final dough silky and allowed the gluten to develop to maximum hydration.
3. The initial dough will look wet, very soft, sticky and not-combined but after rising/resting it will combine into a fully-hydrated (i.e. the gluten well-developed) mass.
4. Don't worry too much about the look and feel of the dough on initial mixing, only really look and feel the dough after the first rising (if you only roughly mixed the dough at the beginning the rising time will be longer than the stated time in the given recipe but the dough will come together with full gluten development) then flour the counter and cutting tools use the minimum extra flour to help you cut, shape and re-rise the doughnuts so they can be deep-fried. .
If you using a mixing machine just follow the instructions given in the recipe.
Slight changes I did to the given recipe
1. I used 2 tablespoons of white vinegar in the milk to make a buttermilk substitute (I reduced the amount of warm water by 2 tablespoons) adding vinegar in the milk makes the dough more tender.
2. I used 1/3 cup vanilla-sugar instead of the normal table sugar since I had it to hand and I thought the ¼ cup of sugar in the recipe was too little. Even with the 1/3 cup of vanilla-sugar the final doughnuts were only mildly sweet (without the icing sugar coating).
3. I didn't use any nutmeg since I don't like it.
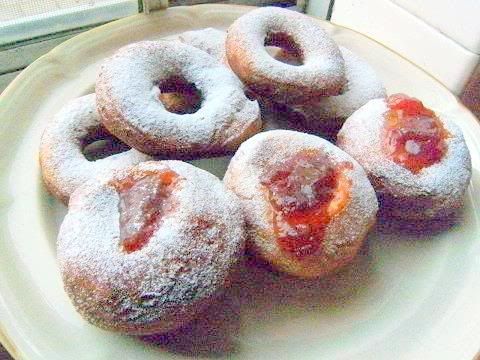
4. I did two doughnut shapes, the normal doughnut with a hole and “German” doughnuts that have no central holes and are filled with berry jam and coated with icing (powdered) sugar.
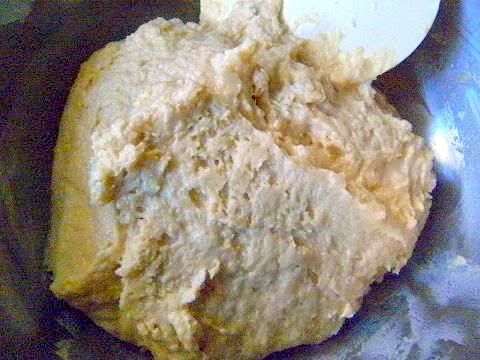
Here is the sticky soft dough after one minute of mixing with a plastic dough scraper, you don't have to mix it too much, the rising time (which will be longer if you don't knead the dough too much) will develop the gluten to the correct hydration level. Notice how wet and soft the dough is and how undeveloped the gluten is in the mixture.
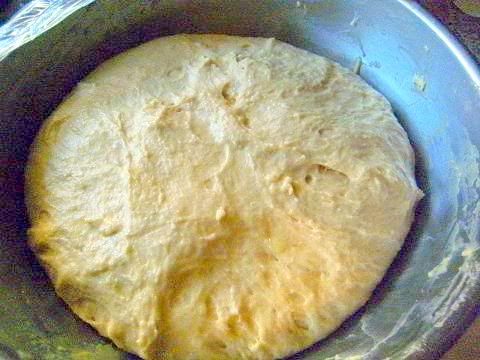
After 1½ hours of rising the dough is firmer and is one-silky-mass and the gluten threads are well hydrated. Notice how the dough is one homogeneous mass, compare this picture with the one above.
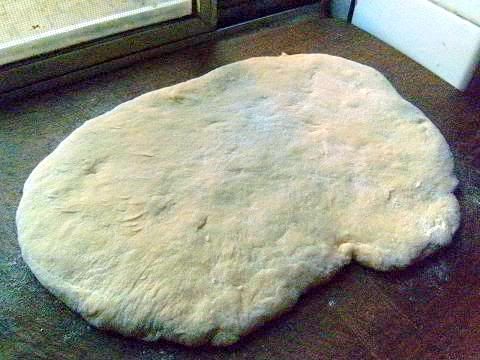
The patted out dough, it is so soft you can easily pat it to the correct thickness I only needed to add a tiny amount of flour onto the board so the dough won't stick.
How I cut out the doughnut shapes, remember not to twist the cutter just push the cutter down, twisting the cutter will give you jagged edges that lead to unattractive serrations to the doughnut shapes and causes misshapen doughnuts..
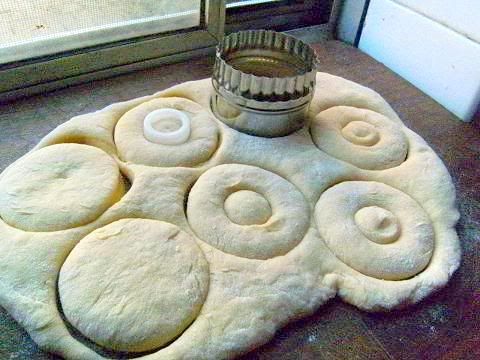
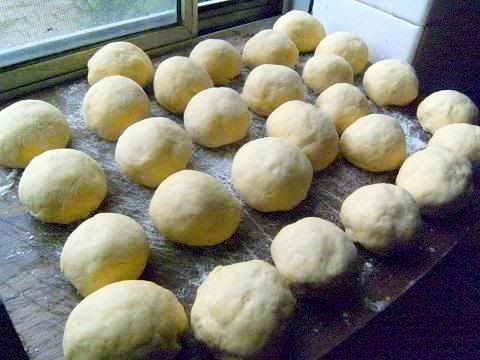
Cut-out doughnut shapes
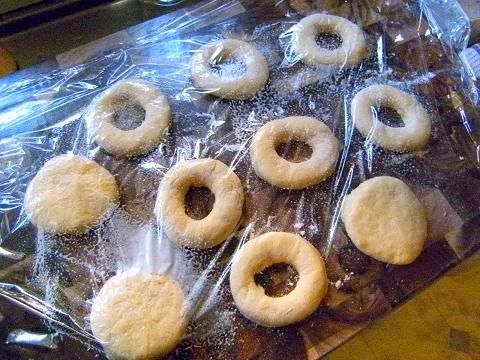
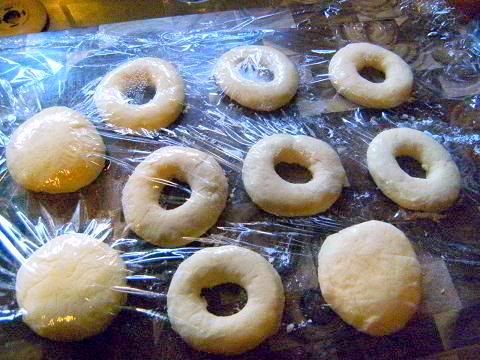
The doughnuts after the second rising (in my case 45 minutes)
The deep-fried doughnut shapes, mine took about 30 seconds each side. The doughnuts increase in size by a factor of two or so while deep-frying.
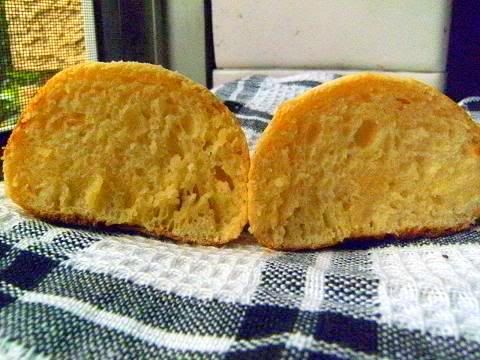
Close-up of the interior of the traditional doughnut shape, notice how airy it is, it is melt in your mouth soft and the crust is very thin and crisp. Certainly the best doughnuts I have tasted.
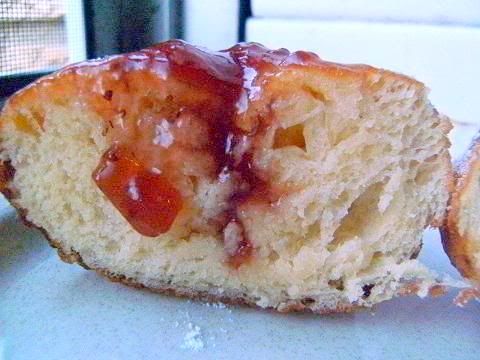
Close-up of the interior of the “German” styled doughnut (no hole and filled with berry jam), notice the large holes and how soft it is yum yum, this is my favourite shape for doughnuts they are absolutely delicious.
The final doughnuts covered in icing (powdered) sugar
If you don't like deep-frying you can bake them!
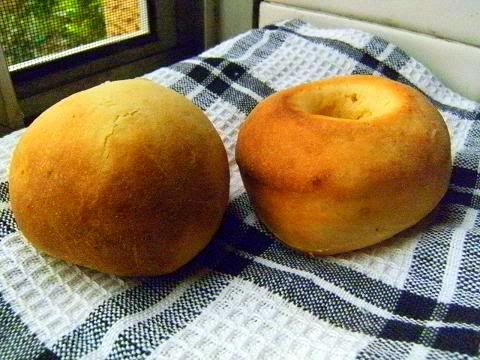
I noticed in the challenge thread that a number of people were interested in baking the doughnuts I did some experimenting. This dough makes marvellous sweet buns. I investigated and baked a doughnut shaped bun and a round bun for 10 minutes in a preheated hot oven 220°C/430°F/gas mark 7 they bake beautifully and the oven-spring (how much the buns rise in the oven) is amazing. The best shape is the “German” style of doughnuts without a hole since the normal shape closes up when baked (see photograph) I suppose if you want holes make them very big so they do not close up in baking or use special doughnut baking pans that have inserts that create holes in the final baked doughnuts. It would be best to brush them with melted butter straight from oven and dust with icing (powdered) sugar. These sweet buns are really yummy and taste remarkably similar to the deep-fried ones. I increased the sugar 1/2 cup to compensate for not deep-frying,
The baked sweet buns
The crumb of the sweet buns
Storage
These doughnuts are best eaten on the day made, but freeze very well. Reheat in a moderately hot oven 400F/200C for ten minutes.
Making the doughnuts in advance
Just put the dough-batter straight (with the bare minimum of kneading) into the refrigerator and let it do its rising in there, there is no need to heat the milk just barely melt the butter/shortening so it will incorporate into the dough-batter. Use this amount of yeast in the recipe for each day the dough-batter will be in the refrigerator
1 day in the refrigerator use 4 teaspoons of yeast
2 days in the refrigerator use 3 teaspoons of yeast
3 days in the refrigerator use 2 teaspoons of yeast
4 days in the refrigerator use 1 teaspoon of yeast
which will allow the dough to be ready on the day needed (the yeast will increase in number and rise the dough by the time it is needed) and the longer time dough rises the better it tastes so your brunch group will be in for a special treat - Slow raised doughnuts. Try to go for the longest rising time to get maximum taste to the dough-batter.
Tips about recycling the frying oil
Reusing cooking oil has been done for ages. There really isn't a problem, if done properly. The greatest hazard is allowing the fat to become rancid (spoiled) and deteriorated to the point it produces undesirable flavors and odors. Besides ruining what would have been a perfectly good meal, rancid oils also contain free radicals that are potentially carcinogenic. Rancid oil has fewer antioxidants but is not poisonous.
To re-use oil safely, use these tips:
Strain it through a few layers of cheesecloth to catch any food particles. Be careful with hot oil, though, because you can easily get burned.
Shake off excess batter from food before frying it.
Use a good thermometer to fry foods at 190°C.
Turn off the heat after you are done cooking. Exposing oil to prolonged heat accelerates rancidity.
Don't mix different types of oil.
Store oil in a cool, dark place.
Avoid iron or copper pots or pans for frying oil that is to be reused. These metals also accelerate rancidity.
Signs of Deteriorated Oil:
Oil darkens with use because the oil and food molecules burn when subjected to high/prolonged heat.
The more you use an oil, the more slowly it will pour. Its viscosity changes because of changes to the oil's molecular structure.
Loose absorbent particles accumulate as sediment at the bottom of the storage container or are suspended in the oil.
When smoke appears on the oils' surface before the temperature reaches 190 degrees C (375 degrees F), your oil will no longer deep-fry effectively.
If the oil has a rancid or "off" smell or if it smells like the foods you've cooked in it, it should be discarded.
Savoury Doughnuts
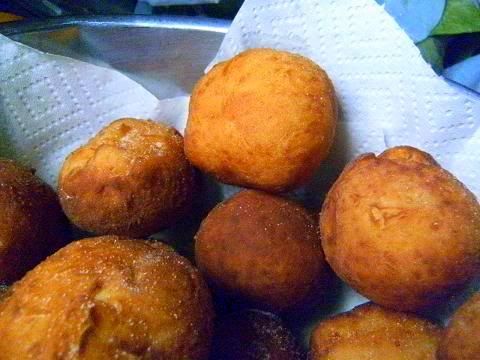
I wanted to make savoury doughnuts so I decided to make lihapiirakka (Traditional Savoury Finnish doughnuts) and a more modern version with cheddar cheese and ham.
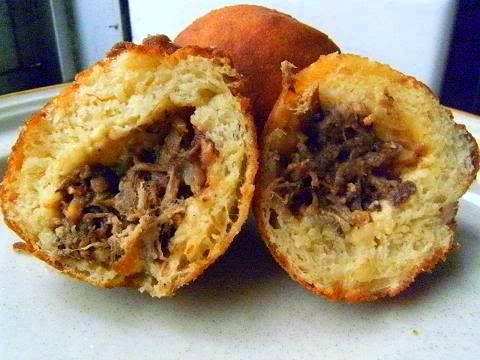
Lihapiirakka is a deep-fried doughnut filled with combination of cooked rice, onion and minced meat I had these a lot when I was growing up I just love them, since I had some slowly-braised in red-wine beef leftover I used that instead of the normal minced beef I really like this combination .
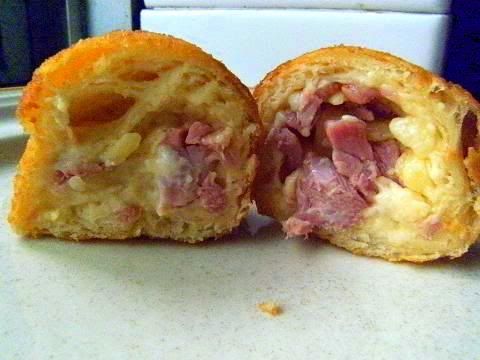
I also made cheese and ham doughnuts these are good also great for afternoon snack or a party.
Doughnuts rising
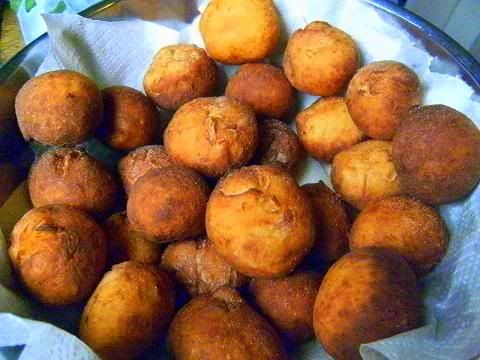
Deep-fried doughnuts sprinkled with garlic powder and onion powder
Close-up of doughnuts
Sharp cheddar cheese and ham
Lihapiirakka
Challenge recipes
I really hope you have fun with this challenge!
Recipe Source: Lori included four recipes:
The yeast doughnut is from Alton Brown:
http://www.foodnetwork.com/recipes/alton-brown/yeast-doughnuts-recipe/index.html
The cake doughnut is a Nancy Silverton recipe:
http://www.seriouseats.com/recipes/2007/06/cook-the-book-oldfashioned-but.html
The raspberry jam bomboloni recipe is a Kate Neumann recipe:
http://www.foodandwine.com/recipes/raspberry-jam-bomboloni
The pumpkin doughnuts are from Bon Appétit: http://www.epicurious.com/recipes/food/views/Pumpkin-Doughnuts-with-Powdered-Sugar-Glaze-and-Spiced-Sugar-Doughnut-Holes-230926
Blog-checking lines: The October 2010 Daring Bakers challenge was hosted by Lori of Butter Me Up. Lori chose to challenge DBers to make doughnuts. She used several sources for her recipes including Alton Brown, Nancy Silverton, Kate Neumann and Epicurious.
Note: I recommend placing your uncooked doughnut on your slotted spoon first and lowering it into the hot oil that way to reduce the chance of injury. Also, try to always turn the spoon away from you to reduce the chances of oil splashing back up.
Mandatory Items: Use any of the recipes provided. Naturally, accommodations are made for those with dietary/allergic restrictions. I’ve attached a link to a gluten free recipe below in the “Additional Information” section.
Variations allowed: Use your creativity to take these recipes and tweak them to come up with new, delicious varieties of doughnuts. You can use any type of toppings and fillings, you can make any shape you’d like, and you can make any size you like. You can add ingredients to the batters to make flavored doughnuts. The possibilities are endless.
Preparation time: See recipes for prep/rising/cooking times for each.
Equipment required:
- A Dutch oven or deep skillet (I prefer using a Dutch oven to reduce splatter)
- Deep fry thermometer, candy thermometer or any thermometer that will withstand and measure temperatures of up to 380 degrees
- Metal slotted spoon, metal slotted spatula or tongs (do NOT use plastic - it will melt!)
- Cookie sheets or a wire rack lined with paper towels to allow doughnuts to drain
- Electric hand mixer or stand mixer, or a bowl and a spoon if you are able to utilize a lot of elbow grease
- Doughnut or biscuit cutters or you can use a glass and a piping tip for the center
- Pastry bag (if you choose to make Bomboloni or any filled doughnut) or a squeeze bottle with a good tip that will poke a hole in your Bomboloni. Another way to fill a doughnut is to use the tip of a sharp knife to poke a hole in the doughnut and then use a ziplock bag filled with filling and cut on one corner to fill the doughnut.
Yeast Doughnuts:
Preparation time:
Hands on prep time - 25 minutes
Rising time - 1.5 hours total
Cooking time - 12 minutes
Yield: 20 to 25 doughnuts & 20 to 25 doughnut holes, depending on size
Ingredients
Milk 1.5 cup / 360 ml
Vegetable Shortening 1/3 cup / 80 ml / 70 gm / 2.5 oz (can substitute butter, margarine or lard)
Active Dry Yeast 4.5 teaspoon (2 pkgs.) / 22.5 ml / 14 gm / ½ oz
Warm Water 1/3 cup / 80 ml (95°F to 105°F / 35°C to 41°C)
Eggs, Large, beaten 2
White Granulated Sugar ¼ cup / 60 ml / 55 gm / 2 oz
Table Salt 1.5 teaspoon / 7.5 ml / 9 gm / 1/3 oz
Nutmeg, grated 1 tsp. / 5 ml / 6 gm / ¼ oz
All Purpose Flour 4 2/3 cup / 1,120 ml / 650 gm / 23 oz + extra for dusting surface
Canola Oil DEPENDS on size of vessel you are frying in – you want THREE (3) inches of oil (can substitute any flavorless oil used for frying)
Directions:
- Place the milk in a medium saucepan and heat over medium heat just until warm enough to melt the shortening. (Make sure the shortening is melted so that it incorporates well into the batter.)
- Place the shortening in a bowl and pour warmed milk over. Set aside.
- In a small bowl, sprinkle the yeast over the warm water and let dissolve for 5 minutes. It should get foamy. After 5 minutes, pour the yeast mixture into the large bowl of a stand mixer and add the milk and shortening mixture, first making sure the milk and shortening mixture has cooled to lukewarm.
- Add the eggs, sugar, salt, nutmeg, and half of the flour. Using the paddle attachment of your mixer (if you have one), combine the ingredients on low speed until flour is incorporated and then turn the speed up to medium and beat until well combined.
- Add the remaining flour, combining on low speed at first, and then increase the speed to medium and beat well.
- Change to the dough hook attachment of the mixer and beat on medium speed until the dough pulls away from the bowl and becomes smooth, approximately 3 to 4 minutes (for me this only took about two minutes). If you do not have a dough hook/stand mixer – knead until the dough is smooth and not sticky.
- Transfer to a well-oiled bowl, cover, and let rise for 1 hour or until doubled in size.
- On a well-floured surface, roll out dough to 3/8-inch (9 mm)thick. (Make sure the surface really is well-floured otherwise your doughnuts will stick to the counter).
- Cut out dough using a 2 1/2-inch (65 mm) doughnut cutter or pastry ring or drinking glass and using a 7/8-inch (22 mm) ring for the center whole. Set on floured baking sheet, cover lightly with a tea towel, and let rise for 30 minutes.
- Preheat the oil in a deep fryer or Dutch oven to 365 °F/185°C.
- Gently place the doughnuts into the oil, 3 to 4 at a time. Cook for 1 minute per side or until golden brown (my doughnuts only took about 30 seconds on each side at this temperature).
- Transfer to a cooling rack placed in baking pan. Allow to cool for 15 to 20 minutes prior to glazing, if desired.
Old-Fashioned Buttermilk Cake Doughnuts:
Preparation time:
Hands on prep time - 25 minutes
Cooking time - 12 minutes
Yield: About 15 doughnuts & 15 doughnut holes, depending on size
Ingredients
Sour Cream ¼ cup / 60 ml / 60 gm / 2 oz
All Purpose Flour 3¼ cup / 780 ml / 455 gm / 16 oz + extra for dusting surface
White Granulated Sugar¾ cup / 180 ml / 170 gm / 6 oz
Baking Soda ½ teaspoon / 2.5 ml / 3 gm / .1 oz
Baking Powder 1 teaspoon / 5 ml / 6 gm / .2 oz
Kosher (Flaked) Salt 1 teaspoon / 5 ml / 6 gm / .2 oz (If using table salt, only use ½ teaspoon)
Nutmeg, grated 1.5 teaspoon / 7.5 ml / 9 gm / .3 oz
Active Dry Yeast 1 1/8 teaspoon / 5.6 ml / 3.5 gm / .125 oz
Buttermilk ¾ cup + 2 Tablespoon / 210 ml / 225 gm / 7 ¾ oz
Egg, Large 1
Egg Yolk, Large 2
Pure Vanilla Extract 1 Tablespoon / 15 ml
Powdered (Icing) Sugar ¼ cup / 120 ml / 65 gm / 2.3 oz (Used for decorating and is optional)
Directions:
- In a small stainless-steel bowl set over a pot of gently simmering water, heat the sour cream until just warm.
- Heat the oil to 375°F/190°C.
- Over a large mixing bowl, sift together the flour, sugar, baking soda, baking powder, salt, nutmeg; make a large well in the center. Place the yeast in the well; pour the sour cream over it. Allow it to soften (if using packed fresh yeast), about 1 minute.
- Pour the buttermilk, whole egg, egg yolks, and vanilla extract into the well. Using one hand, gradually draw in the dry ingredients. The mixture should be fairly smooth before you draw in more flour. Mix until it is completely incorporated. The dough will be very sticky. Wash and dry your hands and dust them with flour.
- Sift an even layer of flour onto a work surface. Don’t be afraid to use a lot of flour. You don’t want the doughnuts sticking to your counter. Scrape dough out of bowl onto the surface; sift another layer of flour over dough. Working quickly, pat dough into an even 1/2-inch (12.5 mm) thickness. Dip cutter in flour and, cutting as closely together as possible, cut out the doughnuts and holes. Place holes and doughnuts on a floured surface. Working quickly, gather scraps of dough together, pat into 1/2-inch (12.5 mm) thickness, and cut out remaining doughnuts and holes.
- Drop three to four doughnuts at a time into the hot oil. Once they turn golden brown, turn them and cook the other side. Cooking times may vary, but with my oil at 375 °F/190°C, I found they only took about 20 to 30 seconds per side.
- Once cooked, place on a baking sheet covered with paper towels to drain.
Bomboloni:
Preparation time:
Hands on prep time - 35 minutes
Rising time - 1 1/2 hours plus overnight
Cooking time - 10 minutes
Yield: About 32 Bomboloni
Ingredients
Water, Lukewarm 1/3 cup + 1 Tablespoon
Active Dry Yeast 3¼ teaspoon (1.5 pkgs.) / 16.25 ml / 10 gm / .35 oz
Honey 1.5 Tablespoon / 22.5 ml
All Purpose Flour 3 cup / 720 ml / 420 gm / 14 ¾ oz
Milk 3 Tablespoon / 45 ml
Egg Yolk, Large 6
White Granulated Sugar 1/3 cup / 80 ml / 75 gm / 2 2/3 oz + more for rolling
Kosher (Flaked) Salt 2 teaspoon / 10 ml / 6 gm / .2 oz
Butter, Unsalted 3 Tablespoon / 45 ml / 42 gm / 1.5 oz
Canola Oil 3 cup / 720 ml / (Or any other flavorless oil used for frying)
Raspberry Jam, Seedless ¾ cup / 180 ml / 300 gm / 10.5 oz (or any flavor jam, preserves, jelly)
Directions:
- In the bowl of a standing electric mixer, mix the water, yeast, honey and 1 cup plus 2 tablespoons (160 gm) of the flour. (Alternatively, whisk the ingredients by hand.) Cover with plastic wrap and let stand at room temperature until foamy, about 1 hour.
- Return the bowl to the mixer, fitted with a dough hook. Add the remaining 1 ¾ cups plus 2 tablespoons (260 gm) of flour, along with the milk, egg yolks, 1/3 cup of granulated sugar and the salt. Mix at low speed until blended, then add the butter and knead at medium speed until silky but sticky, about 5 minutes; the dough will not pull away from the side of the bowl.
- Using an oiled spatula, scrape the dough into an oiled bowl and cover with plastic wrap. Refrigerate overnight.
- In a large saucepan, heat the canola oil to 360°F/180°C. Line a rack with paper towels. Fill a shallow bowl with 1/2 inch (12 mm)of granulated sugar. On a lightly floured surface, roll out the dough a scant 1/2 inch (12 mm) thick. Using a 2-inch (50 mm) round biscuit cutter, stamp out rounds. The original recipe said to not re-roll the dough, but I did and found it to be fine. Fry the rounds, 4 to 5 at a time, until they are browned, about 4 minutes (mine only took about a minute each – try to go more by sight). Be sure to keep the oil between 360°F and 375°F 180°C and 190°C. Drain the bomboloni on paper towels.
- Roll them in the granulated sugar.
Filling Directions:
Fit a pastry bag with a plain donut tip (or a 1/4-inch (6 mm) tip) and fill with the preserves (you can also use a squeeze bottle). Poke the tip three-fourths of the way into the bomboloni and squeeze in the preserves, pulling the tip out slightly as you squeeze to fill them as much as possible. Serve warm.
Pumpkin Doughnuts:
Preparation time:
Hands on prep time - 15 minutes
Chilling time - 3 hours
Cooking time - 10 minutes
Yield: About 24 doughnuts & 24 doughnut holes
Ingredients
All Purpose Flour 3.5 cup / 840 ml / 490 gm / 17 ¼ oz
Baking Powder 4 teaspoon / 20 ml / 24 gm / .85 oz
Table Salt 1 teaspoon / 5 ml / 6 gm / .2 oz
Cinnamon, ground 1 teaspoon / 5 ml / 6 gm / .2 oz
Ginger, ground ½ teaspoon / 2.5 ml / 3 gm / .1 oz
Baking Soda ½ teaspoon / 2.5 ml / 3 gm / .1 oz
Nutmeg, ground ¼ teaspoon / 1.25 ml / 1.5 gm / .05 oz
Cloves, ground 1/8 teaspoon / .6 ml / ¾ gm / .025 oz
White Granulated Sugar 1 cup / 240 ml / 225 gm / 8 oz
Butter, Unsalted 3 Tablespoon / 45 ml / 42 gm / 1.5 oz
Egg, Large 1
Egg Yolk, Large 2
Pure Vanilla Extract 1 teaspoon / 5 ml
Buttermilk ½ cup + 1 Tablespoon / 135 ml
Pumpkin 1 cup / 240 ml / 285 gm / 10 oz (Canned pure pumpkin or fresh cooked and pureed pumpkin – DON’T use pumpkin pie mix!)
Canola Oil DEPENDS on size of vessel you are frying in – you want THREE (3) inches of oil (can substitute any flavorless oil used for frying)
Powdered Sugar Glaze:
Powdered (Icing) Sugar 2 cup / 480 ml / 250 gm / 9 oz
Whipping Cream (About 32% butter fat) 4 Tablespoon + more if needed / 60 ml
Directions:
- Whisk together the first 8 ingredients in medium bowl to blend. Using electric mixer, beat sugar and butter in large bowl until blended (the mixture will be grainy and not smooth). Beat in egg, then yolks and vanilla. Gradually beat in buttermilk; beat in pumpkin. Using rubber spatula, fold in dry ingredients in 4 additions, blending gently after each addition. Cover with plastic; chill 3 hours.
- Sprinkle 2 rimmed baking sheets lightly with flour. Press out 1/3 of dough on floured surface to 1/2- to 2/3-inch (12 mm to 15 mm) thickness. Using 2 1/2-inch (65 mm) -diameter round cutter, cut out dough rounds. Arrange on sheets. Repeat with remaining dough in 2 more batches. Gather dough scraps. Press out dough and cut out more dough rounds until all dough is used.
- Using 1-inch (25 mm) diameter round cutter, cut out center of each dough round to make doughnuts and doughnut holes.
- Line 2 baking sheets with several layers of paper towels. Pour oil into large deep skillet to depth of 1 1/2 inches (40 mm). Attach deep-fry thermometer and heat oil to 365°F to 370°F (185°C to 188°C). Fry doughnut holes in 2 batches until golden brown, turning occasionally, about 2 minutes. Using slotted spoon, transfer to paper towels to drain. Fry doughnuts, 3 or 4 at a time, until golden brown, adjusting heat to maintain temperature, about 1 minute per side. Using slotted spoon, transfer doughnuts to paper towels to drain. Cool completely.
Glaze Directions:
- Whisk powdered sugar and 4 tablespoons whipping cream to blend. Whisk in additional cream, 1 teaspoon at a time, to form medium thick glaze.
- Can be made up to 3 hours ahead.
- Add doughnut holes to bowl of spiced sugar and toss to coat.
- Spread doughnuts on 1 side with powdered sugar glaze.
- Arrange doughnuts, glazed side up, on racks. Let stand until glaze sets, at least 30 minutes.
Additional Information:
Gluten-free recipe from Whole Living Daily:
http://wholelivingdaily.wholeliving.com/2010/06/fried-donuts-food-allergy-recipe-challenge-5-2.html
Nancy Silverton’s instructions for doughnut making:
http://www.seriouseats.com/recipes/2007/06/cook-the-book-nancy-silvertons.html
Alton Brown making the Yeast Doughnuts:
http://www.youtube.com/watch?v=AP8L9FXVNq4
This video is adorable – it’s a girl who has never made doughnuts before. What’s great too is that she uses what she has and didn’t buy any extra equipment/gadgets. Oh and it’s funny. ;)
http://www.youtube.com/watch?v=Uw3iR3jA8Vc
A baked version of doughnuts and he shows how to make them in a bowl using a spoon + kneading:
http://wickedhowtos.com/index.php/2010/01/02/how-to-make-doughnuts/
Photos of doughnuts for inspiration on Flickr:
http://www.flickr.com/search/?q=doughnut&w=all[/quote]
84 comments:
Well, it looks yummmiiiiii. I am a little confused, isn`t the reveling date on 27?
I have to say that all your experience was of great aid to all other DBs. Thanks for sharing. Your doughnuts are fabulous in so many ways. The savory ones look amazingly delicious and they are in my "to try" list! Congratulations on such an awesome job (as always)!
They look wonderful - love the idea of savoury doughnuts!
Thanks also for your very helpful tips; I referred to them when making my own doughnuts. :]
Wowo you are fast in doing the challenge and fast in posting them too. It must be mignight in Australlia now.
I agree with Renata, if it was not for you I would have added more flour to my soggy mixture when i was doing the challenge.
You are lucky to be on the other side of this planet, because my family and I would be knocking on your door each month looking for your wonderful creations! I love reading the DB challenges! Great job!
Stunning, of course!
I'm hoping to kick out one more batch this evening before I post tomorrow.
I sure appreciate all the help you provided!
Dear Audax , Your posts and dbsites posts are so helpful ! I'm one of a million who did not put more flour in the dough ! Grazie , and If I haver get the chance to visit australia Please please invite me for dinner !!
So creative. I love that you did savory ones as well.
Audax, you are a marvel! Everything looks perfect in it's own way!
Oh dear! Doughnuts! I made doughnuts once on a New Years Eve... a bottle of champagne later and I had consumed....SO MANY OF THEM fresh from the fryer. =) Yours look fabulous. Please overnight me one of each :)
Thanks for all the tips and variations. I love the savoury version - must try it sometime!
You are professional!
I loved the savory.
Excellent!!
Love your savoury versions! Congrats!
All of your donuts look fantastic, and I am still amazed that you made a savory version. Thank you, also, for all of your help and inspiration in the forums this month. Your expertise and encouragement were extremely helpful to so many of us. Amazing work, as always.
Yum!! I am soooo craving that cheddar and ham doughnut right now....
Thanks for you kind comments, Audax! Your doughnuts are brilliant! Thanks for all the great tips along the way and encouragement. I can't wait to try your savoury doughnuts!
Wow, Audux, such variety in your doughnuts! I like how you made both sweet and savory. Nice job on the challenge!
Yum, yum, yum... Now I'm going to have to make some savoury ones, argh!!
Savory or sweet - these all look delicious! Great job as always and thanks for sharing your wisdom with us Audax!
Audax!! I love all your versions, but I'm so intrigued with the savory ones. I really have to try those! Great job!
Fantastic as always Audax, I must say the savory ones looks delicious!!! You are much gamer than I when it comes to challenges.
Lovely texture for your Doughnuts. Good to have found this space. Following to get more of such delicious treats from you. best wishes.
You're not of this world! ^-^
Each one of your performances on this challenge is amazing. I love the savory ones but the bomboloni and the yeasted doughnuts are simply stunning. Congratulations, you rocked it once again!
Savoury Donuts! They look soo tasty, must give them a try. Great work Audax!
I'm alwas so surprised to see how many creations and variations you're able to make! It's really wonderful and one time I'll have to try these savoury donuts, too.
Awesome job :)
Waow, it looks like you had great fun with this challenge! I really like your savoury version! Very innovative!
O Audax, you can leave it to you to come up with a million delicious looking doughnuts..lol.. I love all of them and it looks like you had some fun with this challenge!
I agree with you about the fishy/strange taste of canola oil. I will have to see if I can find rice bran oil.
Thank you again for your advice about the batter sitting in the fridge.
A very thorough and amazing job Audax.
As usual, you have come up with a great variety in your challenge. Your doughnuts are marvellous. Did miss you the last 2 months at DB so am happy to see you back. :)
Thank you for the comprehensive post. I picked up a lot of great tips about working with the doughs. The ham and cheese doughnuts look divine, like a Monte Cristo sandwich.
Outstanding selection you made. Love all the sweet and savory one. Ham one would be nice for breakfast. And love all the tips you wrote on frying. I am new to it, since joining DK, so all the help I can get is awesome.
Audax everything looks great. You are really great DB.. before i attempt anything in the challenge I love to read and take ur tips all the time. Hats off to your work and your patience.
I have to agree with the other comments and say thanks for all the tips and information. I always read your post at DB before I start and it's very helpful. As usual, you've outdone yourself with all your variations! Your pictures are mouth-watering!
OMG - you made all of them. They look wonderful and sound delicious. I cannot decide which I like the best!
It all looks wonderful, as usual. Nice light crumb and perfect crust. But I am really fascinated by the savory doughnuts--what a neat idea. I had no idea it was a traditional treat.
Excellent challenge Audax. Your savory version looks mouth watering- I bet they were a nice change after so many sweet doughnuts
Wow! I can't believe how many different doughnuts you made! Your filled savory doughnuts look incredible and I love how much your baked doughnuts puffed up! Great job. Thanks for your kind words and your visit to my blog. :)
Audax, they all look so wonderful!!! And savory doughnuts, I'd never thought about that, but it looks and sounds great, so I'll _have_ to give them a try. Your creativity is unending :-) Thanks for all the tips and advices, too. Greetings from Madrid!
No one can get pass you, you're always at the front of the line, mastering every challenge... and savory doughnuts why didn't I think of that ;)
Your variety of doughnuts are amazing. Thanks so much for the tips you shared. Glad to have met such a Daring Baker.
FUN? Oh yes indeed, but it's a lot more fun to be here and see your creativity Audax. I especially love what you did with the savoury ones! FAB!! Well done dear Audax...you are inspirational!
I am so impressed with this post, I am speechless! Your doughnuts look amazing and I love that you made savory ones too! Great job!!
Your doughnuts are fabulous! And I totally agree with you - butter is the way to go! I loooooove butter!
Those savory donuts look so tasty! And the jelly donuts are drool worthy. Nice! :)
I always look forward to your helpful comments in the private forums. Great job as always!
Lovely, lovely, lovely! Yes, that deserves to be said three times! That picture of the cross-section says it all. Have to throw another one in: LOVELY!
Audax! Savory donuts? Brilliant! They look fabulous, light and delicious! Just perfect and creative as always!
I love your cheese and ham douhnuts, they remind me of calzone! It looks like you had a lot of funny with challenge!
Such an inspiring post..... and bravo for taking such extensive effort to make doughtnut preparation easier for everyone!
Sawadee from Bangkok,
Kris
Never thought of stuffing them with food! What a great idea :]
Hi,
That looks so yumm...Beautiful presentation...:)
Dr.Sameena@
www.myeasytocookrecipes.blogspot.com
Hi Audax, savoury doughnuts seem like a great idea! Yum. I tried baked ones, but using one of the links Lori provided to a non-yeasted recipe, and it was very nice as well; a bit different in texture, obviously, but still distinctly doughnutty!
Audax, the texture of your first dougnuts is so lovely! And I love the savoury versions, I knew you'd attempt one! Great job!
You've made me sooo hungry!! I love the savory filled donuts. What a great combination with the donut!!
Wow, such variety! Love all the air pockets...so light and delicious! I especially love the jelly donuts! Audax, I'd love to be in your kitchen as a taste tester:)
Thanks for the info on cooking oil, I wasn't sure if I could reuse the oil but I hate to dispose of it after one use. All of your doughnuts look fabulous! I am especially craving the ham and cheese variety. Beautiful work!
All your donuts look great! I love the savory ham version, yum! I didn't realize that the smell I noticed was a "quality" of canola oil when frying...interesting!
Audax - your challenge post is awesome! I love the idea of savory doughnuts. Thanks for being an inspiration to all us Daring Bakers. :)
Great tutorial on doughnut making! I think they all look fabulous, but I really want to try the savoury ones. I have just discovered a neglected litre of buttermilk in the back of the fridge, so maybe a savoury buttermilk doughnut is in my future.
p.s. beavertails are from Ottawa, and not really available outside that area, which is probably why you didn't find them in Calgary!
:)
Just amazing. Your doughnuts look so yummy. I can't believe you made so many!
I loved your research on the slow rise doughnut. I am going to try that. Your blog is awesome!
Thanks for your kind comments on my post. Like many other people have said, I too am grateful for your helpful tips and tricks posted on DB and DC. I always look for your post before I do anything else and you always have something helpful to say. Your tips saved my doughnuts! I would have put in extra flour. I also put in 1/4 C. extra sugar like you suggested. Thanks again!
Amy Jo from Edible Experiments
Amazing array of doughnuts abd 'buns'! I'm loving the savory, sort of like a Croque Madame :) As always, you knocked a challenge wayyyy out the park. Beautiful photos too, my friend :)
Wow, so informative! Lot's and lot's of info and beautiful doughnuts. Great job! Can't wait to see what's up next month. Thank you for your comments on my doughnuts too.
All your doughnuts look fantastic! I love how airy and fluffy they are and that ham and cheese doughnut is just calling out to be eaten. Great job as always!
Hi Audax, thanks for your comments on my blog. Also your expertise is much appreciated and I'd also like to commend you for the way you provide constructive feedback to the other Daring Bakers especially the ones who seemed less confident about the challenge and their results - this all takes time, so thanks for giving it so generously :)
Wow Audax, very informative as usual. Thank you for all the fantastic tips. I remember my mum used to recycle oil quite a lot when we were young, but I havn't been game! All your doughnuts look fantastic, and I do liek the soudn of the savoury ones.
Wow, you are so thorough! It's so great to see that you tried so many recipes!
What a great variation of doughnuts! I'm always amazed at how accurately you test and describe your recipes. Thanks for all the tips! And I'll have to try the savoury variation soon.
Wow Audax they all look great and delicious, I don't know what Lihapiirakka is but it looks yummy and it reminds me of Venezuelan pulled meat filled "bollos pelones".
We are ok thanks for asking Audax, at least we won part of the national assembly (congress)but it will beging its funtions on january 2011 so the dictator is more crazy and making so many bad things including a nuclear reactor and more weapons..."that is as dangerous as giving a new razor blade to a monkey" (a Venezuelan saying)Your friend in Venezuela Claudia ;)
They all look fabulous! But, I really want to try the savoury ones, they are calling my name!
Oooo... those savory buns look tasty!
They look super Audax!!
Audax - You almost make me want to go back on my statement of not wanting to make doughnuts again. Your efforts are inspiring as always! I also like the term high-hydration dough. I didn't know a technical term for how this type of dough felt only that it was fun to touch.
Wow! Great work with the donuts. I'm intrigued by the savory variety. Maybe I'll give them a try someday...
As usualy, you have blown me away! Please look here (http://mommy-crafts.blogspot.com/2010/11/sharing-love.html) to see how much I appreciate your efforts!!
These look marvelous!!!! I had to drop Daring Bakers b/c I'm 8 months pg and couldn't keep up, but seeing this makes me sad I missed out on yummy fresh doughnuts.
I might make them anyways!!!
Yum! The doughnuts ALL look delicious. The savory ones are such a great idea - I've never heard of savory Finnish doughnuts. Yum.
I love how detailed your posts always are - so useful for someone who's never made donuts before!
when I saw that the Daring Bakers challenge was doughnuts, I simply had to stop by and see what you did! What a lovely assortment of doughnuts you came up with. I especially love the savoury ones! Bravo!
Linda
I have been searching for a dough recipe for lihapiirakka for a week, as our local finnish baker's deep fryer went down and he won't fix it. What I would really appreciate is an email explaining how u formed the meat ones.....Please and thank you!
Quite worthwhile information, thank you for the article.
Mountain Resorts | employee schedule template | coupon template
This will not actually have effect, I think so.
free payroll calculator | realistic dildo | cool keychains
Post a Comment